HP 400N HP JetDirect 400N Print Server Hardware Installation Guide - 5969-3587 - Page 30
To install the card into the HP LaserJet 5, 5M, or, 5N printers
 |
UPC - 088698733714
View all HP 400N manuals
Add to My Manuals
Save this manual to your list of manuals |
Page 30 highlights
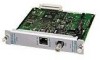
To install the card into the HP LaserJet 5, 5M, or 5N printers 1. Turn off the printer and unplug the power cord. 2. Locate the HP Modular Input/Output (MIO) slot at the back of the printer (see the figure below). Components face right for HP LaserJet 5, 5M, 5N 3. If the slot has a cover plate, remove it. 4. Insert the card. Align the card with the guide rails in the printer. 5. Press the card into the slot until firmly seated and tighten each thumbscrew a little at a time, alternating between each side until both screws are secure. 6. Connect the network cable to the card. 7. Connect the power cord and turn on the printer. NOTE For the HP J4100A JetDirect card (RJ-45 and BNC), you can connect to one of the Ethernet ports (only one Ethernet port is active at a time). For the HP J4105A JetDirect card (RJ-45 and DB9), you can connect to only one Token Ring port. 2-16 Installing the HP JetDirect Print Server Card
-
 1
1 -
2
-
3
-
4
-
5
-
6
-
7
-
8
-
9
-
10
-
11
-
12
-
13
-
14
-
15
-
16
-
17
-
18
-
19
-
20
-
21
-
22
-
23
-
24
-
 25
25 -
 26
26 -
 27
27 -
 28
28 -
 29
29 -
 30
30 -
 31
31 -
 32
32 -
 33
33 -
 34
34 -
 35
35 -
36
-
37
-
38
-
39
-
40
-
41
-
42
-
43
-
44
-
45
-
46
-
47
-
48
-
49
-
50
-
51
-
52
-
53
-
54
-
55
-
56
-
57
-
58
-
59
-
60
-
61
-
62
-
63
-
64
-
65
-
66
-
67
-
68
-
69
-
70
-
71
-
72
-
73
-
74
-
75
-
76
-
77
-
78
-
79
-
80
-
81
-
82
-
83
-
84
-
85
-
86
-
87
-
88
-
89
-
90
-
91
-
92
-
93
-
94
-
95
-
96
 |
 |
