HP 400N HP JetDirect 400N Print Server Hardware Installation Guide - 5969-3587 - Page 36
For an HP J4105A JetDirect card, peel off the DB-9 and RJ-45, Compare the HP JetDirect card
 |
UPC - 088698733714
View all HP 400N manuals
Add to My Manuals
Save this manual to your list of manuals |
Page 36 highlights
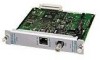
6. Compare the HP JetDirect card's front plate with the custom cover plate. Peel off the appropriate part of the label on the customized cover plate to match the holes punched out on the HP JetDirect card's front plate: • If you are installing an HP J4106A JetDirect card (RJ-45 port only), expose that hole in the custom cover plate by peeling off the RJ-45 portion of the label. • For an HP J4105A JetDirect card, peel off the DB-9 and RJ-45 portions of the label. 7. Attach the custom cover plate to the HP JetDirect card. • Align the holes in the cover plate to the holes in the card. • Insert and slowly tighten the side screws (A). • If you have a Token Ring card, insert the mounting screws (B) and slowly tighten them. Peel off label parts and attach cover plate to card 2-22 Installing the HP JetDirect Print Server Card
-
 1
1 -
2
-
3
-
4
-
5
-
6
-
7
-
8
-
9
-
10
-
11
-
12
-
13
-
14
-
15
-
16
-
17
-
18
-
19
-
20
-
21
-
22
-
23
-
24
-
25
-
26
-
27
-
28
-
29
-
30
-
 31
31 -
 32
32 -
 33
33 -
 34
34 -
 35
35 -
 36
36 -
 37
37 -
 38
38 -
 39
39 -
 40
40 -
 41
41 -
42
-
43
-
44
-
45
-
46
-
47
-
48
-
49
-
50
-
51
-
52
-
53
-
54
-
55
-
56
-
57
-
58
-
59
-
60
-
61
-
62
-
63
-
64
-
65
-
66
-
67
-
68
-
69
-
70
-
71
-
72
-
73
-
74
-
75
-
76
-
77
-
78
-
79
-
80
-
81
-
82
-
83
-
84
-
85
-
86
-
87
-
88
-
89
-
90
-
91
-
92
-
93
-
94
-
95
-
96
 |
 |
