HP 400N HP JetDirect 400N Print Server Hardware Installation Guide - 5969-3587 - Page 37
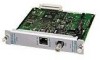
by tightening the spring-loaded thumbscrews C.
 |
UPC - 088698733714
View all HP 400N manuals
Add to My Manuals
Save this manual to your list of manuals |
Page 37 highlights
2 Installation 8. With the components facing up, assemble the two cards together. The card that will be installed into the upper slot (with custom cover plate) will be to the right. Secure the cards by tightening the spring-loaded thumbscrews (C). Connect cards with customized plate at right 9. Attach the plastic retaining clip (D) to the card assembly, matching the small holes in the two cards. Attach plastic retaining clip Installing the HP JetDirect Print Server Card 2-23
-
 1
1 -
2
-
3
-
4
-
5
-
6
-
7
-
8
-
9
-
10
-
11
-
12
-
13
-
14
-
15
-
16
-
17
-
18
-
19
-
20
-
21
-
22
-
23
-
24
-
25
-
26
-
27
-
28
-
29
-
30
-
31
-
 32
32 -
 33
33 -
 34
34 -
 35
35 -
 36
36 -
 37
37 -
 38
38 -
 39
39 -
 40
40 -
 41
41 -
 42
42 -
43
-
44
-
45
-
46
-
47
-
48
-
49
-
50
-
51
-
52
-
53
-
54
-
55
-
56
-
57
-
58
-
59
-
60
-
61
-
62
-
63
-
64
-
65
-
66
-
67
-
68
-
69
-
70
-
71
-
72
-
73
-
74
-
75
-
76
-
77
-
78
-
79
-
80
-
81
-
82
-
83
-
84
-
85
-
86
-
87
-
88
-
89
-
90
-
91
-
92
-
93
-
94
-
95
-
96
 |
 |

Installing the HP JetDirect Print Server Card 2-23
2
Installation
8.
With the components facing up, assemble the two cards
together.
The card that will be installed into the upper slot
(with custom cover plate) will be to the right. Secure the cards
by tightening the spring-loaded thumbscrews (C).
9.
Attach the plastic retaining clip (D) to the card assembly,
matching the small holes in the two cards.
Connect cards with customized plate at right
Attach plastic retaining clip