HP 400N HP JetDirect 400N Print Server Hardware Installation Guide - 5969-3587 - Page 38
Secure the assembly to the printer by tightening the remaining
 |
UPC - 088698733714
View all HP 400N manuals
Add to My Manuals
Save this manual to your list of manuals |
Page 38 highlights
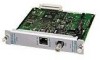
10. With the components facing the left edge of the printer, slide the card assembly into the printer. Align the top and bottom of the assembly with the top and bottom guide rails located inside the printer. Press the cards into the slot until the cards are firmly seated. CAUTION The assembly must fit into the guide rails correctly. Failure to install the assembly correctly may cause damage to the formatter board or to the MIO assembly. Insertion of two cards into HP LaserJet 4Si/4SiMX 11. Secure the assembly to the printer by tightening the remaining three thumbscrews a little at a time, alternating between each side until all of the screws are secure. 12. Connect the network cable. 13. Connect the power cord and turn on the printer. 2-24 Installing the HP JetDirect Print Server Card
-
 1
1 -
2
-
3
-
4
-
5
-
6
-
7
-
8
-
9
-
10
-
11
-
12
-
13
-
14
-
15
-
16
-
17
-
18
-
19
-
20
-
21
-
22
-
23
-
24
-
25
-
26
-
27
-
28
-
29
-
30
-
31
-
32
-
 33
33 -
 34
34 -
 35
35 -
 36
36 -
 37
37 -
 38
38 -
 39
39 -
 40
40 -
 41
41 -
 42
42 -
 43
43 -
44
-
45
-
46
-
47
-
48
-
49
-
50
-
51
-
52
-
53
-
54
-
55
-
56
-
57
-
58
-
59
-
60
-
61
-
62
-
63
-
64
-
65
-
66
-
67
-
68
-
69
-
70
-
71
-
72
-
73
-
74
-
75
-
76
-
77
-
78
-
79
-
80
-
81
-
82
-
83
-
84
-
85
-
86
-
87
-
88
-
89
-
90
-
91
-
92
-
93
-
94
-
95
-
96
 |
 |
