HP 400N HP JetDirect 400N Print Server Hardware Installation Guide - 5969-3587 - Page 73
HP DesignJet, Control Panel, CFG NETWORK=YES, STATUS Ready
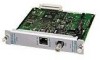 |
UPC - 088698733714
View all HP 400N manuals
Add to My Manuals
Save this manual to your list of manuals |
Page 73 highlights
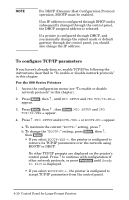
6. Press ↓ to change NO* to YES, then press [Enter] to display CFG NETWORK=YES. 7. At the CFG NETWORK=YES message, press ↑ repeatedly to scroll through the configuration options. a. To change a network protocol setting (enable or disable), press [Enter], ↓, [Enter]. b. To configure network protocol parameters press [Enter], ↓ to select YES, then press [Enter] again. To continue configuring protocol parameters, go to the appropriate sections that follow. 8. Press [Previous] and return to STATUS Ready. 9. To save the configuration, print a configuration plot by pressing the two arrow keys simultaneously. Your printer configuration is now active. To configure parameters using HP JetDirect printer management software and to complete the print server configuration, see the HP JetDirect software installation guide included with the product. Control Panel for Large-Format Printers 4-5 HP DesignJet 4 Control Panel
-
 1
1 -
2
-
3
-
4
-
5
-
6
-
7
-
8
-
9
-
10
-
11
-
12
-
13
-
14
-
15
-
16
-
17
-
18
-
19
-
20
-
21
-
22
-
23
-
24
-
25
-
26
-
27
-
28
-
29
-
30
-
31
-
32
-
33
-
34
-
35
-
36
-
37
-
38
-
39
-
40
-
41
-
42
-
43
-
44
-
45
-
46
-
47
-
48
-
49
-
50
-
51
-
52
-
53
-
54
-
55
-
56
-
57
-
58
-
59
-
60
-
61
-
62
-
63
-
64
-
65
-
66
-
67
-
 68
68 -
 69
69 -
 70
70 -
 71
71 -
 72
72 -
 73
73 -
 74
74 -
 75
75 -
 76
76 -
 77
77 -
 78
78 -
79
-
80
-
81
-
82
-
83
-
84
-
85
-
86
-
87
-
88
-
89
-
90
-
91
-
92
-
93
-
94
-
95
-
96
 |
 |
