HP 6300C HP Scanjet 6300C Scanner PrecisionScan Pro - (English) User Guide - Page 106
Drag-and-drop to another program
 |
View all HP 6300C manuals
Add to My Manuals
Save this manual to your list of manuals |
Page 106 highlights
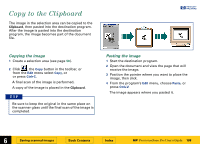
Drag-and-drop to another program The image in the selection area can be dragged and dropped into another program that supports dragand-drop. After the image is dropped into the destination program, the image becomes part of the document file. +$%& 1 Start the destination program. 2 Open the document and view the page that will receive the image. 3 In the scanning software window, position the pointer inside the selection area. The pointer changes to . 4 Press the left mouse button and drag the image to its position in the open document. The pointer changes to . (If the pointer changes to , the destination program does not accept drag-and-drop.) 5 Release the mouse button. A final scan of the image is performed. The image appears in the destination program. TIP Be sure to keep the original in the same place on the scanner glass until the final scan of the image is completed. È 6 Saving scanned images Book Contents Index È HP PrecisionScan Pro User's Guide 106
-
 1
1 -
2
-
3
-
4
-
5
-
6
-
7
-
8
-
9
-
10
-
11
-
12
-
13
-
14
-
15
-
16
-
17
-
18
-
19
-
20
-
21
-
22
-
23
-
24
-
25
-
26
-
27
-
28
-
29
-
30
-
31
-
32
-
33
-
34
-
35
-
36
-
37
-
38
-
39
-
40
-
41
-
42
-
43
-
44
-
45
-
46
-
47
-
48
-
49
-
50
-
51
-
52
-
53
-
54
-
55
-
56
-
57
-
58
-
59
-
60
-
61
-
62
-
63
-
64
-
65
-
66
-
67
-
68
-
69
-
70
-
71
-
72
-
73
-
74
-
75
-
76
-
77
-
78
-
79
-
80
-
81
-
82
-
83
-
84
-
85
-
86
-
87
-
88
-
89
-
90
-
91
-
92
-
93
-
94
-
95
-
96
-
97
-
98
-
99
-
100
-
 101
101 -
 102
102 -
 103
103 -
 104
104 -
 105
105 -
 106
106 -
 107
107 -
 108
108 -
 109
109 -
 110
110 -
 111
111 -
112
-
113
-
114
-
115
-
116
-
117
-
118
-
119
-
120
-
121
 |
 |
