HP 6300C HP Scanjet 6300C Scanner PrecisionScan Pro - (English) User Guide - Page 77
Adjust exposure, Using the Exposure Adjustment tool, Applying the default exposure settings
 |
View all HP 6300C manuals
Add to My Manuals
Save this manual to your list of manuals |
Page 77 highlights
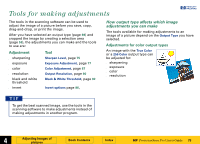
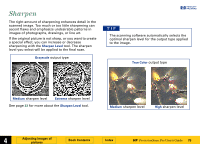
Adjust exposure The scanning software automatically selects the optimal exposure settings for the output type applied to the image of a picture. However, if the original picture needs the brightness or contrast adjusted, you can use the Exposure Adjustment tool to increase or decrease: s highlights (see page 78) s shadows (see page 79) s midtones (gamma) (see page 80) s clipping of white and black pixels (see page 83) s output levels for white and black pixels (see page 85) The exposure settings you select will be applied to the final scan. You can also use the Exposure Adjustment tool to: s view the distribution of pixels (see page 81) s read the RGB values of the pixels in the image (see page 81). The Exposure Adjustment tool is active for the color and grayscale output types. +$%& Using the Exposure Adjustment tool 1 From the Tools menu, select Exposure Adjustment. The Exposure Adjustment tool appears. (See page 36.) 2 Refer to the following sections for using the Exposure Adjustment tool: s Changing highlights on page 78 s Changing shadows on page 79 s Changing midtones (brightness) on page 80 s Checking for clipping of pixels on page 83 s Setting pixel output levels on page 85 Applying the default exposure settings s Click the Auto button in the Exposure Adjustment tool. • The optimal exposure settings determined by the scanning software are applied to the Exposure Adjustment tool. • The results of the changes to the exposure settings can be seen in the preview area. È 4 Adjusting images of pictures Book Contents Index È HP PrecisionScan Pro User's Guide 77
-
 1
1 -
2
-
3
-
4
-
5
-
6
-
7
-
8
-
9
-
10
-
11
-
12
-
13
-
14
-
15
-
16
-
17
-
18
-
19
-
20
-
21
-
22
-
23
-
24
-
25
-
26
-
27
-
28
-
29
-
30
-
31
-
32
-
33
-
34
-
35
-
36
-
37
-
38
-
39
-
40
-
41
-
42
-
43
-
44
-
45
-
46
-
47
-
48
-
49
-
50
-
51
-
52
-
53
-
54
-
55
-
56
-
57
-
58
-
59
-
60
-
61
-
62
-
63
-
64
-
65
-
66
-
67
-
68
-
69
-
70
-
71
-
 72
72 -
 73
73 -
 74
74 -
 75
75 -
 76
76 -
 77
77 -
 78
78 -
 79
79 -
 80
80 -
 81
81 -
 82
82 -
83
-
84
-
85
-
86
-
87
-
88
-
89
-
90
-
91
-
92
-
93
-
94
-
95
-
96
-
97
-
98
-
99
-
100
-
101
-
102
-
103
-
104
-
105
-
106
-
107
-
108
-
109
-
110
-
111
-
112
-
113
-
114
-
115
-
116
-
117
-
118
-
119
-
120
-
121
 |
 |
