HP 6300C HP Scanjet 6300C Scanner PrecisionScan Pro - (English) User Guide - Page 35
Dimensions, HP PrecisionScan Pro
 |
View all HP 6300C manuals
Add to My Manuals
Save this manual to your list of manuals |
Page 35 highlights
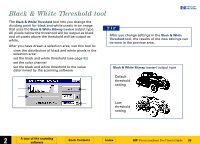
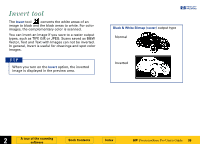
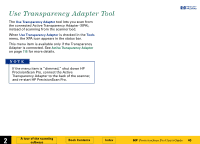
After you have drawn a selection area, use the Dimensions tool to: – adjust the dimensions of the selection area — set values for the width and height of the image to be included in the final scan ˜ select the units you want to work with ™ enlarge or reduce output dimensions of the image for the final scan proportionally by scaling to a percentage of the original's size š lock the output dimensions so you can change the dimensions of the selection area without changing the output dimensions TIP To preserve image quality when you use it in another program: s measure the dimensions of the area in which you will place the image, then s use the Dimensions tool in HP PrecisionScan Pro to scale or resize the image to fit that area. +$%& – — š ˜ ™ See Set the output dimensions on page 65 for more about how to use the Dimensions tool. È 2 A tour of the scanning software Book Contents Index È HP PrecisionScan Pro User's Guide 35
-
 1
1 -
2
-
3
-
4
-
5
-
6
-
7
-
8
-
9
-
10
-
11
-
12
-
13
-
14
-
15
-
16
-
17
-
18
-
19
-
20
-
21
-
22
-
23
-
24
-
25
-
26
-
27
-
28
-
29
-
 30
30 -
 31
31 -
 32
32 -
 33
33 -
 34
34 -
 35
35 -
 36
36 -
 37
37 -
 38
38 -
 39
39 -
 40
40 -
41
-
42
-
43
-
44
-
45
-
46
-
47
-
48
-
49
-
50
-
51
-
52
-
53
-
54
-
55
-
56
-
57
-
58
-
59
-
60
-
61
-
62
-
63
-
64
-
65
-
66
-
67
-
68
-
69
-
70
-
71
-
72
-
73
-
74
-
75
-
76
-
77
-
78
-
79
-
80
-
81
-
82
-
83
-
84
-
85
-
86
-
87
-
88
-
89
-
90
-
91
-
92
-
93
-
94
-
95
-
96
-
97
-
98
-
99
-
100
-
101
-
102
-
103
-
104
-
105
-
106
-
107
-
108
-
109
-
110
-
111
-
112
-
113
-
114
-
115
-
116
-
117
-
118
-
119
-
120
-
121
 |
 |
