HP 6840 HP Deskjet 6800 Printer series - (Windows/Macintosh) Network Guide - Page 57
Report Networking, Connections, Wired 802.3., Wireless, IP Configuration, IP Address
 |
UPC - 829160429724
View all HP 6840 manuals
Add to My Manuals
Save this manual to your list of manuals |
Page 57 highlights
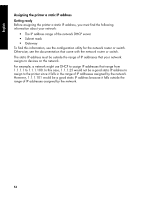
English Assigning the static IP address Follow these steps to assign the printer a static IP address: 1. Use an Ethernet cable to connect the printer to an Ethernet port on the network, such as an available Ethernet port on a Wireless Access Point (WAP), router, hub, or wall socket. 2. When the Network light on the front of the printer is turned on and solid, press the Report Page button to print an HP Report page. 3. Find the printer URL on the HP Report page. 4. Launch the computer Internet browser, and then enter the printer URL listed on the HP Report page in the address box to open the printer embedded Web server (EWS). 5. On the EWS, click the Networking tab. 6. Under the Connections heading, click one of the following options: • If you are connecting the printer to a wired Ethernet network, click Wired (802.3). • If you are connecting the printer to a wireless network, click Wireless (802.11), and then click the IP Configuration tab. 7. Under the IP Address Configuration heading, select Manual IP, and then enter the static IP address you want to assign to the printer, the subnet mask, and default gateway. Note: Remember, the static IP address must be outside the range of IP addresses assigned by the network. Also, if you do not have a subnet mask or default gateway to enter, then enter 0.0.0.0 for each item. Go to the next page... 55
-
 1
1 -
2
-
3
-
4
-
5
-
6
-
7
-
8
-
9
-
10
-
11
-
12
-
13
-
14
-
15
-
16
-
17
-
18
-
19
-
20
-
21
-
22
-
23
-
24
-
25
-
26
-
27
-
28
-
29
-
30
-
31
-
32
-
33
-
34
-
35
-
36
-
37
-
38
-
39
-
40
-
41
-
42
-
43
-
44
-
45
-
46
-
47
-
48
-
49
-
50
-
51
-
 52
52 -
 53
53 -
 54
54 -
 55
55 -
 56
56 -
 57
57 -
 58
58 -
 59
59 -
 60
60 -
 61
61 -
 62
62 -
63
-
64
 |
 |