HP C3982A User Manual - Page 16
Step 5. Load Paper into Tray 2
 |
View all HP C3982A manuals
Add to My Manuals
Save this manual to your list of manuals |
Page 16 highlights
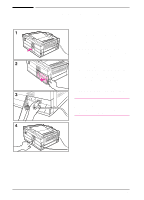
1 Printer Setup Step 5. Load Paper into Tray 2 1 Slide Tray 2 (paper cassette) out of the printer. 2 Load paper up to the arrows on the paper length spacer in the rear of the tray (approximately 250 sheets of Letter, A4, Executive, B5, or Legal paper). 3 Make sure the paper is flat in the tray at all four corners. If needed, press on the clip lever (A) to raise the front left metal holder (B) so the paper will fit underneath. 4 Align the slots (C) on the sides of Tray 2 with the rails (D) inside the Tray 2 cavity. Slide Tray 2 completely back into the printer. Caution Tray 2 is designed for paper use only. Use Tray 1 to print envelopes, adhesive labels, transparencies, cardstock, or custom sized media. Tray 2 hints • To adjust Tray 2 for other paper sizes, see page 3-6. • For letterhead orientation in Tray 2, see page 3-11. • For paper and other media specifications, see Appendix B. EN Printer Setup 1-7
-
 1
1 -
2
-
3
-
4
-
5
-
6
-
7
-
8
-
9
-
10
-
 11
11 -
 12
12 -
 13
13 -
 14
14 -
 15
15 -
 16
16 -
 17
17 -
 18
18 -
 19
19 -
 20
20 -
 21
21 -
22
-
23
-
24
-
25
-
26
-
27
-
28
-
29
-
30
-
31
-
32
-
33
-
34
-
35
-
36
-
37
-
38
-
39
-
40
-
41
-
42
-
43
-
44
-
45
-
46
-
47
-
48
-
49
-
50
-
51
-
52
-
53
-
54
-
55
-
56
-
57
-
58
-
59
-
60
-
61
-
62
-
63
-
64
-
65
-
66
-
67
-
68
-
69
-
70
-
71
-
72
-
73
-
74
-
75
-
76
-
77
-
78
-
79
-
80
-
81
-
82
-
83
-
84
-
85
-
86
-
87
-
88
-
89
-
90
-
91
-
92
-
93
-
94
-
95
-
96
-
97
-
98
-
99
-
100
-
101
-
102
-
103
-
104
-
105
-
106
-
107
-
108
-
109
-
110
-
111
-
112
-
113
-
114
-
115
-
116
-
117
-
118
-
119
-
120
-
121
-
122
-
123
-
124
-
125
-
126
-
127
-
128
-
129
-
130
-
131
-
132
-
133
-
134
-
135
-
136
-
137
-
138
-
139
-
140
-
141
-
142
 |
 |
