HP CP4005n HP Color LaserJet CP4005 - User Guide - Page 104
Printing envelopes, Printing from Tray 2 or optional Tray 3
 |
UPC - 882780717046
View all HP CP4005n manuals
Add to My Manuals
Save this manual to your list of manuals |
Page 104 highlights
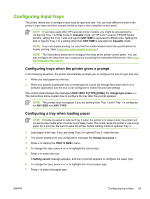
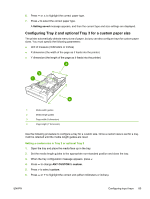
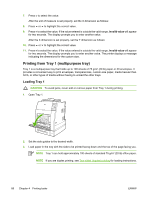
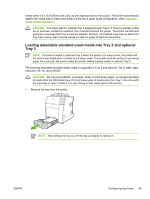
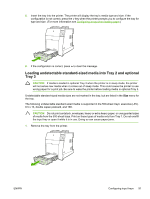
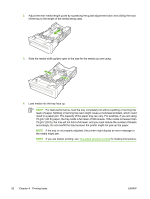
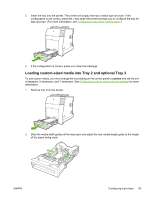
2. Load up to 20 envelopes in the center of Tray 1 with the side to be printed facing down and the postage end toward the printer. Slide the envelopes into the printer as far as they will go without forcing them. 3. Adjust the guides to touch the envelope stack without bending the envelopes. Make sure the envelopes fit under the tabs on the guides. Printing envelopes 1. Specify Tray 1 or select the media source by size in the printer driver. 2. If your software does not automatically format an envelope, specify Landscape for page orientation in your software application or printer driver. Use the following guidelines to set margins for return and destination addresses on Commercial #10 or DL envelopes. Address type Return Destination Left margin 5 mm (0.2 inch) 102 mm (4.0 inches) Top margin 5 mm (0.2 inch) 51 mm (2.0 inches) NOTE For envelopes of other sizes, adjust the margin settings appropriately. 3. Select Print from the software application or printer driver. Printing from Tray 2 or optional Tray 3 Tray 2 and optional Tray 3 each hold up to 500 sheets of standard paper or a 50.8 mm (2 inch) stack of labels. Tray 2 stacks above the optional 500-sheet Tray 3, and, when properly installed, the printer detects optional Tray 3 and shows it as an option in the control panel CONFIGURE DEVICE menu. The trays adjust for detectable media sizes; letter, legal, A4, A5, JIS B5, and executive; and undetectable 88 Chapter 4 Printing tasks ENWW
-
 1
1 -
2
-
3
-
4
-
5
-
6
-
7
-
8
-
9
-
10
-
11
-
12
-
13
-
14
-
15
-
16
-
17
-
18
-
19
-
20
-
21
-
22
-
23
-
24
-
25
-
26
-
27
-
28
-
29
-
30
-
31
-
32
-
33
-
34
-
35
-
36
-
37
-
38
-
39
-
40
-
41
-
42
-
43
-
44
-
45
-
46
-
47
-
48
-
49
-
50
-
51
-
52
-
53
-
54
-
55
-
56
-
57
-
58
-
59
-
60
-
61
-
62
-
63
-
64
-
65
-
66
-
67
-
68
-
69
-
70
-
71
-
72
-
73
-
74
-
75
-
76
-
77
-
78
-
79
-
80
-
81
-
82
-
83
-
84
-
85
-
86
-
87
-
88
-
89
-
90
-
91
-
92
-
93
-
94
-
95
-
96
-
97
-
98
-
 99
99 -
 100
100 -
 101
101 -
 102
102 -
 103
103 -
 104
104 -
 105
105 -
 106
106 -
 107
107 -
 108
108 -
 109
109 -
110
-
111
-
112
-
113
-
114
-
115
-
116
-
117
-
118
-
119
-
120
-
121
-
122
-
123
-
124
-
125
-
126
-
127
-
128
-
129
-
130
-
131
-
132
-
133
-
134
-
135
-
136
-
137
-
138
-
139
-
140
-
141
-
142
-
143
-
144
-
145
-
146
-
147
-
148
-
149
-
150
-
151
-
152
-
153
-
154
-
155
-
156
-
157
-
158
-
159
-
160
-
161
-
162
-
163
-
164
-
165
-
166
-
167
-
168
-
169
-
170
-
171
-
172
-
173
-
174
-
175
-
176
-
177
-
178
-
179
-
180
-
181
-
182
-
183
-
184
-
185
-
186
-
187
-
188
-
189
-
190
-
191
-
192
-
193
-
194
-
195
-
196
-
197
-
198
-
199
-
200
-
201
-
202
-
203
-
204
-
205
-
206
-
207
-
208
-
209
-
210
-
211
-
212
-
213
-
214
-
215
-
216
-
217
-
218
-
219
-
220
-
221
-
222
-
223
-
224
-
225
-
226
-
227
-
228
-
229
-
230
-
231
-
232
-
233
-
234
-
235
-
236
-
237
-
238
-
239
-
240
-
241
-
242
-
243
-
244
-
245
-
246
-
247
-
248
-
249
-
250
-
251
-
252
-
253
-
254
-
255
-
256
-
257
-
258
-
259
-
260
-
261
-
262
-
263
-
264
-
265
-
266
-
267
-
268
-
269
-
270
-
271
-
272
-
273
-
274
-
275
-
276
-
277
-
278
-
279
-
280
-
281
-
282
 |
 |
