HP CP4005n HP Color LaserJet CP4005 - User Guide - Page 62
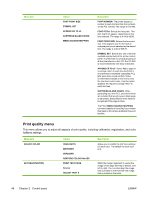
Print quality menu, This menu allows you to adjust all aspects of print quality, including calibration
 |
UPC - 882780717046
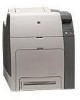
View all HP CP4005n manuals
Add to My Manuals
Save this manual to your list of manuals |
Page 62 highlights
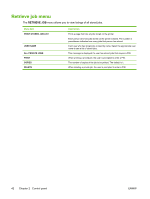
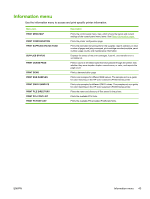
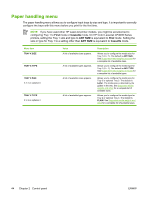
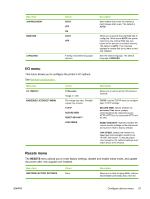
Menu item Values FONT POINT SIZE SYMBOL SET APPEND CR TO LF SUPPRESS BLANK PAGES MEDIA SOURCE MAPPING Description FONT NUMBER: The printer assigns a number to each font and lists the numbers on the PCL font list. The range is 0 to 999. FONT PITCH: Selects the font pitch. This item might not appear, depending on the font selected. The range is 0.44 to 99.99. FONT POINT SIZE: Selects the font point size. This appears only if a font with a scalable point size is selected as the default font. The range is 4.00 to 999.75. SYMBOL SET: Selects any one of several available symbol sets at the printer control panel. A symbol set is a unique grouping of all the characters in a font. PC-8 or PC-850 is recommended for line-draw characters. APPEND CR TO LF: Select Yes to append a carriage return to each line-feed that is encountered in backward-compatible PCL jobs (pure text, no job control). Some environments indicate a new line by only the line-feed control code. Use this option appends the required carriage return to each line feed. SUPPRESS BLANK PAGES: When generating your own PCL, extra form feeds are included that would cause a blank page to be printed. Select Yes for form feeds to be ignored if the page is blank. The PCL5 MEDIA SOURCE MAPPING command selects an input tray by a number that maps to the various available trays and feeders. Print quality menu This menu allows you to adjust all aspects of print quality, including calibration, registration, and color halftone settings. Menu item ADJUST COLOR SET REGISTRATION Values HIGHLIGHTS MIDTONES SHADOWS RESTORE COLOR VALUES PRINT TEST PAGE Source ADJUST TRAY X Description Allows you to modify the half tone settings for each color. The default for each color is 0. Shifts the margin alignment to center the image on the page from top to bottom, and left to right. You can also align the image that is printed on the front with the image that is printed on the back. 46 Chapter 2 Control panel ENWW
-
 1
1 -
2
-
3
-
4
-
5
-
6
-
7
-
8
-
9
-
10
-
11
-
12
-
13
-
14
-
15
-
16
-
17
-
18
-
19
-
20
-
21
-
22
-
23
-
24
-
25
-
26
-
27
-
28
-
29
-
30
-
31
-
32
-
33
-
34
-
35
-
36
-
37
-
38
-
39
-
40
-
41
-
42
-
43
-
44
-
45
-
46
-
47
-
48
-
49
-
50
-
51
-
52
-
53
-
54
-
55
-
56
-
 57
57 -
 58
58 -
 59
59 -
 60
60 -
 61
61 -
 62
62 -
 63
63 -
 64
64 -
 65
65 -
 66
66 -
 67
67 -
68
-
69
-
70
-
71
-
72
-
73
-
74
-
75
-
76
-
77
-
78
-
79
-
80
-
81
-
82
-
83
-
84
-
85
-
86
-
87
-
88
-
89
-
90
-
91
-
92
-
93
-
94
-
95
-
96
-
97
-
98
-
99
-
100
-
101
-
102
-
103
-
104
-
105
-
106
-
107
-
108
-
109
-
110
-
111
-
112
-
113
-
114
-
115
-
116
-
117
-
118
-
119
-
120
-
121
-
122
-
123
-
124
-
125
-
126
-
127
-
128
-
129
-
130
-
131
-
132
-
133
-
134
-
135
-
136
-
137
-
138
-
139
-
140
-
141
-
142
-
143
-
144
-
145
-
146
-
147
-
148
-
149
-
150
-
151
-
152
-
153
-
154
-
155
-
156
-
157
-
158
-
159
-
160
-
161
-
162
-
163
-
164
-
165
-
166
-
167
-
168
-
169
-
170
-
171
-
172
-
173
-
174
-
175
-
176
-
177
-
178
-
179
-
180
-
181
-
182
-
183
-
184
-
185
-
186
-
187
-
188
-
189
-
190
-
191
-
192
-
193
-
194
-
195
-
196
-
197
-
198
-
199
-
200
-
201
-
202
-
203
-
204
-
205
-
206
-
207
-
208
-
209
-
210
-
211
-
212
-
213
-
214
-
215
-
216
-
217
-
218
-
219
-
220
-
221
-
222
-
223
-
224
-
225
-
226
-
227
-
228
-
229
-
230
-
231
-
232
-
233
-
234
-
235
-
236
-
237
-
238
-
239
-
240
-
241
-
242
-
243
-
244
-
245
-
246
-
247
-
248
-
249
-
250
-
251
-
252
-
253
-
254
-
255
-
256
-
257
-
258
-
259
-
260
-
261
-
262
-
263
-
264
-
265
-
266
-
267
-
268
-
269
-
270
-
271
-
272
-
273
-
274
-
275
-
276
-
277
-
278
-
279
-
280
-
281
-
282
 |
 |
