HP CP4005n HP Color LaserJet CP4005 - User Guide - Page 120
Setting the color options, Using the HP Digital Imaging Options dialog box, Color, Automatic, Manual
 |
UPC - 882780717046
View all HP CP4005n manuals
Add to My Manuals
Save this manual to your list of manuals |
Page 120 highlights
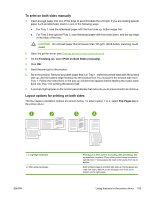
3. Long-edge portrait 4. Short-edge portrait This is the default setting, and the most common layout used, with every printed image oriented right-side-up. Facing pages are read from top to bottom on the first page, then from top to bottom on the second page. This layout is often used with clipboards. Every other printed image is oriented upside-down. Facing pages are read continuously from top to bottom. Setting the color options Options on the Color tab control how colors are interpreted and printed from software programs. You can choose either Automatic or Manual color options. For more information, see Managing printer color options on Windows computers. ● Select Automatic to optimize the color and halftone used for each element in a document (such as text, graphics, and photographs). The Automatic setting provides additional color options for applications and operating systems that support color-management systems. This setting is recommended for printing all color documents. ● Select Manual to manually adjust the color and halftone modes for text, graphics, and photographs. If you are using a PCL driver, you can adjust the RGB data. If you are using the PS driver, you can adjust RGB or CMYK data. To set the color options 1. Open the printer driver (see Gaining access to the printer drivers). 2. Select the Color tab. 3. In the Color Options area, select the option that you want to use. 4. If you selected Manual, click Settings to open the Color Settings dialog box. Adjust the individual settings for text, graphics, and photographs. You can also adjust the general printing settings. Click OK. 5. In the Color Themes area, select the RGB Color option that you want to use. 6. Click OK. The product is now set to use the color options that you selected. Using the HP Digital Imaging Options dialog box HP Digital Imaging Options make it easy for you to get better photos and images. NOTE HP Digital Imaging Options are available for Windows 2000, Windows XP, and Windows Server 2003. The following options are available on the HP Digital Imaging Options dialog box: ● Contrast Enhancement: Automatically enhance colors and contrast for washed-out photos. Click Automatic to allow the printer software to intelligently brighten your photo, focusing only on areas that need adjustment. ● Digital Flash: Adjust the exposure in dark areas of photos to bring out detail. Click Automatic to allow the printer software to balance lightness and darkness automatically. 104 Chapter 4 Printing tasks ENWW
-
 1
1 -
2
-
3
-
4
-
5
-
6
-
7
-
8
-
9
-
10
-
11
-
12
-
13
-
14
-
15
-
16
-
17
-
18
-
19
-
20
-
21
-
22
-
23
-
24
-
25
-
26
-
27
-
28
-
29
-
30
-
31
-
32
-
33
-
34
-
35
-
36
-
37
-
38
-
39
-
40
-
41
-
42
-
43
-
44
-
45
-
46
-
47
-
48
-
49
-
50
-
51
-
52
-
53
-
54
-
55
-
56
-
57
-
58
-
59
-
60
-
61
-
62
-
63
-
64
-
65
-
66
-
67
-
68
-
69
-
70
-
71
-
72
-
73
-
74
-
75
-
76
-
77
-
78
-
79
-
80
-
81
-
82
-
83
-
84
-
85
-
86
-
87
-
88
-
89
-
90
-
91
-
92
-
93
-
94
-
95
-
96
-
97
-
98
-
99
-
100
-
101
-
102
-
103
-
104
-
105
-
106
-
107
-
108
-
109
-
110
-
111
-
112
-
113
-
114
-
 115
115 -
 116
116 -
 117
117 -
 118
118 -
 119
119 -
 120
120 -
 121
121 -
 122
122 -
 123
123 -
 124
124 -
 125
125 -
126
-
127
-
128
-
129
-
130
-
131
-
132
-
133
-
134
-
135
-
136
-
137
-
138
-
139
-
140
-
141
-
142
-
143
-
144
-
145
-
146
-
147
-
148
-
149
-
150
-
151
-
152
-
153
-
154
-
155
-
156
-
157
-
158
-
159
-
160
-
161
-
162
-
163
-
164
-
165
-
166
-
167
-
168
-
169
-
170
-
171
-
172
-
173
-
174
-
175
-
176
-
177
-
178
-
179
-
180
-
181
-
182
-
183
-
184
-
185
-
186
-
187
-
188
-
189
-
190
-
191
-
192
-
193
-
194
-
195
-
196
-
197
-
198
-
199
-
200
-
201
-
202
-
203
-
204
-
205
-
206
-
207
-
208
-
209
-
210
-
211
-
212
-
213
-
214
-
215
-
216
-
217
-
218
-
219
-
220
-
221
-
222
-
223
-
224
-
225
-
226
-
227
-
228
-
229
-
230
-
231
-
232
-
233
-
234
-
235
-
236
-
237
-
238
-
239
-
240
-
241
-
242
-
243
-
244
-
245
-
246
-
247
-
248
-
249
-
250
-
251
-
252
-
253
-
254
-
255
-
256
-
257
-
258
-
259
-
260
-
261
-
262
-
263
-
264
-
265
-
266
-
267
-
268
-
269
-
270
-
271
-
272
-
273
-
274
-
275
-
276
-
277
-
278
-
279
-
280
-
281
-
282
 |
 |
