HP LaserJet 4v/mv HP LaserJet 4V and 4MV Printer - User’s Guide, C314 - Page 151
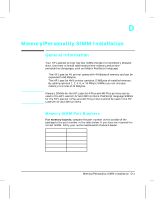
Installing a SIMM Board
 |
View all HP LaserJet 4v/mv manuals
Add to My Manuals
Save this manual to your list of manuals |
Page 151 highlights
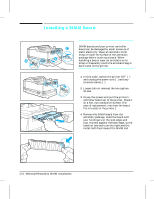
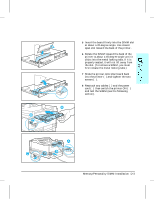
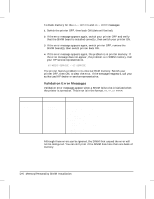
Installing a SIMM Board 1 Caution SIMM boards and your printer controller board can be damaged by small amounts of static electricity. Wear an antistatic wrist strap or touch the surface of the antistatic package before touching a board. When handling a board, wear an antistatic wrist strap or frequently touch the antistatic bag or bare metal on the printer. 2 1 In this order, switch the printer OFF (A) and unplug the power cord (B) and any attached cables (C). 2 Loosen (do not remove) the two captive screws. 3 Grasp the screws and pull the printer's controller board out of the printer. Place it on a flat, non-conductive surface. (For 3 ease of replacement, note how the board fits into slots in the printer.) 4 Remove the SIMM board from the antistatic package. Hold the board with your forefingers on the side edges and your thumbs against the back edge, so the notch on one end is on the right and the metal teeth face toward the SIMM slot. 4 D-2 Memory/Personality SIMM Installation
-
 1
1 -
2
-
3
-
4
-
5
-
6
-
7
-
8
-
9
-
10
-
11
-
12
-
13
-
14
-
15
-
16
-
17
-
18
-
19
-
20
-
21
-
22
-
23
-
24
-
25
-
26
-
27
-
28
-
29
-
30
-
31
-
32
-
33
-
34
-
35
-
36
-
37
-
38
-
39
-
40
-
41
-
42
-
43
-
44
-
45
-
46
-
47
-
48
-
49
-
50
-
51
-
52
-
53
-
54
-
55
-
56
-
57
-
58
-
59
-
60
-
61
-
62
-
63
-
64
-
65
-
66
-
67
-
68
-
69
-
70
-
71
-
72
-
73
-
74
-
75
-
76
-
77
-
78
-
79
-
80
-
81
-
82
-
83
-
84
-
85
-
86
-
87
-
88
-
89
-
90
-
91
-
92
-
93
-
94
-
95
-
96
-
97
-
98
-
99
-
100
-
101
-
102
-
103
-
104
-
105
-
106
-
107
-
108
-
109
-
110
-
111
-
112
-
113
-
114
-
115
-
116
-
117
-
118
-
119
-
120
-
121
-
122
-
123
-
124
-
125
-
126
-
127
-
128
-
129
-
130
-
131
-
132
-
133
-
134
-
135
-
136
-
137
-
138
-
139
-
140
-
141
-
142
-
143
-
144
-
145
-
 146
146 -
 147
147 -
 148
148 -
 149
149 -
 150
150 -
 151
151 -
 152
152 -
 153
153 -
 154
154 -
 155
155 -
 156
156 -
157
-
158
-
159
-
160
-
161
-
162
-
163
-
164
-
165
-
166
-
167
-
168
-
169
-
170
-
171
 |
 |
