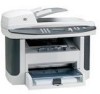
HP M1522nf HP LaserJet M1522 MFP - Software Technical Reference - Page 166
Set up the client computers running Windows XP or Windows Vista
 |
UPC - 883585238880
View all HP M1522nf manuals
Add to My Manuals
Save this manual to your list of manuals |
Page 166 highlights
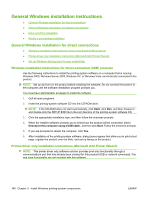
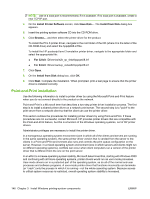
Set up the client computers running Windows XP or Windows Vista At the host computer that will share the product, perform the following steps: 1. Click Start, and then do one of the following: For Windows XP Professional: Select Settings, and then click Printers and Faxes. -orFor Windows XP Home: Click Control Panel, double-click the Printers and Other Hardware icon, and then click Printers and Faxes. -orFor Windows Vista: Click Computer, click Control Panel, and then click Hardware and Sound. 2. In the column to the left, under Printer Tasks, click Add a printer to open the Add Printer wizard. 3. Click Next to start the wizard. 4. Select A network printer or a printer attached to another computer, and then click Next. 5. Type the path and share name of the product to which you want to connect, and then click Next. 6. Click Yes or No when asked if you want to use this product as the default printer for Windowsbased programs, and then click Next. 7. Click Finish to complete the installation and close the Add Printer wizard. General Windows installation for network connections ● Network setup ● Windows installation instructions for network-connected products ● Printer-driver only installation instructions (Microsoft Add Printer Wizard) Network setup NOTE: Set up, turn on, and connect the product to the network before installing the software. To connect a product to a network, use the following instructions: 1. Connect the product to the network. 2. Turn on the product. NOTE: You must complete the power-up sequence in this order or the installer discovery utility fails to recognize the product. It might take a few minutes for the product to obtain a TCP/IP address. 3. To print a configuration page from the product control panel, press Setup . Use the arrow buttons to select Reports , and then press OK . Use the arrow buttons to select Config report and then press OK. 4. Install the printing-system software. Use the information from the test pages to specify the network variables during installation. NOTE: A second page prints. On that page, the Fax Settings and Imaging Settings sections provide details about the product fax settings (fax models only). 144 Chapter 3 Install Windows printing-system components ENWW
-
 1
1 -
2
-
3
-
4
-
5
-
6
-
7
-
8
-
9
-
10
-
11
-
12
-
13
-
14
-
15
-
16
-
17
-
18
-
19
-
20
-
21
-
22
-
23
-
24
-
25
-
26
-
27
-
28
-
29
-
30
-
31
-
32
-
33
-
34
-
35
-
36
-
37
-
38
-
39
-
40
-
41
-
42
-
43
-
44
-
45
-
46
-
47
-
48
-
49
-
50
-
51
-
52
-
53
-
54
-
55
-
56
-
57
-
58
-
59
-
60
-
61
-
62
-
63
-
64
-
65
-
66
-
67
-
68
-
69
-
70
-
71
-
72
-
73
-
74
-
75
-
76
-
77
-
78
-
79
-
80
-
81
-
82
-
83
-
84
-
85
-
86
-
87
-
88
-
89
-
90
-
91
-
92
-
93
-
94
-
95
-
96
-
97
-
98
-
99
-
100
-
101
-
102
-
103
-
104
-
105
-
106
-
107
-
108
-
109
-
110
-
111
-
112
-
113
-
114
-
115
-
116
-
117
-
118
-
119
-
120
-
121
-
122
-
123
-
124
-
125
-
126
-
127
-
128
-
129
-
130
-
131
-
132
-
133
-
134
-
135
-
136
-
137
-
138
-
139
-
140
-
141
-
142
-
143
-
144
-
145
-
146
-
147
-
148
-
149
-
150
-
151
-
152
-
153
-
154
-
155
-
156
-
157
-
158
-
159
-
160
-
 161
161 -
 162
162 -
 163
163 -
 164
164 -
 165
165 -
 166
166 -
 167
167 -
 168
168 -
 169
169 -
 170
170 -
 171
171 -
172
-
173
-
174
-
175
-
176
-
177
-
178
-
179
-
180
-
181
-
182
-
183
-
184
-
185
-
186
-
187
-
188
-
189
-
190
-
191
-
192
-
193
-
194
-
195
-
196
-
197
-
198
-
199
-
200
-
201
-
202
-
203
-
204
-
205
-
206
-
207
-
208
-
209
-
210
-
211
-
212
-
213
-
214
-
215
-
216
-
217
-
218
-
219
-
220
-
221
-
222
-
223
-
224
-
225
-
226
-
227
-
228
-
229
-
230
-
231
-
232
-
233
-
234
-
235
-
236
-
237
-
238
-
239
-
240
-
241
-
242
-
243
-
244
-
245
-
246
-
247
-
248
-
249
-
250
-
251
-
252
-
253
-
254
-
255
-
256
-
257
-
258
-
259
-
260
-
261
-
262
-
263
-
264
-
265
-
266
-
267
-
268
-
269
-
270
-
271
-
272
-
273
-
274
-
275
-
276
-
277
-
278
-
279
-
280
-
281
-
282
-
283
-
284
-
285
-
286
-
287
-
288
-
289
-
290
-
291
-
292
-
293
-
294
-
295
-
296
-
297
-
298
-
299
-
300
-
301
-
302
-
303
-
304
-
305
-
306
-
307
-
308
-
309
-
310
-
311
-
312
-
313
-
314
-
315
-
316
-
317
-
318
-
319
-
320
-
321
-
322
-
323
-
324
-
325
-
326
-
327
-
328
-
329
-
330
-
331
-
332
-
333
-
334
-
335
-
336
-
337
-
338
-
339
-
340
-
341
-
342
-
343
-
344
-
345
-
346
-
347
-
348
-
349
-
350
-
351
-
352
-
353
-
354
-
355
-
356
 |
 |
