HP M1522nf HP LaserJet M1522 MFP Series User Guide - Page 105
Set up fax with a telephone answering machine, Setup for stand-alone fax, Con fax settings
 |
UPC - 883585238880
View all HP M1522nf manuals
Add to My Manuals
Save this manual to your list of manuals |
Page 105 highlights
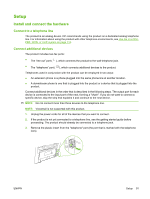
7. To connect a telephone, plug a telephone cord into the previous device's "telephone" port. Plug the other end of the telephone cord into the telephone "line" port. 8. After you have finished connecting additional devices, plug all of the devices into their power sources. Set up fax with a telephone answering machine ● Set the product rings-to-answer setting for at least one ring more than the number of rings for which the answering machine is set. ● If an answering machine is connected to the same telephone line but on a different jack (in another room, for example), it might interfere with the product's ability to receive faxes. Setup for stand-alone fax 1. Unpack and set up the product. 2. Set the time, date, and fax header. See Configure fax settings on page 93. 3. Set other settings as necessary to configure for the product environment. Configure fax settings The product fax settings can be set from the control panel, from HP ToolboxFX, or from the embedded Web server. At the initial set-up process, the HP Fax Setup Wizard can be used to configure the settings. In the United States and many other countries/regions, setting the time, date, and other fax header information is a legal requirement. Use the control panel to set the fax time, date, and header To use the control panel to set the date, time, and header, complete the following steps: 1. At the control panel, press Setup ( ). 2. Use the arrow buttons to select System setup, and then press OK. 3. Use the arrow buttons to select Time/Date. Press OK. 4. Use the arrow buttons to select the 12-hour clock or 24-hour clock, and then press OK. 5. Use the alphanumeric buttons to enter the current time. ENWW Setup 93
-
 1
1 -
2
-
3
-
4
-
5
-
6
-
7
-
8
-
9
-
10
-
11
-
12
-
13
-
14
-
15
-
16
-
17
-
18
-
19
-
20
-
21
-
22
-
23
-
24
-
25
-
26
-
27
-
28
-
29
-
30
-
31
-
32
-
33
-
34
-
35
-
36
-
37
-
38
-
39
-
40
-
41
-
42
-
43
-
44
-
45
-
46
-
47
-
48
-
49
-
50
-
51
-
52
-
53
-
54
-
55
-
56
-
57
-
58
-
59
-
60
-
61
-
62
-
63
-
64
-
65
-
66
-
67
-
68
-
69
-
70
-
71
-
72
-
73
-
74
-
75
-
76
-
77
-
78
-
79
-
80
-
81
-
82
-
83
-
84
-
85
-
86
-
87
-
88
-
89
-
90
-
91
-
92
-
93
-
94
-
95
-
96
-
97
-
98
-
99
-
 100
100 -
 101
101 -
 102
102 -
 103
103 -
 104
104 -
 105
105 -
 106
106 -
 107
107 -
 108
108 -
 109
109 -
 110
110 -
111
-
112
-
113
-
114
-
115
-
116
-
117
-
118
-
119
-
120
-
121
-
122
-
123
-
124
-
125
-
126
-
127
-
128
-
129
-
130
-
131
-
132
-
133
-
134
-
135
-
136
-
137
-
138
-
139
-
140
-
141
-
142
-
143
-
144
-
145
-
146
-
147
-
148
-
149
-
150
-
151
-
152
-
153
-
154
-
155
-
156
-
157
-
158
-
159
-
160
-
161
-
162
-
163
-
164
-
165
-
166
-
167
-
168
-
169
-
170
-
171
-
172
-
173
-
174
-
175
-
176
-
177
-
178
-
179
-
180
-
181
-
182
-
183
-
184
-
185
-
186
-
187
-
188
-
189
-
190
-
191
-
192
-
193
-
194
-
195
-
196
-
197
-
198
-
199
-
200
-
201
-
202
-
203
-
204
-
205
-
206
-
207
-
208
-
209
-
210
-
211
-
212
-
213
-
214
-
215
-
216
-
217
-
218
-
219
-
220
-
221
-
222
-
223
-
224
-
225
-
226
-
227
-
228
-
229
-
230
-
231
-
232
-
233
-
234
-
235
-
236
-
237
-
238
-
239
-
240
-
241
-
242
-
243
-
244
-
245
-
246
-
247
-
248
-
249
-
250
-
251
-
252
-
253
-
254
 |
 |
