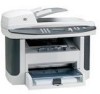
HP M1522nf HP LaserJet M1522 MFP Series User Guide - Page 94
Scan to a file, e-mail, or software program, Delete Destination
 |
UPC - 883585238880
View all HP M1522nf manuals
Add to My Manuals
Save this manual to your list of manuals |
Page 94 highlights
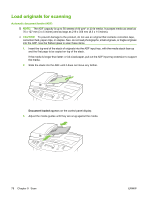
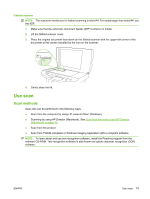
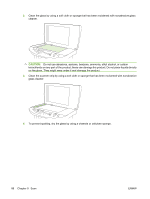
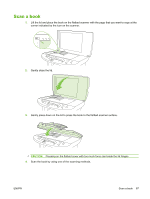
5. Highlight a destination and click the arrow to move to the destinations currently on the dialog box. Repeat for all three destinations. 6. Click Update. Add destinations 1. Click Start, click Programs (or All Programs in Windows XP), click HP, click the product, click Scan, and then click Setup. 2. Select Create a new destination with settings that I specify. 3. Do one of the following: ● For folders, select Save it to my computer, and then click Next. ● For e-mail, select Attach to a new e-mail, and then click Next. ● For programs, select Open it in another software application, and then click Next. 4. Select the scan resolution, color mode, and scan dimension settings, and then click Next. 5. Enter the file destination name or check to set up the destination on the product. Name the default destination, and then click Next. 6. Select the quality and click Next. 7. Verify the selections, and then click Save. Delete destinations 1. From the Set up the list for the All-in-One, select one of the Available Destinations on this PC and click Delete. The Delete Destination dialog box displays. 2. From the Delete Destination dialog box, highlight the destination to delete and click Next. The Confirmation dialog box displays. 3. Click Delete to perform the deletion, or click Cancel to choose another destination. Scan to a file, e-mail, or software program NOTE: To use this feature in Windows, a destination must be programmed in the scan setup before scanning to a destination. See Set up the product Scan To button on page 81. 1. Load the originals that are to be scanned face-up in the automatic document feeder (ADF) input tray, with the top of the document forward, and adjust the media guides. -or- Lift the flatbed scanner lid and load the original that is to be scanned face-down on the flatbed scanner with the top, left corner of the document located at the corner indicated by the icon on the scanner. Gently close the lid. 2. On the product control panel, press Scan To. 3. Use the arrow buttons to select a file destination. 4. Press Start Scan or OK to scan the document to a file. 82 Chapter 9 Scan ENWW
-
 1
1 -
2
-
3
-
4
-
5
-
6
-
7
-
8
-
9
-
10
-
11
-
12
-
13
-
14
-
15
-
16
-
17
-
18
-
19
-
20
-
21
-
22
-
23
-
24
-
25
-
26
-
27
-
28
-
29
-
30
-
31
-
32
-
33
-
34
-
35
-
36
-
37
-
38
-
39
-
40
-
41
-
42
-
43
-
44
-
45
-
46
-
47
-
48
-
49
-
50
-
51
-
52
-
53
-
54
-
55
-
56
-
57
-
58
-
59
-
60
-
61
-
62
-
63
-
64
-
65
-
66
-
67
-
68
-
69
-
70
-
71
-
72
-
73
-
74
-
75
-
76
-
77
-
78
-
79
-
80
-
81
-
82
-
83
-
84
-
85
-
86
-
87
-
88
-
 89
89 -
 90
90 -
 91
91 -
 92
92 -
 93
93 -
 94
94 -
 95
95 -
 96
96 -
 97
97 -
 98
98 -
 99
99 -
100
-
101
-
102
-
103
-
104
-
105
-
106
-
107
-
108
-
109
-
110
-
111
-
112
-
113
-
114
-
115
-
116
-
117
-
118
-
119
-
120
-
121
-
122
-
123
-
124
-
125
-
126
-
127
-
128
-
129
-
130
-
131
-
132
-
133
-
134
-
135
-
136
-
137
-
138
-
139
-
140
-
141
-
142
-
143
-
144
-
145
-
146
-
147
-
148
-
149
-
150
-
151
-
152
-
153
-
154
-
155
-
156
-
157
-
158
-
159
-
160
-
161
-
162
-
163
-
164
-
165
-
166
-
167
-
168
-
169
-
170
-
171
-
172
-
173
-
174
-
175
-
176
-
177
-
178
-
179
-
180
-
181
-
182
-
183
-
184
-
185
-
186
-
187
-
188
-
189
-
190
-
191
-
192
-
193
-
194
-
195
-
196
-
197
-
198
-
199
-
200
-
201
-
202
-
203
-
204
-
205
-
206
-
207
-
208
-
209
-
210
-
211
-
212
-
213
-
214
-
215
-
216
-
217
-
218
-
219
-
220
-
221
-
222
-
223
-
224
-
225
-
226
-
227
-
228
-
229
-
230
-
231
-
232
-
233
-
234
-
235
-
236
-
237
-
238
-
239
-
240
-
241
-
242
-
243
-
244
-
245
-
246
-
247
-
248
-
249
-
250
-
251
-
252
-
253
-
254
 |
 |
