HP Pro 3330 HP Pro 3330 Microtower PC, HP Pro 3330 Small Form Factor PC, and H - Page 152
Save Changes and Exit, Storage Options
 |
View all HP Pro 3330 manuals
Add to My Manuals
Save this manual to your list of manuals |
Page 152 highlights
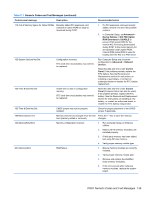
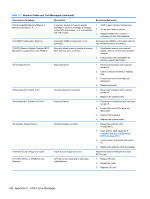
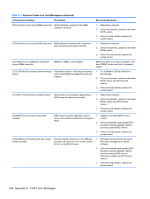
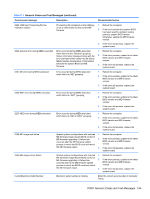
Table C-1 Numeric Codes and Text Messages (continued) Control panel message Description Recommended action 1151-Serial Port A Address Conflict Detected Both external and internal serial ports are assigned to COM1. 1. Remove any serial port expansion cards. 2. Clear CMOS. (See Appendix B, Password Security and Resetting CMOS on page 186.) 3. Reconfigure card resources and/or run Computer Setup or Windows utilities. 1152-Serial Port B Address Conflict Detected Both external and internal serial ports are assigned to COM2. 1. Remove any serial port expansion cards. 2. Clear CMOS. (See Appendix B, Password Security and Resetting CMOS on page 186.) 3. Reconfigure card resources and/or run Computer Setup or Windows utilities. 1155-Serial Port Address Conflict Detected Both external and internal serial ports are assigned to same IRQ. 1. Remove any serial port expansion cards. 2. Clear CMOS. (See Appendix B, Password Security and Resetting CMOS on page 186.) 3. Reconfigure card resources and/or run Computer Setup or Windows utilities. 1720-SMART Hard Drive Detects Imminent Failure Hard drive is about to fail. (Some hard 1. drives have a hard drive firmware patch that will fix an erroneous error message.) 2. 3. Determine if hard drive is giving correct error message. Enter Computer Setup and run the Drive Protection System test under Storage > DPS Self-test. Apply hard drive firmware patch if applicable. (Available at http://www.hp.com/support.) Back up contents and replace hard drive. 1796-SATA Cabling Error One or more SATA devices are improperly attached. For optimal performance, the SATA 0 and SATA 1 connectors must be used before SATA 2 and SATA 3. Ensure SATA connectors are used in ascending order. For one device, use SATA 0. For two devices, use SATA 0 and SATA 1. For three devices, use SATA 0, SATA 1, and SATA 2. 1797-SATA Drivelock is not supported in RAID mode. Drivelock is enabled on one or more SATA hard drives, and they cannot be accessed while the system is configured for RAID mode. Either remove the Drivelocked SATA device or disable the Drivelock feature. To disable the Drivelock feature, enter Computer Setup, change Storage > Storage Options > SATA Emulation to IDE, and select File > Save Changes and Exit. Reenter Computer Setup and select Security > Drivelock Security. For each listed Drivelock-capable SATA device, ensure Drivelock is Disabled. Lastly, change Storage > Storage Options > SATA Emulation back to RAID and select File > Save Changes and Exit. 1801-Microcode Patch Error Processor is not supported by ROM BIOS. 1. Upgrade BIOS to proper version. 2. Change the processor. 142 Appendix C POST Error Messages
-
 1
1 -
2
-
3
-
4
-
5
-
6
-
7
-
8
-
9
-
10
-
11
-
12
-
13
-
14
-
15
-
16
-
17
-
18
-
19
-
20
-
21
-
22
-
23
-
24
-
25
-
26
-
27
-
28
-
29
-
30
-
31
-
32
-
33
-
34
-
35
-
36
-
37
-
38
-
39
-
40
-
41
-
42
-
43
-
44
-
45
-
46
-
47
-
48
-
49
-
50
-
51
-
52
-
53
-
54
-
55
-
56
-
57
-
58
-
59
-
60
-
61
-
62
-
63
-
64
-
65
-
66
-
67
-
68
-
69
-
70
-
71
-
72
-
73
-
74
-
75
-
76
-
77
-
78
-
79
-
80
-
81
-
82
-
83
-
84
-
85
-
86
-
87
-
88
-
89
-
90
-
91
-
92
-
93
-
94
-
95
-
96
-
97
-
98
-
99
-
100
-
101
-
102
-
103
-
104
-
105
-
106
-
107
-
108
-
109
-
110
-
111
-
112
-
113
-
114
-
115
-
116
-
117
-
118
-
119
-
120
-
121
-
122
-
123
-
124
-
125
-
126
-
127
-
128
-
129
-
130
-
131
-
132
-
133
-
134
-
135
-
136
-
137
-
138
-
139
-
140
-
141
-
142
-
143
-
144
-
145
-
146
-
 147
147 -
 148
148 -
 149
149 -
 150
150 -
 151
151 -
 152
152 -
 153
153 -
 154
154 -
 155
155 -
 156
156 -
 157
157 -
158
-
159
-
160
-
161
-
162
-
163
-
164
-
165
-
166
-
167
-
168
-
169
-
170
-
171
-
172
-
173
-
174
-
175
-
176
-
177
-
178
-
179
-
180
-
181
-
182
-
183
-
184
-
185
-
186
-
187
-
188
-
189
-
190
-
191
-
192
-
193
-
194
-
195
-
196
-
197
-
198
-
199
-
200
-
201
-
202
-
203
-
204
-
205
-
206
-
207
-
208
 |
 |