HP ProLiant DL185 HP ProLiant DL185 Generation 5 Server Software Configuration
HP ProLiant DL185 - G5 Server Manual
 |
View all HP ProLiant DL185 manuals
Add to My Manuals
Save this manual to your list of manuals |
HP ProLiant DL185 manual content summary:
- HP ProLiant DL185 | HP ProLiant DL185 Generation 5 Server Software Configuration - Page 1
HP ProLiant DL185 Generation 5 Server Software Configuration Guide Part number 452453-001 First edition November 2007 - HP ProLiant DL185 | HP ProLiant DL185 Generation 5 Server Software Configuration - Page 2
such products and services. Nothing herein should be construed as constituting an additional warranty. HP shall not be liable for technical or editorial errors or omissions contained herein. Microsoft, Windows, and Windows NT are U.S. registered trademarks of Microsoft Corporation. Windows Server - HP ProLiant DL185 | HP ProLiant DL185 Generation 5 Server Software Configuration - Page 3
jumper 39 NOS installation ...40 Supported NOS...40 NOS pre-installation procedure ...40 Hardware setup ...40 BIOS update ...41 Installing Microsoft Windows NOS ...41 Pre-installation instructions ...41 Installation flow...41 Section 1. Creating the driver diskettes 41 Section 2. Installing - HP ProLiant DL185 | HP ProLiant DL185 Generation 5 Server Software Configuration - Page 4
Configuring the BMC ...59 Index ...61 Contents 4 - HP ProLiant DL185 | HP ProLiant DL185 Generation 5 Server Software Configuration - Page 5
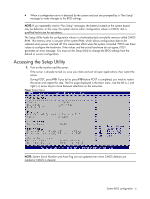
be referred to as "Setup" or "Setup Utility" in this guide. Also, the screenshots used in this guide display default system values. These values may not be the same as those in your server. The AMIBIOS Setup Utility is a hardware configuration program built into the server BIOS. Because most systems - HP ProLiant DL185 | HP ProLiant DL185 Generation 5 Server Software Configuration - Page 6
server and repeat this step. The first page displayed is the Main menu. Use the left (←) and right (→) arrow keys to move between selections on the menu bar. Figure 1 Main Menu NOTE: System Serial Number and Asset Tag are not updated even when CMOS defaults are loaded or CMOS is cleared. System BIOS - HP ProLiant DL185 | HP ProLiant DL185 Generation 5 Server Software Configuration - Page 7
1 Setup Utility navigation keys lists these legend keys and their respective functions. Table 1 Setup Utility Specific Help panel. This panel displays the help text for the selected field. It updates as Figure 2. The General Help window describes other Setup navigation keys that are not displayed on - HP ProLiant DL185 | HP ProLiant DL185 Generation 5 Server Software Configuration - Page 8
Utility menu bar displays the five primary menu selections. For detailed information and screenshots of these Setup menus and their related submenus, refer to the following sections. , and 5:30, P.M. as 17:30:00. If you clear CMOS, setup time and date values will be 00:00:00 and 02/29/2006. System - HP ProLiant DL185 | HP ProLiant DL185 Generation 5 Server Software Configuration - Page 9
menu fields Field System Overview Processor System Memory Power Supply Asset Tag System Serial Number System Time System Date Boot Settings Configuration Description Displays the system ROM Version, the date when the Setup utility was created and identification number. Displays the CPU version - HP ProLiant DL185 | HP ProLiant DL185 Generation 5 Server Software Configuration - Page 10
booting. Disabled Advanced menu Figure 5 Advanced menu NOTE: The CPU Configuration setup screen varies depending on the installed processor. Table 4 Advanced menu fields Field Description CPU Configuration Use this screen to select options for the CPU Configuration Settings. System BIOS - HP ProLiant DL185 | HP ProLiant DL185 Generation 5 Server Software Configuration - Page 11
Configuration options for the system USB controller. CPU Configuration submenu Figure 6 CPU Configuration submenu Table 5 CPU Configuration submenu fields Field Runtime Legacy PSB Description Options Set this value to prevent the generation of Power State Blocks for use Disabled by - HP ProLiant DL185 | HP ProLiant DL185 Generation 5 Server Software Configuration - Page 12
Table 6 IDE Configuration submenu fields Field Description Options Onboard PCI IDE Controller Set this value to allow the best setting to use if the onboard IDE controllers are 0 set to a specific IDE disk drive in the BIOS Set this value to stop the setup from searching the IDE bus for IDE - HP ProLiant DL185 | HP ProLiant DL185 Generation 5 Server Software Configuration - Page 13
Description Set this value to stop the setup from searching the IDE bus for IDE disk drives in 20 seconds Set this value to stop the setup from searching the IDE bus for IDE disk drives in 25 seconds Set this value to stop the setup is best to set this port to Disabled. System BIOS configuration 13 - HP ProLiant DL185 | HP ProLiant DL185 Generation 5 Server Software Configuration - Page 14
submenu Table 8 S-ATA Configuration submenu fields Field HT1000 S-ATA S-ATA mode INT13 Support Description Set this value to enable the on-board HT1000 S-ATA controller Set this value to disable the on-board HT1000 S-ATA controller. Set this value to S-ATA mode Set this value to P-ATA mode Set - HP ProLiant DL185 | HP ProLiant DL185 Generation 5 Server Software Configuration - Page 15
Table 9 ACPI Configuration submenu fields Field ACPI Version Features AMI OEMB table Headless mode Description Set this value to enable ACPI Version Features Set this value to disable ACPI Headless mode Options Enabled Disabled Enabled Disabled Disabled Enabled System BIOS configuration 15 - HP ProLiant DL185 | HP ProLiant DL185 Generation 5 Server Software Configuration - Page 16
Figure 11 Event Log Configuration submenu Table 10 Event Log Configuration submenu fields Field View Event log Mark all events as read Clean Event log Description Display the event log contents. The option allows you to mark all events as read. The option allows you to clean the event log - HP ProLiant DL185 | HP ProLiant DL185 Generation 5 Server Software Configuration - Page 17
Figure 12 IPMI Configuration submenu Table 11 IPMI Device Configuration submenu fields Field Description SEL Configuration Configuration of the BMC Sensor Event Log. Serial Port Configuration Select , CPU fan speed, system fan speed, and chassis fan speed. System BIOS configuration 17 - HP ProLiant DL185 | HP ProLiant DL185 Generation 5 Server Software Configuration - Page 18
Table 12 SEL Configuration submenu fields Field View BMC System Event Log Clear BMC System Event Log Description Select to view the contents of the System Event log. If the BMC Event log is appear before the log is cleared. Figure 14 Serial Port Configuration submenu System BIOS configuration 18 - HP ProLiant DL185 | HP ProLiant DL185 Generation 5 Server Software Configuration - Page 19
Setting this value will disable support of NIC sharing. Setting this value will allow NIC mode (disabled the KVM). Setting this value will allow dynamic IP assignment. Setting this value will allow manual IP assignment. Options Disabled Enabled Enabled Disabled System BIOS configuration 19 - HP ProLiant DL185 | HP ProLiant DL185 Generation 5 Server Software Configuration - Page 20
Watchdog Timer Action BMC Watch Dog Time Out Description Options Set this value to allow BMC to power down the system if the operating system crashes or hangs. Power Down Set this value to allow BMC to power cycle the system if the operating system crashes or hangs. Power BIOS configuration 20 - HP ProLiant DL185 | HP ProLiant DL185 Generation 5 Server Software Configuration - Page 21
health information submenu Console Redirection submenu Figure 18 Console Redirection submenu Table 16 Console Redirection submenu fields Field Description Console Redirection Setting this value will enable console redirection. Setting this value will disable console redirection and prevent - HP ProLiant DL185 | HP ProLiant DL185 Generation 5 Server Software Configuration - Page 22
USB Configuration submenu NOTE: If USB storage is installed, the USB Mass Device Configuration item is displayed. Selecting this item provides information and configuration options. Table 17 USB Configuration submenu fields Field Description USB Controller This setting enables the onboard USB - HP ProLiant DL185 | HP ProLiant DL185 Generation 5 Server Software Configuration - Page 23
is PXE enabled. Boot Device Priority submenu To change the boot order, select a boot category type such as Hard disk drives, Removable media or ATAPI CD ROM devices from the boot menu. For example, if the 1st boot device is set to Hard disk drives, then BIOS will try to boot to hard disk drives - HP ProLiant DL185 | HP ProLiant DL185 Generation 5 Server Software Configuration - Page 24
Device Priority submenu NOTE: When you select a boot category from the boot menu, a list of devices in that category appears. For example, if the system has three hard . When entered, this password allows the user to access and change all settings in the Setup Utility. System BIOS configuration 24 - HP ProLiant DL185 | HP ProLiant DL185 Generation 5 Server Software Configuration - Page 25
Enter New Password box. The password may consist of up to eight alphanumeric characters (A-Z, a-z, 0-9), Next, press Enter, and the Confirm New Password window displays. System BIOS configuration 25 - HP ProLiant DL185 | HP ProLiant DL185 Generation 5 Server Software Configuration - Page 26
OK to continue. Figure 26 Password installed 4. Press F10 to save the password and close the Setup Utility. To change the administrator password: 1. In the Security menu screen, in the Change Administrator displays. Press the Enter button (this enters a blank password) System BIOS configuration 26 - HP ProLiant DL185 | HP ProLiant DL185 Generation 5 Server Software Configuration - Page 27
password: Figure 28 Password Check submenu Table 19 Password Check submenu fields Option Setup Always Description Set this value to check password when invoking the Setup utility. Set this value to check password when invoking Setup as well as on each boot. System BIOS configuration 27 - HP ProLiant DL185 | HP ProLiant DL185 Generation 5 Server Software Configuration - Page 28
about the current server configuration and is necessary for troubleshooting and may be required when asking for technical support. This information includes: • Processor specifications • BIOS version and release date • BMC firmware version • Size of the system and video memory, as well as - HP ProLiant DL185 | HP ProLiant DL185 Generation 5 Server Software Configuration - Page 29
to correct the error. These default settings have been selected to optimize the server's performance. Setup default settings are quite demanding in terms of resource consumption. If you are using low-speed memory chips or other types of low-performance components and you choose to load these - HP ProLiant DL185 | HP ProLiant DL185 Generation 5 Server Software Configuration - Page 30
to the HP ProLiant DL185 Generation 5 Server Maintenance and Service Guide for Setup Utility. Power-On Self Test (POST) When the server boots up, a series of tests are displayed on the screen. This is referred to as PowerOn Self-Test (POST). POST is a series of diagnostic tests that checks firmware - HP ProLiant DL185 | HP ProLiant DL185 Generation 5 Server Software Configuration - Page 31
battery indicator shows the system battery is dead. 1 Replace the system battery following the procedures in the HP ProLiant DL185 Generation 5 Server Maintenance and Service Guide. 2 Run Setup to reconfigure the system. System CMOS checksum bad - Default configuration used The settings in the - HP ProLiant DL185 | HP ProLiant DL185 Generation 5 Server Software Configuration - Page 32
bootup failed. BIOS automatically loads the default system values, then boot again. Memory size found by POST differed from CMOS The user has added or removed a memory module, thus a memory size that is different from the previous bootup. DMA test failed The DMA control test failed. Software - HP ProLiant DL185 | HP ProLiant DL185 Generation 5 Server Software Configuration - Page 33
number Beep code 1-3-1-1 1-3-1-3 Description Initialize IPMI Verify power management Load alternate registers with initial POST values Restore processor control word during warm boot Initialize PCI bus mastering devices Initialize keyboard controller BIOS ROM checksum Initialize cache before memory - HP ProLiant DL185 | HP ProLiant DL185 Generation 5 Server Software Configuration - Page 34
extended memory for ROM pilot Initialize interrupt vectors POST device initialization Check ROM copyright notice Check video configuration against CMOS Initialize PCI bus and devices Initialize all video adapters in system Quiet boot start (optional) Shadow video BIOS ROM Display BIOS copyright - HP ProLiant DL185 | HP ProLiant DL185 Generation 5 Server Software Configuration - Page 35
Description Set key click if enabled Enable USB devices Enable keyboard Enable FireWire devices Test for unexpected interrupts Initialize POST display service Display prompt "Press F10 to enter SETUP" Disable processor cache Test RAM between 512 and 640 KB Test base memory Test extended memory - HP ProLiant DL185 | HP ProLiant DL185 Generation 5 Server Software Configuration - Page 36
Power management processor speed Set up power management Initialize security engine (optional) Enable hardware interrupts Determine number of SATA or SAS drives Set time of day Check key lock Initialize typematic rate Erase F10 prompt Scan for F10 key stroke Enter Setup System BIOS configuration - HP ProLiant DL185 | HP ProLiant DL185 Generation 5 Server Software Configuration - Page 37
Description Clear boot flag Check for errors Inform ROM pilot about the end of POST POST done, prepare to boot operating system Store extended CMOS One short beep before boot Terminate quiet boot (optional) Check password (optional) Initialize ACPI BIOS Prepare boot 13h to memory technologies devices - HP ProLiant DL185 | HP ProLiant DL185 Generation 5 Server Software Configuration - Page 38
. 6. If the server still does not work, repeat step 2. 7. Remove all accessories, except the primary boot hard disk drive. 8. Repeat steps 4 and 5. If the server now works, replace the boards and accessories one at a time to determine which one is causing the problem. System BIOS configuration 38 - HP ProLiant DL185 | HP ProLiant DL185 Generation 5 Server Software Configuration - Page 39
is on jumper block P56 on the system board. Refer to the HP ProLiant DL185 Generation 5 Server Maintenance and Service Guide for the location of this jumper block and the crisis recovery setting. To reprogram the BIOS: 1. Perform the pre-installation procedures described on page 58. 2. If necessary - HP ProLiant DL185 | HP ProLiant DL185 Generation 5 Server Software Configuration - Page 40
Server 2003 for 64-bit Microsoft World Wide Web access: www.microsoft.com Microsoft Product Support Services: http://support.microsoft the server. 2. Update the server BIOS. Hardware setup Prepare the server following the instructions in the HP ProLiant DL185 Generation 5 Server Installation Sheet - HP ProLiant DL185 | HP ProLiant DL185 Generation 5 Server Software Configuration - Page 41
that you update the server BIOS with the latest system BIOS version to take advantage of the most recent compatibility fixes. You can download the latest HP ProLiant DL185 Generation 5 server BIOS at www.hp.com. NOTE: For ease of reading, the HP ProLiant DL185 Generation 5 Server Support CD will - HP ProLiant DL185 | HP ProLiant DL185 Generation 5 Server Software Configuration - Page 42
directory of the Support CD. 3. Follow the on-screen instructions to create the Windows NOS driver diskette. 4. Label, date, and save the driver diskette as HP disk [Windows NOS version]. Section 2. Installing Windows NOS 1. Boot the server from the Windows NOS CD-ROM. The Setup is inspecting your - HP ProLiant DL185 | HP ProLiant DL185 Generation 5 Server Software Configuration - Page 43
-click the Startup.htm file located on the root directory of the Support CD. 2. Click the HP ProLiant DL185 Generation 5 server drivers for chipset, Network, and Video link. 3. Select the ServerEngines chipset driver option for Windows [NOS version] option. The File Download dialog box displays - HP ProLiant DL185 | HP ProLiant DL185 Generation 5 Server Software Configuration - Page 44
2. Click the HP ProLiant DL185 Generation 5 server drivers for chipset, Network, and Video link. 3. Select the embedded VGA driver for the Windows [NOS version] option. The File Download dialog box displays. 4. Click Open to download the driver. The Security Warning dialog box displays. 5. Click Yes - HP ProLiant DL185 | HP ProLiant DL185 Generation 5 Server Software Configuration - Page 45
Double-click Storage in the server. 5. Select the default permissions for application compatibility, then click Next. 6. Click Next to accept the support number of disks required and label them as Terminal Services for [...] Disk [x/y]. 5. Click OK to proceed. 6. Follow the on-screen instructions - HP ProLiant DL185 | HP ProLiant DL185 Generation 5 Server Software Configuration - Page 46
, then double-click Local Area Connection on your server. NOTE: If your ProLiant server hosts several network adapters, the window shows one local the server name you entered during the Windows NOS installation. You should get four replies from your new server. If there is a connection problem, you - HP ProLiant DL185 | HP ProLiant DL185 Generation 5 Server Software Configuration - Page 47
controller setup The Windows NOS manual calls this process "Promoting the server to a domain controller." 1. Click Start | Programs | Administrative Tools | Configure Your Server with pre-Windows Server [2003]. 17. Enter and confirm an administrator password, then click Next. 18. Review the Summary - HP ProLiant DL185 | HP ProLiant DL185 Generation 5 Server Software Configuration - Page 48
[version]. For the specific procedure for each RHEL NOS version, refer to the following sections. 2. Install additional HP accessories. The HP ProLiant DL185 Generation 5 Server Support CD includes the drivers for accessories compatible to your server. Refer to the product manual enclosed with the - HP ProLiant DL185 | HP ProLiant DL185 Generation 5 Server Software Configuration - Page 49
. Keyboard Configuration Your HP server comes with a Generic Review the Disk Setup settings and modify if necessary, then click Next. Boot Loader Configuration HP Support Review the Additional Language Support setting and modify if necessary, then click Next to continue. Time Zone Selection Review - HP ProLiant DL185 | HP ProLiant DL185 Generation 5 Server Software Configuration - Page 50
Review example, the DNS Name Server package may be required if you have set up your new server to be the DNS controller. Section 3. Installing Additional CDs Ignore this page. Click Next to continue. Finish Setup The initial setup configuration is complete. Click Next to proceed to the login window - HP ProLiant DL185 | HP ProLiant DL185 Generation 5 Server Software Configuration - Page 51
[version]. For the specific procedure for each SLE NOS version, refer to the following sections. 2. Install additional HP accessories. The HP ProLiant DL185 Generation 5 Server Support CD includes the drivers for accessories compatible to your server. Refer to the product manual enclosed with the - HP ProLiant DL185 | HP ProLiant DL185 Generation 5 Server Software Configuration - Page 52
Click Next to proceed with the installation. Service Configuration Review the Services settings and select those items that are required Enterprise Server 10 Installation Section 1. Installing SUSE Linux Enterprise Server 10 1. Turn on the server and insert the SUSE Linux Enterprise Server 10 - HP ProLiant DL185 | HP ProLiant DL185 Generation 5 Server Software Configuration - Page 53
Next to continue. Clock and Time Zone Modify the Clock and Time Zone settings, then click Next to continue. Installation Setting 1. Review the default installation settings and modify them to meet your network environment. 2. Click Accept to initialize the installation process. 3. Click Install - HP ProLiant DL185 | HP ProLiant DL185 Generation 5 Server Software Configuration - Page 54
1. Install Sun Solaris 10. Refer to the next section for detailed instructions. 2. Install additional HP accessories. The HP ProLiant DL185 Generation 5 Server Support CD includes the drivers for accessories compatible to your server. Refer to the product manual enclosed with the accessory for the - HP ProLiant DL185 | HP ProLiant DL185 Generation 5 Server Software Configuration - Page 55
interlaced). 6. Select your display device's screen size, then press F2. 7. Set the preferred Resolution/Color/Refresh Rate settings, then press F2. 8. HP recommends the 1024 x 768 - 65536 colors option. 9. Select Save and Test the Window System Configuration, then press F2. 10. Press F2 again - HP ProLiant DL185 | HP ProLiant DL185 Generation 5 Server Software Configuration - Page 56
Products For the initial installation, no additional Solaris software is required. Click Next to continue. Select Solaris Software Group Click Entire Group, then click Next to continue. Disk Selection Select a boot continue. Layout File System Review the default file system layout and modify if - HP ProLiant DL185 | HP ProLiant DL185 Generation 5 Server Software Configuration - Page 57
Ready to Install An installation information summary is displayed. Verify this information, then click Install Now to start the installation process. Upon completing the installation, the system automatically reboots. You can now eject the SS10U1 DVD. Once the system reboots, the new Sun Solaris - HP ProLiant DL185 | HP ProLiant DL185 Generation 5 Server Software Configuration - Page 58
listed in Chapter 2 of the HP ProLiant DL185 Generation 5Server Maintenance and Service Guide when handling any hardware component. 1. Turn off the server and all the peripherals connected to it. 2. Disconnect the AC power cord from the power supply cable located on the server rear panel to turn off - HP ProLiant DL185 | HP ProLiant DL185 Generation 5 Server Software Configuration - Page 59
step-by-step instructions. 2. Check to make sure you have not left loose tools or parts inside the server. 3. Reinstall any the server. The serial port can be controlled by the server or shared between the server and the BMC (the default setting). To configure the BMC through the Setup Utility - HP ProLiant DL185 | HP ProLiant DL185 Generation 5 Server Software Configuration - Page 60
address. 13. Open a browser and enter the IP address that you set manually or that was set automatically using DHCP. 14. When prompted, enter the same session. 15. Browse the server settings using the user interface that displays. To enable console redirection via the Setup Utility: 1. In the I/O - HP ProLiant DL185 | HP ProLiant DL185 Generation 5 Server Software Configuration - Page 61
Setup Utility, 5 asset tag, 9 ATA/IDE Configuration, 12 B base I/O address, 28 Baseboard management controller, 19 Basic Input/Output System, 5 beep codes, 32 BIOS EHCI Hand-Off, 22 BIOS overview, 5 BMC firmware version, 28 BMC Watch Dog Time Out, 20 Boot Device Priority, 23 Boot Options, 29 Boot - HP ProLiant DL185 | HP ProLiant DL185 Generation 5 Server Software Configuration - Page 62
Summary Screen, 9 Sun Solaris 10, 54 system configuration changing, 5 System Date, 9 system defaults, 29 System Time, 9 system time and date setting, 5 T terminal error, 32 U USB 2.0 Controller, 22 USB Controller, 22 V View BMC System Event Log, 18 W Watchdog Configuration, 17 Index 62
-
 1
1 -
 2
2 -
 3
3 -
 4
4 -
 5
5 -
 6
6 -
 7
7 -
8
-
9
-
10
-
11
-
12
-
13
-
14
-
15
-
16
-
17
-
18
-
19
-
20
-
21
-
22
-
23
-
24
-
25
-
26
-
27
-
28
-
29
-
30
-
31
-
32
-
33
-
34
-
35
-
36
-
37
-
38
-
39
-
40
-
41
-
42
-
43
-
44
-
45
-
46
-
47
-
48
-
49
-
50
-
51
-
52
-
53
-
54
-
55
-
56
-
57
-
58
-
59
-
60
-
61
-
62
 |
 |

HP ProLiant DL185 Generation 5 Server
Software Configuration Guide
Part number 452453-001
First edition November 2007