HP ProLiant DL185 HP ProLiant DL185 Generation 5 Server Software Configuration - Page 41
BIOS update, Installing Microsoft Windows NOS, Pre-installation instructions, Installation flow
 |
View all HP ProLiant DL185 manuals
Add to My Manuals
Save this manual to your list of manuals |
Page 41 highlights
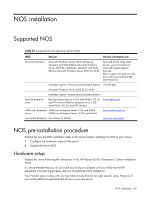
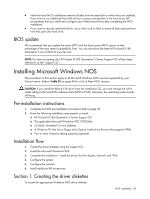
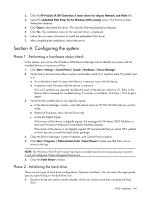
• Note that most NOS installations remove all data from the hard disk on which they are installed. If you want to use additional hard disk drives to access existing data in the new server, HP recommends that you install and configure any of these hard drives after completing the NOS installation. • If you want to recycle used hard drives, use a utility such as fdisk to erase all data and partitions from that particular hard drive. BIOS update HP recommends that you update the server BIOS with the latest system BIOS version to take advantage of the most recent compatibility fixes. You can download the latest HP ProLiant DL185 Generation 5 server BIOS at www.hp.com. NOTE: For ease of reading, the HP ProLiant DL185 Generation 5 Server Support CD will be simply referred to as the "Support CD." Installing Microsoft Windows NOS The procedures in this section apply to all Microsoft Windows NOS versions supported by your ProLiant server. Refer to Table 23 on page 40 for a list of these NOS versions. CAUTION: If you install the default ATA driver from the installation CD, you must change the SATA mode setting in the Serial ATA submenu from SATA to PATA; otherwise, the operating system kernel will hang. Pre-installation instructions 1. Complete the NOS pre-installation procedure listed on page 40. 2. Have the following installation requirements on hand: ○ HP ProLiant DL185 Generation 5 Server Support CD ○ The applicable Microsoft Windows NOS CD-ROM(s) ○ Six blank, formatted 3.5-inch diskettes ○ A Windows PC that has a Floppy drive Optical media drive Browser that supports HTML ○ Two or more clients for testing purposes (optional) Installation flow 1. Create the driver diskettes using the Support CD. 2. Install the Microsoft Windows NOS. 3. Complete the installation-install the drivers for the chipsets, network, and VGA. 4. Configure the system. 5. Configure the network. 6. Install additional HP accessories. Section 1. Creating the driver diskettes To create the appropriate Windows NOS driver diskette: NOS installation 41
-
 1
1 -
2
-
3
-
4
-
5
-
6
-
7
-
8
-
9
-
10
-
11
-
12
-
13
-
14
-
15
-
16
-
17
-
18
-
19
-
20
-
21
-
22
-
23
-
24
-
25
-
26
-
27
-
28
-
29
-
30
-
31
-
32
-
33
-
34
-
35
-
 36
36 -
 37
37 -
 38
38 -
 39
39 -
 40
40 -
 41
41 -
 42
42 -
 43
43 -
 44
44 -
 45
45 -
 46
46 -
47
-
48
-
49
-
50
-
51
-
52
-
53
-
54
-
55
-
56
-
57
-
58
-
59
-
60
-
61
-
62
 |
 |