HP ProLiant DL185 HP ProLiant DL185 Generation 5 Server Software Configuration - Page 42
Installing Windows NOS
 |
View all HP ProLiant DL185 manuals
Add to My Manuals
Save this manual to your list of manuals |
Page 42 highlights
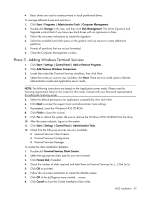
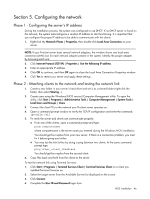
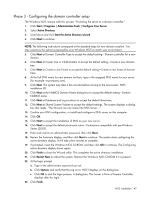
1. Insert one blank, formatted 3.5" diskette into the floppy drive. 2. Insert the Support CD into the optical media drive. By default, the Support CD automatically runs and displays the Welcome page. However, if this does not occur, double-click the Startup.htm file located on the root directory of the Support CD. 3. Follow the on-screen instructions to create the Windows NOS driver diskette. 4. Label, date, and save the driver diskette as HP disk [Windows NOS version]. Section 2. Installing Windows NOS 1. Boot the server from the Windows NOS CD-ROM. The Setup is inspecting your hardware configuration message displays; then the Setup screen displays. The message prompt Press F6 if you need to install a third party SCSI or RAID controller is displayed briefly on the bottom of the Setup screen. Press F6 if you want to install a third party controller; otherwise, proceed to step 2. NOTE: If you missed pressing F6 before the message is invalidated, you need to reboot the system to display the message prompt again. 2. Follow the procedures corresponding to the type of hard disk that is installed in the server. 3. At the Welcome to Setup screen, press Enter to continue. 4. Press F8 to accept the licensing agreement. 5. At the drives partitioning screen, select the target drive. If you want to use the entire drive to install the Windows NOS, press Enter. Otherwise, press C to create a drive partition. NOTE: Windows Server 2003 does not have the 2-GB limitation present in Windows NT 4.0. In this example, we will create a 10-GB partition. a. Press C to create a partition. b. At the Create partition size prompt, type 10240, then press Enter. c. Select unpartitioned space and press C again to create additional partitions. HP recommends that you create all the partitions needed for each hard drive present on your system. 6. Select the target drive to be used to install the Windows NOS, then press Enter. 7. On the next screen, select Format the partition using the NTFS file system, then press Enter. The installer formats and copies files to the hard drive, after which the system reboots and launches the Windows NOS graphic interface. Be sure to remove the Windows NOS CD-ROM before rebooting. You can now customize your installation using the graphical interface. NOTE: The network settings may need to be customized to your environment. Refer to the Windows NOS manual should you need further details on the networking settings. 8. After completing the customization phase, click Next to proceed with the installation. The installation status is indicated by the Install Network progress bar. This may take some time. After the installation is completed, the system automatically reboots. NOS installation 42
-
 1
1 -
2
-
3
-
4
-
5
-
6
-
7
-
8
-
9
-
10
-
11
-
12
-
13
-
14
-
15
-
16
-
17
-
18
-
19
-
20
-
21
-
22
-
23
-
24
-
25
-
26
-
27
-
28
-
29
-
30
-
31
-
32
-
33
-
34
-
35
-
36
-
 37
37 -
 38
38 -
 39
39 -
 40
40 -
 41
41 -
 42
42 -
 43
43 -
 44
44 -
 45
45 -
 46
46 -
 47
47 -
48
-
49
-
50
-
51
-
52
-
53
-
54
-
55
-
56
-
57
-
58
-
59
-
60
-
61
-
62
 |
 |
