HP ProLiant DL388e HP ProLiant DL388e Gen8 Server User Guide - Page 21
Remove the security bezel (optional), Remove the access panel, Install the access panel
 |
View all HP ProLiant DL388e manuals
Add to My Manuals
Save this manual to your list of manuals |
Page 21 highlights
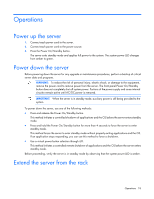
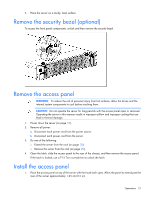
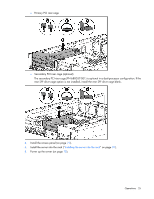
5. Place the server on a sturdy, level surface. Remove the security bezel (optional) To access the front panel components, unlock and then remove the security bezel. Remove the access panel WARNING: To reduce the risk of personal injury from hot surfaces, allow the drives and the internal system components to cool before touching them. CAUTION: Do not operate the server for long periods with the access panel open or removed. Operating the server in this manner results in improper airflow and improper cooling that can lead to thermal damage. 1. Power down the server (on page 18). 2. Remove all power: a. Disconnect each power cord from the power source. b. Disconnect each power cord from the server. 3. Do one of the following: o Extend the server from the rack (on page 18). o Remove the server from the rack (on page 20). 4. Open the latch, slide the access panel to the rear of the chassis, and then remove the access panel. If the latch is locked, use a T-15 Torx screwdriver to unlock the latch. Install the access panel 1. Place the access panel on top of the server with the hood latch open. Allow the panel to extend past the rear of the server approximately 1.25 cm (0.5 in). Operations 21
-
 1
1 -
2
-
3
-
4
-
5
-
6
-
7
-
8
-
9
-
10
-
11
-
12
-
13
-
14
-
15
-
 16
16 -
 17
17 -
 18
18 -
 19
19 -
 20
20 -
 21
21 -
 22
22 -
 23
23 -
 24
24 -
 25
25 -
 26
26 -
27
-
28
-
29
-
30
-
31
-
32
-
33
-
34
-
35
-
36
-
37
-
38
-
39
-
40
-
41
-
42
-
43
-
44
-
45
-
46
-
47
-
48
-
49
-
50
-
51
-
52
-
53
-
54
-
55
-
56
-
57
-
58
-
59
-
60
-
61
-
62
-
63
-
64
-
65
-
66
-
67
-
68
-
69
-
70
-
71
-
72
-
73
-
74
-
75
-
76
-
77
-
78
-
79
-
80
-
81
-
82
-
83
-
84
-
85
-
86
-
87
-
88
-
89
-
90
-
91
-
92
-
93
-
94
-
95
-
96
-
97
-
98
-
99
-
100
-
101
-
102
-
103
-
104
-
105
-
106
-
107
-
108
-
109
-
110
-
111
-
112
-
113
-
114
-
115
-
116
-
117
-
118
-
119
-
120
-
121
-
122
-
123
-
124
-
125
-
126
-
127
-
128
-
129
-
130
-
131
-
132
-
133
-
134
-
135
-
136
-
137
-
138
-
139
-
140
 |
 |
