HP Q6651C HP Designjet Z6100 Printer Series - User's Guide - Page 109
Identify a job in the queue, Delete a job from the queue, Make copies of a job in the queue,
 |
View all HP Q6651C manuals
Add to My Manuals
Save this manual to your list of manuals |
Page 109 highlights
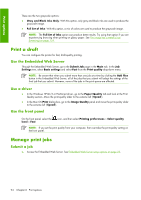
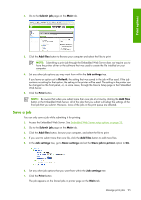
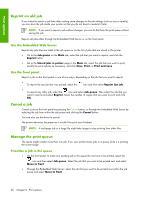
Print options NOTE: If nesting is turned on, the prioritized job might remain nested with others. If you want only this job to be printed next, and on its own on the roll, first turn nesting off and then move the job to the front of the queue as described. Identify a job in the queue The best way to look at the queue is through the Embedded Web Server, on the Jobs queue page on the Main tab. Manage the queue and get full information about every job by clicking the name of the file. You can also manage the queue on the front panel. To do so, select the icon and then select Job queue. You can see a list of the jobs in the queue, each with an icon depicting its status as pending, active, done, or cancelled. Delete a job from the queue Under normal circumstances, you do not need to delete a job from the queue after printing it, because it will leave the queue as more files are sent. However, if you have sent a file in error and want to avoid the chance that it will be reprinted, you can delete it by selecting it and then selecting Delete through the Embedded Web Server or on the front panel. In the same way, you can delete a job that has not been printed yet. If the job is currently being printed (status = printing) and you want to both cancel the job and delete it, first click the Cancel icon in the Web server or press the Cancel button on the front panel, and then delete the job from the queue. Make copies of a job in the queue To make extra copies of any job in the queue, select the job through the Embedded Web Server and click the Reprint button, and then specify the number of copies that you want. The job moves to the top of the queue. You can also do this on the front panel: select the icon and then select Job queue. Select the job, select Copies, and then specify the number of copies that you want and press the OK button. This overrides any value set in your software. NOTE: If Rotate was On when you sent the file, every copy will be rotated. If the job has already been printed, use Move to front to move it to the top of the queue. Understand job status These are the possible job status messages, in the approximate order in which they appear: ● receiving: the printer is receiving the job from the computer. ● waiting to process: the job has been received by the printer and is waiting to be rendered (only for jobs submitted through the Embedded Web Server.) ● processing: the printer is parsing and rendering the job. ● preparing to print: the printer is performing writing system checks before printing the job. ● waiting to print: the job is waiting for the print engine to become available to proceed with printing. Manage print jobs 97
-
 1
1 -
2
-
3
-
4
-
5
-
6
-
7
-
8
-
9
-
10
-
11
-
12
-
13
-
14
-
15
-
16
-
17
-
18
-
19
-
20
-
21
-
22
-
23
-
24
-
25
-
26
-
27
-
28
-
29
-
30
-
31
-
32
-
33
-
34
-
35
-
36
-
37
-
38
-
39
-
40
-
41
-
42
-
43
-
44
-
45
-
46
-
47
-
48
-
49
-
50
-
51
-
52
-
53
-
54
-
55
-
56
-
57
-
58
-
59
-
60
-
61
-
62
-
63
-
64
-
65
-
66
-
67
-
68
-
69
-
70
-
71
-
72
-
73
-
74
-
75
-
76
-
77
-
78
-
79
-
80
-
81
-
82
-
83
-
84
-
85
-
86
-
87
-
88
-
89
-
90
-
91
-
92
-
93
-
94
-
95
-
96
-
97
-
98
-
99
-
100
-
101
-
102
-
103
-
 104
104 -
 105
105 -
 106
106 -
 107
107 -
 108
108 -
 109
109 -
 110
110 -
 111
111 -
 112
112 -
 113
113 -
 114
114 -
115
-
116
-
117
-
118
-
119
-
120
-
121
-
122
-
123
-
124
-
125
-
126
-
127
-
128
-
129
-
130
-
131
-
132
-
133
-
134
-
135
-
136
-
137
-
138
-
139
-
140
-
141
-
142
-
143
-
144
-
145
-
146
-
147
-
148
-
149
-
150
-
151
-
152
-
153
-
154
-
155
-
156
-
157
-
158
-
159
-
160
-
161
-
162
-
163
-
164
-
165
-
166
-
167
-
168
-
169
-
170
-
171
-
172
-
173
-
174
-
175
-
176
-
177
-
178
-
179
-
180
-
181
-
182
-
183
-
184
-
185
-
186
-
187
-
188
-
189
-
190
-
191
-
192
-
193
-
194
-
195
-
196
-
197
-
198
-
199
-
200
-
201
-
202
-
203
-
204
-
205
-
206
-
207
-
208
-
209
-
210
-
211
-
212
-
213
-
214
-
215
-
216
-
217
-
218
-
219
-
220
-
221
-
222
-
223
-
224
-
225
-
226
-
227
-
228
-
229
-
230
-
231
-
232
 |
 |
