HP Q6651C HP Designjet Z6100 Printer Series - User's Guide - Page 86
Replace maintenance ctg
 |
View all HP Q6651C manuals
Add to My Manuals
Save this manual to your list of manuals |
Page 86 highlights
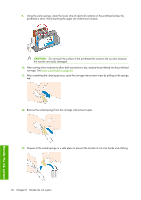
WARNING! Make sure that the printer wheels are locked (the brake lever is pressed down) to prevent the printer from moving. 1. On the printer's front panel, select the icon, and then select Replace maintenance ctg. 2. The maintenance cartridge is located in a slot underneath the front panel, at the front of the printer. Open the door. 3. The maintenance cartridge has a handle on the front. To remove the cartridge, press inward and upward as indicated by the arrow, until the cartridge is released. 4. Lift up the maintenance cartridge to remove it from the slot, and slide it out. Handle the ink system See also Insert the maintenance cartridge on page 75. 74 Chapter 5 Handle the ink system
-
 1
1 -
2
-
3
-
4
-
5
-
6
-
7
-
8
-
9
-
10
-
11
-
12
-
13
-
14
-
15
-
16
-
17
-
18
-
19
-
20
-
21
-
22
-
23
-
24
-
25
-
26
-
27
-
28
-
29
-
30
-
31
-
32
-
33
-
34
-
35
-
36
-
37
-
38
-
39
-
40
-
41
-
42
-
43
-
44
-
45
-
46
-
47
-
48
-
49
-
50
-
51
-
52
-
53
-
54
-
55
-
56
-
57
-
58
-
59
-
60
-
61
-
62
-
63
-
64
-
65
-
66
-
67
-
68
-
69
-
70
-
71
-
72
-
73
-
74
-
75
-
76
-
77
-
78
-
79
-
80
-
 81
81 -
 82
82 -
 83
83 -
 84
84 -
 85
85 -
 86
86 -
 87
87 -
 88
88 -
 89
89 -
 90
90 -
 91
91 -
92
-
93
-
94
-
95
-
96
-
97
-
98
-
99
-
100
-
101
-
102
-
103
-
104
-
105
-
106
-
107
-
108
-
109
-
110
-
111
-
112
-
113
-
114
-
115
-
116
-
117
-
118
-
119
-
120
-
121
-
122
-
123
-
124
-
125
-
126
-
127
-
128
-
129
-
130
-
131
-
132
-
133
-
134
-
135
-
136
-
137
-
138
-
139
-
140
-
141
-
142
-
143
-
144
-
145
-
146
-
147
-
148
-
149
-
150
-
151
-
152
-
153
-
154
-
155
-
156
-
157
-
158
-
159
-
160
-
161
-
162
-
163
-
164
-
165
-
166
-
167
-
168
-
169
-
170
-
171
-
172
-
173
-
174
-
175
-
176
-
177
-
178
-
179
-
180
-
181
-
182
-
183
-
184
-
185
-
186
-
187
-
188
-
189
-
190
-
191
-
192
-
193
-
194
-
195
-
196
-
197
-
198
-
199
-
200
-
201
-
202
-
203
-
204
-
205
-
206
-
207
-
208
-
209
-
210
-
211
-
212
-
213
-
214
-
215
-
216
-
217
-
218
-
219
-
220
-
221
-
222
-
223
-
224
-
225
-
226
-
227
-
228
-
229
-
230
-
231
-
232
 |
 |

WARNING!
Make sure that the printer wheels are locked (the brake lever is pressed down) to
prevent the printer from moving.
1
.
On the printer's front panel, select the
icon, and then select
Replace maintenance ctg
.
2
.
The maintenance cartridge is located in a slot underneath the front panel, at the front of the printer.
Open the door.
3
.
The maintenance cartridge has a handle on the front. To remove the cartridge, press inward and
upward as indicated by the arrow, until the cartridge is released.
4
.
Lift up the maintenance cartridge to remove it from the slot, and slide it out.
See also
Insert the maintenance cartridge
on page
75
.
74
Chapter
5
Handle the ink system
Handle the ink system