HP Q6651C HP Designjet Z6100 Printer Series - User's Guide - Page 135
Overview, Resize an image by using Adobe Photoshop HP-GL, and PostScript driver
 |
View all HP Q6651C manuals
Add to My Manuals
Save this manual to your list of manuals |
Page 135 highlights
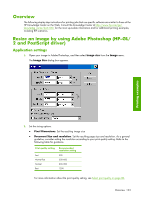
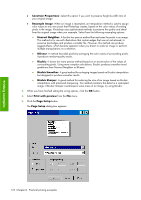
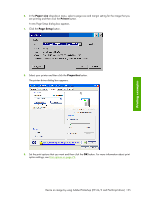
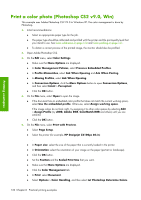
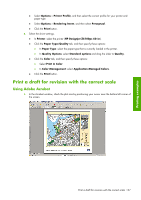
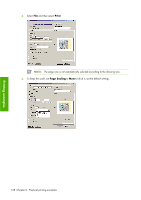
Overview The following step-by-step instructions for printing jobs that use specific software are similar to those at the HP Knowledge Center on the Web. Consult the Knowledge Center at http://www.hp.com/go/ knowledge_center/djz6100/ for the most up-to-date information and for additional printing examples, including RIP scenarios. Resize an image by using Adobe Photoshop (HP-GL/ 2 and PostScript driver) Application settings 1. Open your image in Adobe Photoshop, and then select Image size from the Image menu. The Image Size dialog box appears. Printing examples 2. Set the sizing options. ● Pixel Dimensions: Set the resulting image size ● Document Size and resolution: Set the resulting page size and resolution. As a general guideline, consider setting the resolution according to your print quality setting. Refer to the following table for guidance. Print quality setting Fast Normal-Fast Normal Best Recommended resolution setting 300 300-600 600-900 1200 For more information about the print quality setting, see Select print quality on page 80. Overview 123
-
 1
1 -
2
-
3
-
4
-
5
-
6
-
7
-
8
-
9
-
10
-
11
-
12
-
13
-
14
-
15
-
16
-
17
-
18
-
19
-
20
-
21
-
22
-
23
-
24
-
25
-
26
-
27
-
28
-
29
-
30
-
31
-
32
-
33
-
34
-
35
-
36
-
37
-
38
-
39
-
40
-
41
-
42
-
43
-
44
-
45
-
46
-
47
-
48
-
49
-
50
-
51
-
52
-
53
-
54
-
55
-
56
-
57
-
58
-
59
-
60
-
61
-
62
-
63
-
64
-
65
-
66
-
67
-
68
-
69
-
70
-
71
-
72
-
73
-
74
-
75
-
76
-
77
-
78
-
79
-
80
-
81
-
82
-
83
-
84
-
85
-
86
-
87
-
88
-
89
-
90
-
91
-
92
-
93
-
94
-
95
-
96
-
97
-
98
-
99
-
100
-
101
-
102
-
103
-
104
-
105
-
106
-
107
-
108
-
109
-
110
-
111
-
112
-
113
-
114
-
115
-
116
-
117
-
118
-
119
-
120
-
121
-
122
-
123
-
124
-
125
-
126
-
127
-
128
-
129
-
 130
130 -
 131
131 -
 132
132 -
 133
133 -
 134
134 -
 135
135 -
 136
136 -
 137
137 -
 138
138 -
 139
139 -
 140
140 -
141
-
142
-
143
-
144
-
145
-
146
-
147
-
148
-
149
-
150
-
151
-
152
-
153
-
154
-
155
-
156
-
157
-
158
-
159
-
160
-
161
-
162
-
163
-
164
-
165
-
166
-
167
-
168
-
169
-
170
-
171
-
172
-
173
-
174
-
175
-
176
-
177
-
178
-
179
-
180
-
181
-
182
-
183
-
184
-
185
-
186
-
187
-
188
-
189
-
190
-
191
-
192
-
193
-
194
-
195
-
196
-
197
-
198
-
199
-
200
-
201
-
202
-
203
-
204
-
205
-
206
-
207
-
208
-
209
-
210
-
211
-
212
-
213
-
214
-
215
-
216
-
217
-
218
-
219
-
220
-
221
-
222
-
223
-
224
-
225
-
226
-
227
-
228
-
229
-
230
-
231
-
232
 |
 |
