HP Q6651C HP Designjet Z6100 Printer Series - User's Guide - Page 80
on the front panel. See
 |
View all HP Q6651C manuals
Add to My Manuals
Save this manual to your list of manuals |
Page 80 highlights
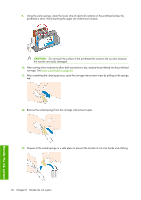
2. Open the carriage interconnect wiper. 3. Load the sponge by positioning the sponge on the face of the carriage interconnect wiper with the shorter tab in the locating slot. 4. Close the carriage interconnect wiper, trapping the sponge in place. 5. Open the printhead carriage latch and extract the printhead that is causing the problem, as indicated on the front panel. See Remove a printhead on page 61. 68 Chapter 5 Handle the ink system Handle the ink system
-
 1
1 -
2
-
3
-
4
-
5
-
6
-
7
-
8
-
9
-
10
-
11
-
12
-
13
-
14
-
15
-
16
-
17
-
18
-
19
-
20
-
21
-
22
-
23
-
24
-
25
-
26
-
27
-
28
-
29
-
30
-
31
-
32
-
33
-
34
-
35
-
36
-
37
-
38
-
39
-
40
-
41
-
42
-
43
-
44
-
45
-
46
-
47
-
48
-
49
-
50
-
51
-
52
-
53
-
54
-
55
-
56
-
57
-
58
-
59
-
60
-
61
-
62
-
63
-
64
-
65
-
66
-
67
-
68
-
69
-
70
-
71
-
72
-
73
-
74
-
 75
75 -
 76
76 -
 77
77 -
 78
78 -
 79
79 -
 80
80 -
 81
81 -
 82
82 -
 83
83 -
 84
84 -
 85
85 -
86
-
87
-
88
-
89
-
90
-
91
-
92
-
93
-
94
-
95
-
96
-
97
-
98
-
99
-
100
-
101
-
102
-
103
-
104
-
105
-
106
-
107
-
108
-
109
-
110
-
111
-
112
-
113
-
114
-
115
-
116
-
117
-
118
-
119
-
120
-
121
-
122
-
123
-
124
-
125
-
126
-
127
-
128
-
129
-
130
-
131
-
132
-
133
-
134
-
135
-
136
-
137
-
138
-
139
-
140
-
141
-
142
-
143
-
144
-
145
-
146
-
147
-
148
-
149
-
150
-
151
-
152
-
153
-
154
-
155
-
156
-
157
-
158
-
159
-
160
-
161
-
162
-
163
-
164
-
165
-
166
-
167
-
168
-
169
-
170
-
171
-
172
-
173
-
174
-
175
-
176
-
177
-
178
-
179
-
180
-
181
-
182
-
183
-
184
-
185
-
186
-
187
-
188
-
189
-
190
-
191
-
192
-
193
-
194
-
195
-
196
-
197
-
198
-
199
-
200
-
201
-
202
-
203
-
204
-
205
-
206
-
207
-
208
-
209
-
210
-
211
-
212
-
213
-
214
-
215
-
216
-
217
-
218
-
219
-
220
-
221
-
222
-
223
-
224
-
225
-
226
-
227
-
228
-
229
-
230
-
231
-
232
 |
 |

2
.
Open the carriage interconnect wiper.
3
.
Load the sponge by positioning the sponge on the face of the carriage interconnect wiper with the
shorter tab in the locating slot.
4
.
Close the carriage interconnect wiper, trapping the sponge in place.
5
.
Open the printhead carriage latch and extract the printhead that is causing the problem, as indicated
on the front panel. See
Remove a printhead
on page
61
.
68
Chapter
5
Handle the ink system
Handle the ink system