HP Q6651C HP Designjet Z6100 Printer Series - User's Guide - Page 84
Interpret the Printhead status plot
 |
View all HP Q6651C manuals
Add to My Manuals
Save this manual to your list of manuals |
Page 84 highlights
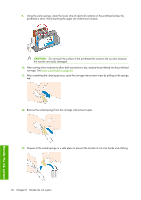
Interpret the Printhead status plot The print is divided into two parts, both of which test printhead performance. ● Part 1 (top) consists of rectangles of pure colors, one for each printhead. This part represents the print quality that you will get from each color. ● Part 2 (bottom) consists of small dashes, one for each nozzle on each printhead. This part complements the first, and detects how many faulty nozzles are on each printhead. First look at the top part of the print. Each colored rectangle should be a uniform color without any horizontal lines across it. Then look at the bottom part of the print. For each individual colored pattern, make sure that most of the dashes are present. If you see horizontal lines in the top part and also see missing dashes in the bottom part for the same color, the printhead for that color needs to be cleaned. However, if the rectangles look solid, do not worry about a few missing dashes in the bottom part, because the printer can compensate for a few clogged nozzles. The graphic shown illustrates printhead 2 in a bad state: 72 Chapter 5 Handle the ink system Handle the ink system
-
 1
1 -
2
-
3
-
4
-
5
-
6
-
7
-
8
-
9
-
10
-
11
-
12
-
13
-
14
-
15
-
16
-
17
-
18
-
19
-
20
-
21
-
22
-
23
-
24
-
25
-
26
-
27
-
28
-
29
-
30
-
31
-
32
-
33
-
34
-
35
-
36
-
37
-
38
-
39
-
40
-
41
-
42
-
43
-
44
-
45
-
46
-
47
-
48
-
49
-
50
-
51
-
52
-
53
-
54
-
55
-
56
-
57
-
58
-
59
-
60
-
61
-
62
-
63
-
64
-
65
-
66
-
67
-
68
-
69
-
70
-
71
-
72
-
73
-
74
-
75
-
76
-
77
-
78
-
 79
79 -
 80
80 -
 81
81 -
 82
82 -
 83
83 -
 84
84 -
 85
85 -
 86
86 -
 87
87 -
 88
88 -
 89
89 -
90
-
91
-
92
-
93
-
94
-
95
-
96
-
97
-
98
-
99
-
100
-
101
-
102
-
103
-
104
-
105
-
106
-
107
-
108
-
109
-
110
-
111
-
112
-
113
-
114
-
115
-
116
-
117
-
118
-
119
-
120
-
121
-
122
-
123
-
124
-
125
-
126
-
127
-
128
-
129
-
130
-
131
-
132
-
133
-
134
-
135
-
136
-
137
-
138
-
139
-
140
-
141
-
142
-
143
-
144
-
145
-
146
-
147
-
148
-
149
-
150
-
151
-
152
-
153
-
154
-
155
-
156
-
157
-
158
-
159
-
160
-
161
-
162
-
163
-
164
-
165
-
166
-
167
-
168
-
169
-
170
-
171
-
172
-
173
-
174
-
175
-
176
-
177
-
178
-
179
-
180
-
181
-
182
-
183
-
184
-
185
-
186
-
187
-
188
-
189
-
190
-
191
-
192
-
193
-
194
-
195
-
196
-
197
-
198
-
199
-
200
-
201
-
202
-
203
-
204
-
205
-
206
-
207
-
208
-
209
-
210
-
211
-
212
-
213
-
214
-
215
-
216
-
217
-
218
-
219
-
220
-
221
-
222
-
223
-
224
-
225
-
226
-
227
-
228
-
229
-
230
-
231
-
232
 |
 |
