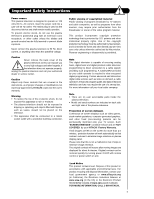
Hitachi P50X901 Owners Guide - Page 5
How To Set Up Your New Hitachi Plasma Television - flat panel
 |
View all Hitachi P50X901 manuals
Add to My Manuals
Save this manual to your list of manuals |
Page 5 highlights
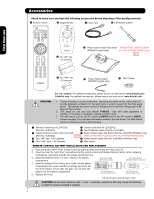
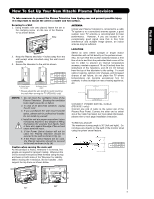
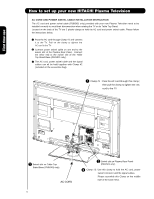
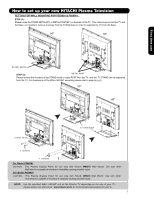
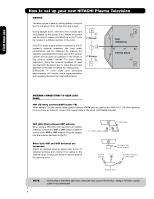
First time use How To Set Up Your New Hitachi Plasma Television To take measures to prevent the Plasma Television from tipping over and prevent possible injury it is important to mount the unit in a stable and flat surface. Securing to a Wall 1. Using metallic wire (two places) fasten the set to the clamping screw on the rear of the Plasma TV as shown below. Wire ANTENNA Unless your Plasma Television is connected to a cable TV system or to a centralized antenna system, a good outdoor color TV antenna is recommended for best performance. However, if you are located in an exceptionally good signal area that is free from interference and multiple image ghosts, an indoor antenna may be sufficient. 2. Keep the Plasma television 4 inches away from the wall except when mounted using the wall mount bracket. 3. Secure the television to the wall as shown. A B A 50" 4 in. 10 cm A 60" 4 in. 10 cm B 12 in. 30 cm B 12 in. 30 cm (a) Power Swivel NOT USED (b) Power Swivel USED * Please adjust the wire length to avoid touching the wall when turning the TV (P50X901 only). NOTES: 1. Do not block the ventilation holes of the Plasma Television. Blocking the ventilation holes might cause fire or defect. 2. In case of an abnormal symptom, unplug the AC cord. 3. If you purchased the wall mount bracket option, please ask for professional installer. Do not install by yourself. 4. Install the unit at a proper area where it does not expose anyone to any danger of hitting themselves (for example their hands, head or face, etc.) against the edge of the unit and cause personal injury. 5. If the Power Swivel feature will not be used, the Plasma television should be secured to the wall as shown in fig. (a). 6. If the Power Swivel feature will be used, the Plasma television should be secured to the wall as shown in fig. (b). Caution when moving the main unit As this product is heavy, whenever it is moved, two people are required to transport it safely. Whenever the unit is moved it should be lifted forward using the top and base on both sides of the Television for stability. When moving the Television, lift the handles , then support the top frame as shown below. LOCATION Select an area where sunlight or bright indoor illumination will not fall directly on the picture screen. Also, be sure that the location selected allows a free flow of air to and from the perforated back cover of the set. In order to prevent an internal temperature increase, maintain a space of 10 cm (4 inches) from the sides/back of the Television, and 30 cm (12 inches) from the top of the television to the ceiling. To avoid cabinet warping, cabinet color changes, and increased chance of set failure, do not place the TV where temperatures can become excessively hot, for example, in direct sunlight or near a heating appliance, etc. 30 cm (12 inches) 10 cm (4 inches) 10 cm (4 inches) CONNECT POWER SWIVEL CABLE (P50X901 only) Connect one end of cable to the swivel slot of the Plasma Rear Panel. Connect the other end to swivel slot of the Table Top Stand. For more detail information, please refer to next page installation instruction. TURNING ANGLE The maximum turning angle is 30° (left and right). Do not place any objects on the path of the monitor when using the power swivel feature. C C D 50" 10.8 in. 15.35 in. D 27.5 cm 39 cm 60" 50" 5
-
 1
1 -
 2
2 -
 3
3 -
 4
4 -
 5
5 -
 6
6 -
 7
7 -
 8
8 -
 9
9 -
 10
10 -
 11
11 -
12
-
13
-
14
-
15
-
16
-
17
-
18
-
19
-
20
-
21
-
22
-
23
-
24
-
25
-
26
-
27
-
28
-
29
-
30
-
31
-
32
-
33
-
34
-
35
-
36
-
37
-
38
-
39
-
40
-
41
-
42
-
43
-
44
-
45
-
46
-
47
-
48
-
49
-
50
-
51
-
52
-
53
-
54
-
55
-
56
-
57
-
58
-
59
-
60
-
61
-
62
-
63
-
64
-
65
-
66
-
67
-
68
-
69
-
70
-
71
-
72
-
73
-
74
-
75
-
76
-
77
-
78
-
79
-
80
-
81
-
82
-
83
-
84
-
85
-
86
-
87
-
88
-
89
-
90
-
91
-
92
-
93
-
94
-
95
-
96
-
97
-
98
-
99
-
100
-
101
-
102
-
103
-
104
-
105
-
106
-
107
-
108
-
109
-
110
-
111
-
112
-
113
-
114
-
115
-
116
-
117
-
118
-
119
-
120
-
121
-
122
-
123
-
124
-
125
-
126
-
127
-
128
-
129
-
130
-
131
-
132
-
133
-
134
-
135
-
136
-
137
-
138
-
139
-
140
-
141
-
142
-
143
-
144
-
145
-
146
-
147
-
148
-
149
-
150
-
151
-
152
-
153
-
154
-
155
-
156
-
157
-
158
-
159
-
160
-
161
-
162
-
163
-
164
-
165
-
166
-
167
-
168
-
169
-
170
-
171
-
172
-
173
-
174
-
175
-
176
-
177
-
178
-
179
-
180
-
181
-
182
-
183
-
184
-
185
-
186
-
187
-
188
-
189
-
190
-
191
-
192
 |
 |