Hitachi P50X901 Owners Guide - Page 73
Select the Test button VOL
 |
View all Hitachi P50X901 manuals
Add to My Manuals
Save this manual to your list of manuals |
Page 73 highlights
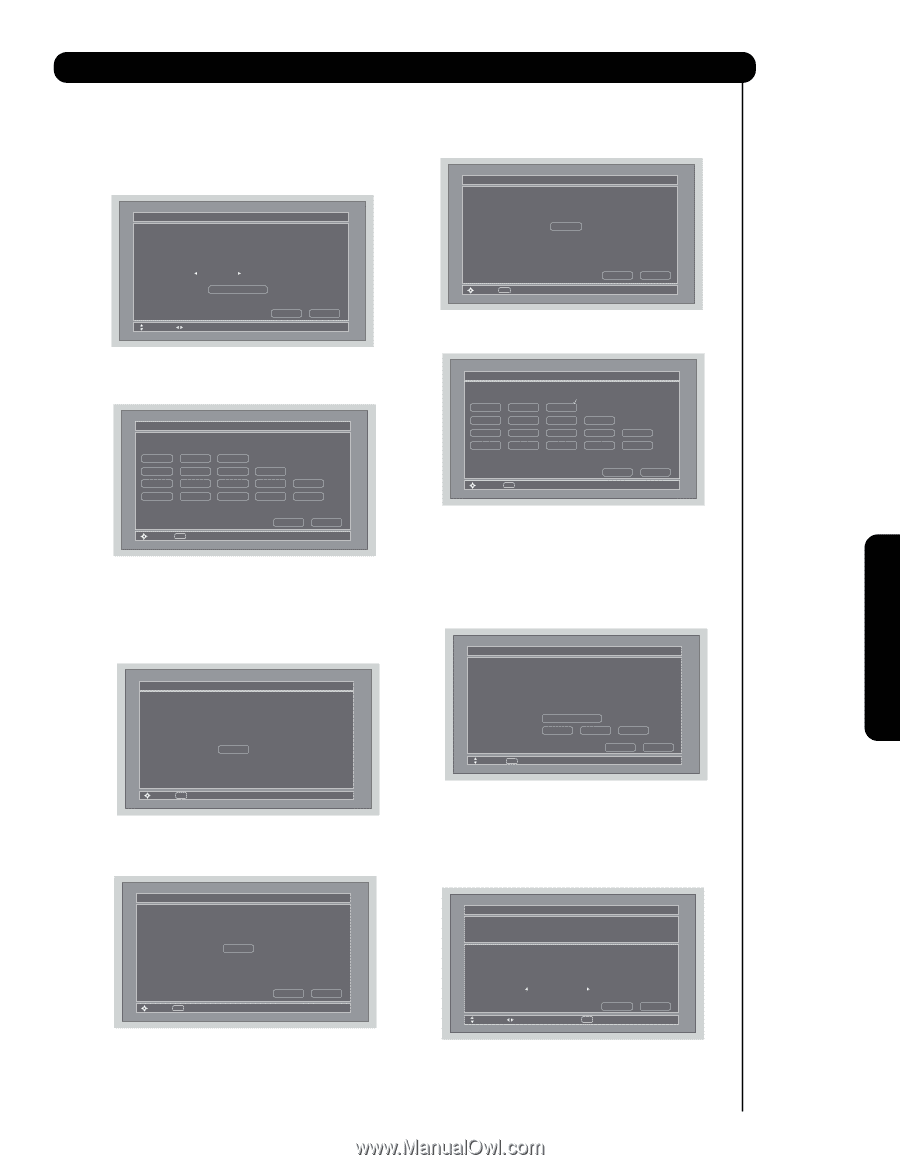
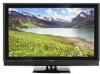
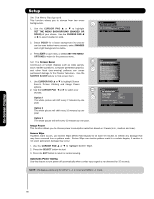
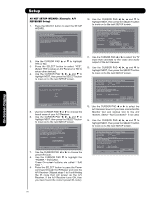
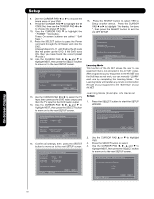
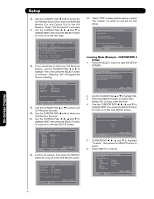
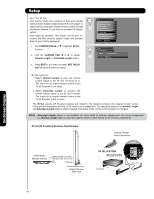
Setup 5. Use the CURSOR PAD ̇ or ̈ to select "Other" from brand name choices. 6. Use the CURSOR PAD ̆ or ̄ to highlight "Learning Mode" then press the SELECT button. AV Net Setup Wizard : A/V Receiver Setup Please choose the B rand Name of your A/V Receiver. If you can not find the B rand Name, please choose "Other" and proceed to the Learning mode by pushing the Learning Mode B utton. B rand Name Other Learning Mode Move Change B rand Name B ack Next 7. Use the CURSOR PAD ̇, ̈, ̆ and ̄ to select the Soft Key to learn (Ex. VOL ̆), then press the SELECT button. AV Net Setup Wizard : Custom Settings Select the A/V Receiver softkey to learn? TV Softkeys POWER CH̆ VOL̆ MUTE CH̄ VOL̄ AUDIO SOURCE 1 SOURCE 2 SOURCE 3 SOURCE 4 SOURCE 5 SOURCE 6 SOURCE 7 SOURCE 8 SOURCE 9 SOURCE 10 Move SEL Select B ack Done 8. Press and hold the VOL ̆ button of your A/V Receiver remote control while pointing directly at the learning AV NET sensor of the Plasma TV (located at the lower right corner of the screen) at a distance of 3.2 feet or 1 meter maximum. AV Net Setup Wizard : A/V Receiver Setup Press and hold desired button to transfer the command to AV NET. VOL̆ Please wait while AV NET Learns the command.... Move SEL Select 9. If the IR code transfer was not completed, the screen below appears. Repeat step 8 to try again. AV Net Setup Wizard : A/V Receiver Setup VOL̆ Transfer not completed! Try again? Move SEL Select Cancel OK 10. If the IR code transfer was successful, the screen below appears, then select "OK" to continue setup. AV Net Setup Wizard : A/V Receiver Setup VOL̆ Transfer was successful. Press OK to store and continue. Move SEL Select Cancel OK 11. Select another Soft Key to learn or select DONE to move on to the next screen. AV Net Setup Wizard : Custom Settings Select the A/V Receiver softkey to learn? TV Softkeys POWER CH̆ VOL̆ MUTE CH̄ VOL̄ AUDIO SOURCE 1 SOURCE 2 SOURCE 3 SOURCE 4 SOURCE 5 SOURCE 6 SOURCE 7 SOURCE 8 SOURCE 9 SOURCE 10 Move SEL Select B ack Done 12. Select the Test button VOL ̆ to check the response of the device to this command. Test Buttons will show you first learned keys with a maximum of 3. 13. Use the CURSOR PAD ̇, ̈, ̆ and ̄ to highlight NEXT, then press the SELECT button to move on to the next SETUP screen. AV Net Setup Wizard : A/V Receiver Setup Select the Test button. If device responds to this command, proceed to "Next". Otherwise, try another IR Code Set number. B rand Name IR Code Set Test B utton Other Other Learning Mode VOL ̆ Move SEL IR Out B ack Next 14. Use the CURSOR PAD ̇ or ̈ to select the TV Input that connects to the video and audio output of the A/V Receiver. 15. Use the CURSOR PAD ̇, ̈, ̆ and ̄ to highlight NEXT, then press the SELECT button to move on to the next SETUP screen. AV Net Setup Wizard : A/V Receiver Setup B rand Name IR Code Set Other Other TV Input Settings If you connect the video or audio output of the A/V Receiver to this TV, please select a TV Input. TV Input Not Connected Move Change Input B ack SEL Select Next On-Screen Display 73
-
 1
1 -
2
-
3
-
4
-
5
-
6
-
7
-
8
-
9
-
10
-
11
-
12
-
13
-
14
-
15
-
16
-
17
-
18
-
19
-
20
-
21
-
22
-
23
-
24
-
25
-
26
-
27
-
28
-
29
-
30
-
31
-
32
-
33
-
34
-
35
-
36
-
37
-
38
-
39
-
40
-
41
-
42
-
43
-
44
-
45
-
46
-
47
-
48
-
49
-
50
-
51
-
52
-
53
-
54
-
55
-
56
-
57
-
58
-
59
-
60
-
61
-
62
-
63
-
64
-
65
-
66
-
67
-
 68
68 -
 69
69 -
 70
70 -
 71
71 -
 72
72 -
 73
73 -
 74
74 -
 75
75 -
 76
76 -
 77
77 -
 78
78 -
79
-
80
-
81
-
82
-
83
-
84
-
85
-
86
-
87
-
88
-
89
-
90
-
91
-
92
-
93
-
94
-
95
-
96
-
97
-
98
-
99
-
100
-
101
-
102
-
103
-
104
-
105
-
106
-
107
-
108
-
109
-
110
-
111
-
112
-
113
-
114
-
115
-
116
-
117
-
118
-
119
-
120
-
121
-
122
-
123
-
124
-
125
-
126
-
127
-
128
-
129
-
130
-
131
-
132
-
133
-
134
-
135
-
136
-
137
-
138
-
139
-
140
-
141
-
142
-
143
-
144
-
145
-
146
-
147
-
148
-
149
-
150
-
151
-
152
-
153
-
154
-
155
-
156
-
157
-
158
-
159
-
160
-
161
-
162
-
163
-
164
-
165
-
166
-
167
-
168
-
169
-
170
-
171
-
172
-
173
-
174
-
175
-
176
-
177
-
178
-
179
-
180
-
181
-
182
-
183
-
184
-
185
-
186
-
187
-
188
-
189
-
190
-
191
-
192
 |
 |