Husqvarna AUTOMOWER 415X Owner Manual - Page 20
After the installation of the product, 10 Product settings, 11 Automower, Connect app
 |
View all Husqvarna AUTOMOWER 415X manuals
Add to My Manuals
Save this manual to your list of manuals |
Page 20 highlights
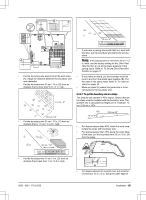
6. Push down the cover on the coupler with adjustable pliers to attach the wires in the coupler. 7. Put the boundary wire or the guide wire into position with stakes. 8. Connect the charging station to the power outlet. 3.9 After the installation of the product 3.9.1 To do a visual check of the charging station 1. Make sure that the indicator LED lamp on the charging station has a green light. work areas, but the settings can be adapted to the conditions for each work area. 3.11 Automower® Connect app The product can connect to mobile devices that have the Automower® Connect app installed. Automower® Connect is a free app for your mobile device. You can use the extended functions for the product in the Automower® Connect app. • The Dashboard shows the current operation of the product. You can select an operating mode for the product in the dashboard. • The Map shows the current position of the product and the set center point for the function. • In the Settings menu you can set the settings for the product. • In the Statistics menu you can see the statistics of the product. • In the Messages menu you can find the Fault messages and the Information messages of the product. 2. If the indicator LED lamp does not have a green light, do a check of the installation. Refer to Indicator lamp in the charging station on page 42 and To install the charging station on page 18. 3.9.2 To do the basic settings Before the product starts to operate for the first time, you must do the basic settings. 1. Put the product in the charging station. 2. Switch on the product. 3. Push the arrow buttons and the OK button. Select language, country, date, time and set a PIN code. Note: For some models, a factory PIN code is necessary before you select a personal PIN code. It is not possible to use 0000 as PIN code. 3.10 Product settings You can use the keypad and the display on the product or the Automower® Connect app to do the settings for the functions of the product. The functions of the product have factory settings that are applicable for almost all The Automower® Connect app has Long-range cellular connectivity and Short-range Bluetooth® connectivity. 3.11.1 To install the Automower® Connect app 1. Download the Automower® Connect app on your mobile device. 2. Sign up for a Husqvarna account in the Automower® Connect app. 3. An e-mail is sent to the registered e-mail address. Follow the instructions in the e-mail in less than 24 hours to validate your account. 4. Log in to your Husqvarna account in the Automower® Connect app. 20 - Installation 1650 - 005 - 17.03.2022
-
 1
1 -
2
-
3
-
4
-
5
-
6
-
7
-
8
-
9
-
10
-
11
-
12
-
13
-
14
-
 15
15 -
 16
16 -
 17
17 -
 18
18 -
 19
19 -
 20
20 -
 21
21 -
 22
22 -
 23
23 -
 24
24 -
 25
25 -
26
-
27
-
28
-
29
-
30
-
31
-
32
-
33
-
34
-
35
-
36
-
37
-
38
-
39
-
40
-
41
-
42
-
43
-
44
-
45
-
46
-
47
-
48
-
49
-
50
-
51
-
52
 |
 |
