Husqvarna AUTOMOWER 415X Owner Manual - Page 31
To use the ON/OFF button, WARNING, 2 To start the product, 3 To park the product
 |
View all Husqvarna AUTOMOWER 415X manuals
Add to My Manuals
Save this manual to your list of manuals |
Page 31 highlights
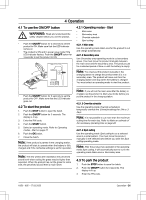
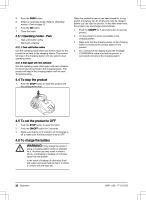
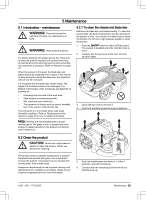
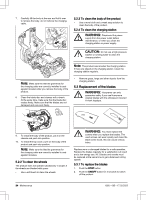
4 Operation 4.1 To use the ON/OFF button WARNING: Read and understand the safety chapter before you use the product. • Push the ON/OFF button for 3 seconds to set the product to ON. Make sure that the LED indicator comes on. • The product is ON and in power save mode if the LED indicator flashes. Push the ON/OFF button for 3 seconds to set the product to ON. 4.2.1 Operating modes - Start • Main area • Secondary area • Override schedule • Spot cutting 4.2.1.1 Main area Use the operating mode Main area for the product to cut and charge automatically. 4.2.1.2 Secondary area Use Secondary area operating mode to cut secondary areas. You must move the product manually between the main area and the secondary area. The product cuts for a selected period of time or until the battery is empty. Note: You must put the product manually in the charging station to charge the product when it is in a secondary area. The product will move out from the charging station and stop when the battery is charged. You must select an operating mode to start the product. • Push the ON/OFF button for 3 seconds to set the product to OFF. Make sure that the LED indicator goes out. 4.2 To start the product 1. Push the STOP button to open the hatch. 2. Push the ON/OFF button for 3 seconds. The display is lit up. 3. Enter the PIN code. 4. Push the START button. 5. Select an operating mode. Refer to Operating modes - Start on page 31. 6. Push the OK button. 7. Close the hatch. Note: If the product is parked in the charging station, the product will start to operate when the battery is fully charged and if the Schedule settings is set for operation Note: The first weeks after installation the perceived sound level when cutting the grass may be higher than expected. When the product has cut the grass for some time, the perceived sound level is much lower. Note: If you will cut the main area after the battery is charged, set the product to Main area mode before you put the product in the charging station. 4.2.1.3 Override schedule Use the operating mode Override schedule to temporarily override the Schedule settings for 24h or 3 days. Note: It is not possible to cut more than the maximum cutting time for each day. Refer to Make an estimate of the necessary operating time on page 22. 4.2.1.4 Spot cutting Use the operating mode Spot cutting to cut a selected area in a spiral pattern. You must move the product manually to the selected area before you start the Spot cutting operating mode. Note: After the product has operated in the operating mode Spot cutting, it will automatically start to cut in the operating mode Main area or Secondary area. 4.3 To park the product 1. Push the STOP button to open the hatch. 2. Push the ON/OFF button for 3 seconds. The display is lit up. 3. Enter the PIN code. 1650 - 005 - 17.03.2022 Operation - 31
-
 1
1 -
2
-
3
-
4
-
5
-
6
-
7
-
8
-
9
-
10
-
11
-
12
-
13
-
14
-
15
-
16
-
17
-
18
-
19
-
20
-
21
-
22
-
23
-
24
-
25
-
 26
26 -
 27
27 -
 28
28 -
 29
29 -
 30
30 -
 31
31 -
 32
32 -
 33
33 -
 34
34 -
 35
35 -
 36
36 -
37
-
38
-
39
-
40
-
41
-
42
-
43
-
44
-
45
-
46
-
47
-
48
-
49
-
50
-
51
-
52
 |
 |
