Husqvarna AUTOMOWER 415X Owner Manual - Page 32
To stop the product, 5 To set the product to OFF, 6 To charge the battery, WARNING
 |
View all Husqvarna AUTOMOWER 415X manuals
Add to My Manuals
Save this manual to your list of manuals |
Page 32 highlights
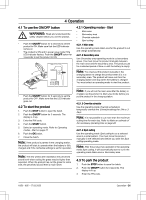
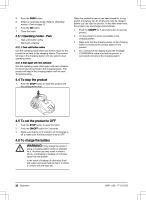
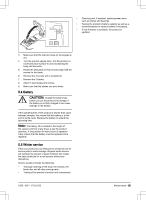
4. Push the PARK button. 5. Select an operating mode. Refer to Operating modes - Park on page 32. 6. Push the OK button. 7. Close the hatch. 4.3.1 Operating modes - Park • Park until further notice • Start with schedule 4.3.1.1 Park until further notice Use the operating mode Park until further notice for the product to go back to the charging station. The product will stay in the charging station until you select a new operating mode. 4.3.1.2 Start again with next schedule Use the operating mode Start again with next schedule for the product to go back to the charging station. The product will stay in the charging station until the next Schedule setting. 4.4 To stop the product 1. Push the STOP button to make the product and the cutting motor stop. When the product is new or has been stored for a long period, the battery can be empty and must be charged before you can start the product. In the Main area mode, the product cuts and charges automatically. 1. Push the ON/OFF for 3 seconds button to start the product. 2. Put the product in as far as possible in the charging station. 3. Make sure that the charging plates on the charging station connects to the contact plates on the product. 4. Do a check that the display shows the message CHARGING to make sure that the product is connected correctly to the charging station. 4.5 To set the product to OFF 1. Push the STOP button to open the hatch. 2. Push the ON/OFF button for 3 seconds. 3. Make sure that the LED indicator on the keypad is off to make sure that the product is set to OFF. 4.6 To charge the battery WARNING: Only charge the product using a charging station which is intended for it. Incorrect use may result in electric shock, overheating or leakage of corrosive liquid from the battery. In the event of leakage of electrolyte flush with water and seek medical help if it comes in contact with the eyes etc. 32 - Operation 1650 - 005 - 17.03.2022
-
 1
1 -
2
-
3
-
4
-
5
-
6
-
7
-
8
-
9
-
10
-
11
-
12
-
13
-
14
-
15
-
16
-
17
-
18
-
19
-
20
-
21
-
22
-
23
-
24
-
25
-
26
-
 27
27 -
 28
28 -
 29
29 -
 30
30 -
 31
31 -
 32
32 -
 33
33 -
 34
34 -
 35
35 -
 36
36 -
 37
37 -
38
-
39
-
40
-
41
-
42
-
43
-
44
-
45
-
46
-
47
-
48
-
49
-
50
-
51
-
52
 |
 |
