Husqvarna AUTOMOWER 415X Owner Manual - Page 36
Introduction - troubleshooting, 2 Fault messages - problem
 |
View all Husqvarna AUTOMOWER 415X manuals
Add to My Manuals
Save this manual to your list of manuals |
Page 36 highlights
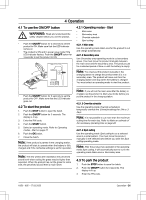
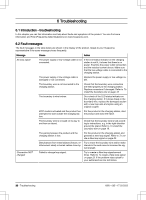
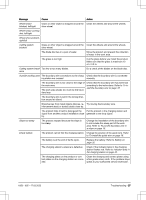
6 Troubleshooting 6.1 Introduction - troubleshooting In this chapter you can find information and help about faults and symptoms of the product. You can find more information and FAQ (Frequently Asked Questions) on www.husqvarna.com. 6.2 Fault messages The fault messages in the table below are shown in the display of the product. Speak to your Husqvarna representative if the same message shows frequently. Message Cause Action No loop signal The power supply or low-voltage cable is not connected. If the LED status indicator on the charging station is not lit, it shows that there is no power. Examine the power outlet connection and the residual-current device. Make sure that the low-voltage cable is connected to the charging station. The power supply or low-voltage cable is damaged or not connected. Replace the power supply or low-voltage cable. The boundary wire is not connected to the charging station. Check that the boundary wire connectors are fitted properly to the charging station. Replace connectors if damaged. Refer to To install the boundary wire on page 18. The boundary is wire broken. Do a check of the LED status indicator on the charging station. If it shows break in the boundary wire, replace the damaged section with a new loop wire and splice using an original coupler. ECO mode is activated and the product has attempted to start outside the charging station. Put the product in the charging station, start the product and close the hatch. The boundary wire is crossed on its way to and from an island. Check that the boundary wire is laid according to instructions, e.g. in the right direction around the island. Refer to To install the boundary wire on page 18. The pairing between the product and the charging station is lost. Put the product in the charging station and generate a new loop signal. Refer to To create a New loop signal on page 23. Disturbances from metal objects (fences, re- Try to move the boundary wire and/or make inforcement steel) or buried cables close by. islands in the work area to increase the sig- nal strength. Connection NOT changed Failed to change loop signal. Try to create a New loop signal several times. Refer to To create a New loop signal on page 23. If the problem stays speak to your authorized service technician. 36 - Troubleshooting 1650 - 005 - 17.03.2022
-
 1
1 -
2
-
3
-
4
-
5
-
6
-
7
-
8
-
9
-
10
-
11
-
12
-
13
-
14
-
15
-
16
-
17
-
18
-
19
-
20
-
21
-
22
-
23
-
24
-
25
-
26
-
27
-
28
-
29
-
30
-
 31
31 -
 32
32 -
 33
33 -
 34
34 -
 35
35 -
 36
36 -
 37
37 -
 38
38 -
 39
39 -
 40
40 -
 41
41 -
42
-
43
-
44
-
45
-
46
-
47
-
48
-
49
-
50
-
51
-
52
 |
 |