Icom IC-M510 Instruction Manual - Page 15
PANEL DESCRIPTION, Front panel
 |
View all Icom IC-M510 manuals
Add to My Manuals
Save this manual to your list of manuals |
Page 15 highlights
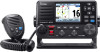
2 PANEL DESCRIPTION ■ Front panel Function Speaker 1 display (p. 4) 2 3 4 5 6 7 8 9 PW R 13 12 11 10 1 DISTRESS KEY [DISTRESS] Hold down for 3 seconds to transmit a Distress call. (p. 21) 2 ENTER KEY [ENT] Push to set the entered data, selected item, and so on. 3 LEFT/RIGHT KEYS Push to scroll the Software Key functions. (pp. 6 ~ 7) • Push to select a character or number in the entry mode. (pp. 8, 14, 19~20) 4 UP/DOWN KEYS Push to select an operating channel, Menu items, Menu settings, and so on. (p. 10) • Push to select a character or number in the entry mode. (pp. 14, 19~20) 5 MENU KEY [MENU] Push to display or close the Menu screen. 6 CLEAR KEY [CLEAR] Push to cancel the entered data or to return to the previous screen. 7 CHANNEL 16/CALL CHANNEL KEY [16/C] • Push to select Channel 16. (p. 10) • Hold down for 1 second to select the Call channel. (p. 10) 8 DISPLAY KEY [DISP] Push to switch the main screen between the INFO, the Plotter, and the Highway screens. 9 CHANNEL/ENTER/POWER DIAL [CH/ENT]/[PWR] • Hold down for 1 second to turn the transceiver ON or OFF. • Rotate to select the operating channels, Menu items, Menu settings, and so on. • Push to set the entered data, selected item, and so on. 10 SOFTWARE KEYS (pp. 6 ~ 7) Scroll the key functions pushing [◄] or [►], then push either of the 4 software keys to select the function displayed at the bottom of the display. 11 SQUELCH DIAL [SQL] (p. 12) Rotate to adjust the squelch level. 12 VOLUME DIAL [VOL] (p. 12) Rotate to adjust the volume level. 13 MICROPHONE CONNECTOR CAUTION: Be sure that the microphone connector is tightened completely (rotate clockwise) to maintain the transceiver's waterproof protection. 1 2 3 4 5 6 7 8 9 10 11 12 13 14 15 16 17 18 2
-
 1
1 -
2
-
3
-
4
-
5
-
6
-
7
-
8
-
9
-
 10
10 -
 11
11 -
 12
12 -
 13
13 -
 14
14 -
 15
15 -
 16
16 -
 17
17 -
 18
18 -
 19
19 -
 20
20 -
21
-
22
-
23
-
24
-
25
-
26
-
27
-
28
-
29
-
30
-
31
-
32
-
33
-
34
-
35
-
36
-
37
-
38
-
39
-
40
-
41
-
42
-
43
-
44
-
45
-
46
-
47
-
48
-
49
-
50
-
51
-
52
-
53
-
54
-
55
-
56
-
57
-
58
-
59
-
60
-
61
-
62
-
63
-
64
-
65
-
66
-
67
-
68
-
69
-
70
-
71
-
72
-
73
-
74
-
75
-
76
-
77
-
78
-
79
-
80
-
81
-
82
-
83
-
84
-
85
-
86
-
87
-
88
-
89
-
90
-
91
-
92
-
93
-
94
-
95
-
96
-
97
-
98
-
99
-
100
-
101
-
102
-
103
-
104
-
105
-
106
-
107
-
108
-
109
-
110
-
111
-
112
-
113
-
114
-
115
-
116
-
117
-
118
-
119
-
120
-
121
-
122
-
123
-
124
-
125
-
126
-
127
-
128
-
129
-
130
-
131
-
132
 |
 |
