Intel SHG2 Product Guide - Page 45
Processors, WARNING, CAUTIONS
 |
UPC - 735858152891
View all Intel SHG2 manuals
Add to My Manuals
Save this manual to your list of manuals |
Page 45 highlights
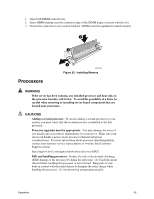
1. Open both DIMM socket levers. 2. Insert DIMM making sure the connector edge of the DIMM aligns correctly with the slot. 3. Check that socket levers are securely latched. DIMMs must be populated in identical pairs. 2 1A 3 Processors 1 1B OM13205 Figure 26. Installing Memory WARNING If the server has been running, any installed processor and heat sink on the processor board(s) will be hot. To avoid the possibility of a burn, be careful when removing or installing server board components that are located near processors. CAUTIONS Adding a second processor: If you are adding a second processor to your system, you must verify that the second processor is identical to the first processor. Processor upgrades must be appropriate: You may damage the server if you install a processor that is inappropriate for your server. Make sure your server can handle a newer, faster processor (thermal and power considerations). For exact information about processor interchangeability, contact your customer service representative or visit the Intel Customer Support website: http://support.intel.com/support/motherboards/server/SHG2 ESD and handling processors: Reduce the risk of electrostatic discharge (ESD) damage to the processor by doing the following: (1) Touch the metal chassis before touching the processor or server board. Keep part of your body in contact with the metal chassis to dissipate the static charge while handling the processor. (2) Avoid moving around unnecessarily. Upgrading 45
-
 1
1 -
2
-
3
-
4
-
5
-
6
-
7
-
8
-
9
-
10
-
11
-
12
-
13
-
14
-
15
-
16
-
17
-
18
-
19
-
20
-
21
-
22
-
23
-
24
-
25
-
26
-
27
-
28
-
29
-
30
-
31
-
32
-
33
-
34
-
35
-
36
-
37
-
38
-
39
-
 40
40 -
 41
41 -
 42
42 -
 43
43 -
 44
44 -
 45
45 -
 46
46 -
 47
47 -
 48
48 -
 49
49 -
 50
50 -
51
-
52
-
53
-
54
-
55
-
56
-
57
-
58
-
59
-
60
-
61
-
62
-
63
-
64
-
65
-
66
-
67
-
68
-
69
-
70
-
71
-
72
-
73
-
74
-
75
-
76
-
77
-
78
-
79
-
80
-
81
-
82
-
83
-
84
-
85
-
86
-
87
-
88
-
89
-
90
-
91
-
92
-
93
-
94
-
95
-
96
-
97
-
98
-
99
-
100
 |
 |
