Intel SHG2 Product Guide - Page 47
Opening Socket Lever and Attaching Processor
 |
UPC - 735858152891
View all Intel SHG2 manuals
Add to My Manuals
Save this manual to your list of manuals |
Page 47 highlights
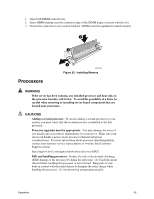
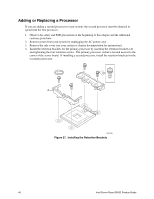
5. Lift the socket lever on the processor socket labeled CPU1. (If adding a second processor, lift the socket lever on the processor socket labeled CPU2.) 6. Align the pins of the processor with the socket, and insert the processor into the socket. Lower the socket lever completely. ✏ NOTE When installing a second processor, note that the secondary processor socket is oriented so that the processor pins are rotated 180° relative to the primary processor socket. A B OM14365 C. Alignment Triangle Mark D. Alignment Triangle Cutout Figure 28. Opening Socket Lever and Attaching Processor Upgrading 47
-
 1
1 -
2
-
3
-
4
-
5
-
6
-
7
-
8
-
9
-
10
-
11
-
12
-
13
-
14
-
15
-
16
-
17
-
18
-
19
-
20
-
21
-
22
-
23
-
24
-
25
-
26
-
27
-
28
-
29
-
30
-
31
-
32
-
33
-
34
-
35
-
36
-
37
-
38
-
39
-
40
-
41
-
 42
42 -
 43
43 -
 44
44 -
 45
45 -
 46
46 -
 47
47 -
 48
48 -
 49
49 -
 50
50 -
 51
51 -
 52
52 -
53
-
54
-
55
-
56
-
57
-
58
-
59
-
60
-
61
-
62
-
63
-
64
-
65
-
66
-
67
-
68
-
69
-
70
-
71
-
72
-
73
-
74
-
75
-
76
-
77
-
78
-
79
-
80
-
81
-
82
-
83
-
84
-
85
-
86
-
87
-
88
-
89
-
90
-
91
-
92
-
93
-
94
-
95
-
96
-
97
-
98
-
99
-
100
 |
 |

Upgrading
47
5.
Lift the socket lever on the processor socket labeled CPU1.
(If adding a second processor, lift
the socket lever on the processor socket labeled CPU2.)
6.
Align the pins of the processor with the socket, and insert the processor into the socket.
Lower
the socket lever completely.
✏
NOTE
When installing a second processor, note that the secondary processor socket
is oriented so that the processor pins are rotated 180
°
relative to the primary
processor socket.
OM14365
A
B
C.
Alignment Triangle Mark
D.
Alignment Triangle Cutout
Figure 28.
Opening Socket Lever and Attaching Processor