JVC DLA-RS45U 288 page operation manual for D-ILA Projectors DLA-RS65, DLA-RS5 - Page 38
Basic Operation continued
 |
View all JVC DLA-RS45U manuals
Add to My Manuals
Save this manual to your list of manuals |
Page 38 highlights
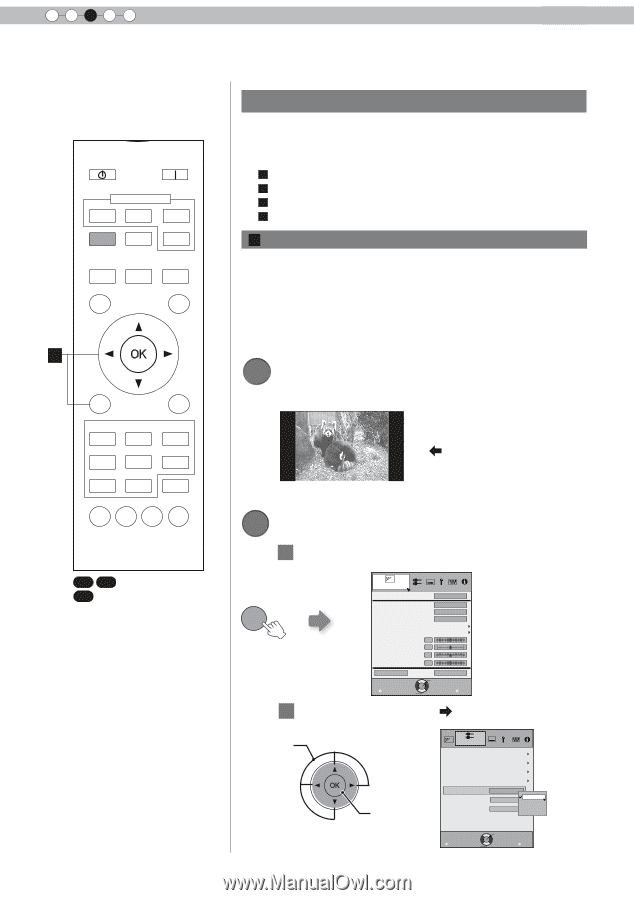
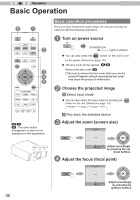
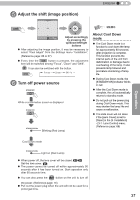
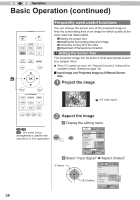
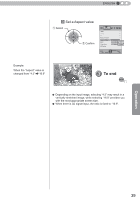
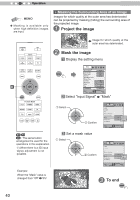
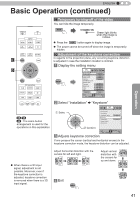
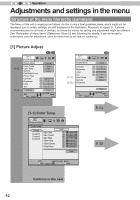
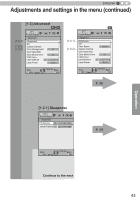
3 Operation Basic Operation (continued) STAND BY ON HDMI 1 INPUT HDMI 2 3D FORMAT 3D SETTING COMP. PC LENS. CONTROL LENS MEMORY ANAMO. HIDE LIGHT A Frequently used useful functions You can change the screen size of the projected image or hide the surrounding area of an image for which quality at the outer area has deteriorated. A Setting the Screen Size B Masking the Surrounding Area of an Image C Temporary turning-off of the video D Adjustment of the keystone correction A Setting the Screen Size The projected image can be set to a most appropriate screen size (aspect ratio). ● When PC signals are input, the "Aspect(Computer)" setting will be available instead. (Reference page: 60) ■ Input Image and Projected Image by Different Screen Size 1 Project the image MENU BACK PICTURE MODE FILM CINEMA ANIME NATURAL STAGE 3D THX USER C.M.D. 4:3 video signal GAMMA COLOR TEMP COLOR P.FILE PIC. ADJ. 2 Aspect the image 1 Display the setting menu 65 55 X475 : The same button arrangement is used for the operations in this explanation. MENU Picture Adjust Picture Mode Color Profile Color Temp. Gamma Dark/Bright Level Picture Tone Contrast Brightness Color Tint Advanced Exit MENU Select Natural Video 6500K Normal 0 0 0 0 Reset Operate Back BACK 2 Select "Input Signal" "Aspect (Video)" ① Select ② Confirm Input Signal HDMI COMP. PC Picture Position Aspect (Video) Mask Progressive 3D Setting 4:3 off Auto 4:3 16:9 Custom Exit MENU Select Operate Back BACK 38
-
 1
1 -
2
-
3
-
4
-
5
-
6
-
7
-
8
-
9
-
10
-
11
-
12
-
13
-
14
-
15
-
16
-
17
-
18
-
19
-
20
-
21
-
22
-
23
-
24
-
25
-
26
-
27
-
28
-
29
-
30
-
31
-
32
-
 33
33 -
 34
34 -
 35
35 -
 36
36 -
 37
37 -
 38
38 -
 39
39 -
 40
40 -
 41
41 -
 42
42 -
 43
43 -
44
-
45
-
46
-
47
-
48
-
49
-
50
-
51
-
52
-
53
-
54
-
55
-
56
-
57
-
58
-
59
-
60
-
61
-
62
-
63
-
64
-
65
-
66
-
67
-
68
-
69
-
70
-
71
-
72
-
73
-
74
-
75
-
76
-
77
-
78
-
79
-
80
-
81
-
82
-
83
-
84
-
85
-
86
-
87
-
88
-
89
-
90
-
91
-
92
-
93
-
94
-
95
-
96
-
97
-
98
-
99
-
100
-
101
-
102
-
103
-
104
-
105
-
106
-
107
-
108
-
109
-
110
-
111
-
112
-
113
-
114
-
115
-
116
-
117
-
118
-
119
-
120
-
121
-
122
-
123
-
124
-
125
-
126
-
127
-
128
-
129
-
130
-
131
-
132
-
133
-
134
-
135
-
136
-
137
-
138
-
139
-
140
-
141
-
142
-
143
-
144
-
145
-
146
-
147
-
148
-
149
-
150
-
151
-
152
-
153
-
154
-
155
-
156
-
157
-
158
-
159
-
160
-
161
-
162
-
163
-
164
-
165
-
166
-
167
-
168
-
169
-
170
-
171
-
172
-
173
-
174
-
175
-
176
-
177
-
178
-
179
-
180
-
181
-
182
-
183
-
184
-
185
-
186
-
187
-
188
-
189
-
190
-
191
-
192
-
193
-
194
-
195
-
196
-
197
-
198
-
199
-
200
-
201
-
202
-
203
-
204
-
205
-
206
-
207
-
208
-
209
-
210
-
211
-
212
-
213
-
214
-
215
-
216
-
217
-
218
-
219
-
220
-
221
-
222
-
223
-
224
-
225
-
226
-
227
-
228
-
229
-
230
-
231
-
232
-
233
-
234
-
235
-
236
-
237
-
238
-
239
-
240
-
241
-
242
-
243
-
244
-
245
-
246
-
247
-
248
-
249
-
250
-
251
-
252
-
253
-
254
-
255
-
256
-
257
-
258
-
259
-
260
-
261
-
262
-
263
-
264
-
265
-
266
-
267
-
268
-
269
-
270
-
271
-
272
-
273
-
274
-
275
-
276
-
277
-
278
-
279
-
280
-
281
-
282
-
283
-
284
-
285
-
286
-
287
-
288
 |
 |