JVC DLA-RS45U 288 page operation manual for D-ILA Projectors DLA-RS65, DLA-RS5 - Page 66
-2] Pixel Adjust
 |
View all JVC DLA-RS45U manuals
Add to My Manuals
Save this manual to your list of manuals |
Page 66 highlights
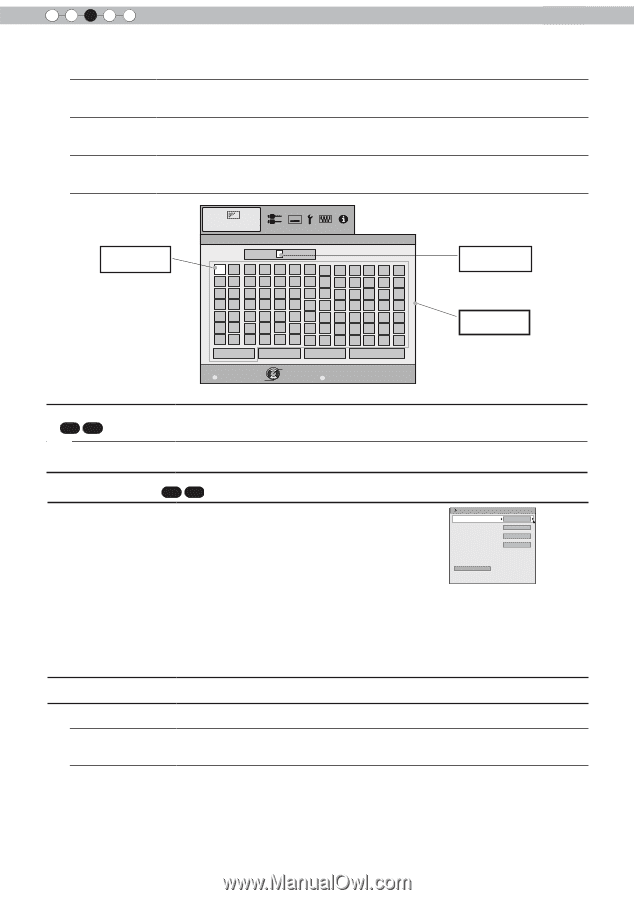
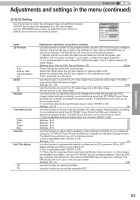
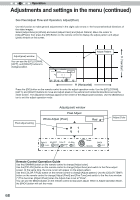
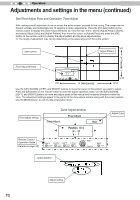
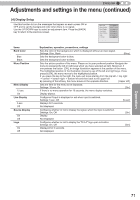
3 Operation Adjustments and settings in the menu (continued) Clear All Clear OK Use this function to delete a character. Move the select cursor to the desired location and press the [OK] key on the main unit or on the remote control. This will delete the character to the left of the input cursor in the Name field. Use this function to delete all characters. Move the select cursor to the desired location and press the [OK] key on the main unit or on the remote control. A delete confirmation message will appear. Use this function to set your name. Move the select cursor to the desired location and press the [OK] key on the main unit or on the remote control. A save confirmation message will appear. Select cursor Picture Adjust >> User Name Edit Name User 1 AB C D E F G H IJ NO P Q R S T U VW ab c d e f g h ij no p q r s t y vw 12 3 4 5 6 7 8 90 SPACE Clear All Clear Exit MENU Select Operate Back BACK KL M XY Z kl m xy z OK Input cursor Character list Lens Cover 65 55 Auto Open This function is used to set if the lens cover should be linked with a power supply for opening/closing, or if it should be left open. Settings: Auto, Open [Auto] This opens/closes the lens cover when it is linked to on/off of a power supply. Regardless if the power supply is on/off, the lens cover is always open. [3-2] Pixel Adjust 65 55 Use this function to adjust slight color errorsin the horizontal/vertical Pixel Adjust directions of the video image. It is recommended to first set the "Adjust Area" to [Whole] and make general adjustments using [Adjust (Pixel)], then make further adjustments using the [Adjust (Fine)] function. Next, set Adjust Adjust Area Adjust Color Adjust Pattern Color On Whole Red White the "Adjust Area" to "Zone" to make partial adjustments. See Summary "Pixel Adjust Flow and Operation. Adjust(Pixel) Adjust(Fine) Reset Use the UP/DOWN keys to select an adjustment item. Press the [BACK] key to return to the previous screen. (*) It is impossible to match all image pixels on the screen. Due to the equipment, there will always be some gaps. Color errors vary depending on screen position. (*) In case the image is reversed, or upside-down, the horizontal and vertical directions are reversed. (*) Please perform adjustments on a clear still picture. (*) For fine tuning, the effects of adjustments may be difficult to understand for some video images. Items Adjust Adjust Area Whole Zone Explanation, operation, precautions, settings Use this function to turn the pixel alignment adjust function ON and OFF. Settings: Off, On Use this function to set the pixel error adjustment range. Settings: Whole, Zone Select the entire screen as the adjustment area. The entire screen can be divided into 11X11 sections for adjustment. (*) The size of the zone cannot be changed. [Off] [Whole] 66
-
 1
1 -
2
-
3
-
4
-
5
-
6
-
7
-
8
-
9
-
10
-
11
-
12
-
13
-
14
-
15
-
16
-
17
-
18
-
19
-
20
-
21
-
22
-
23
-
24
-
25
-
26
-
27
-
28
-
29
-
30
-
31
-
32
-
33
-
34
-
35
-
36
-
37
-
38
-
39
-
40
-
41
-
42
-
43
-
44
-
45
-
46
-
47
-
48
-
49
-
50
-
51
-
52
-
53
-
54
-
55
-
56
-
57
-
58
-
59
-
60
-
 61
61 -
 62
62 -
 63
63 -
 64
64 -
 65
65 -
 66
66 -
 67
67 -
 68
68 -
 69
69 -
 70
70 -
 71
71 -
72
-
73
-
74
-
75
-
76
-
77
-
78
-
79
-
80
-
81
-
82
-
83
-
84
-
85
-
86
-
87
-
88
-
89
-
90
-
91
-
92
-
93
-
94
-
95
-
96
-
97
-
98
-
99
-
100
-
101
-
102
-
103
-
104
-
105
-
106
-
107
-
108
-
109
-
110
-
111
-
112
-
113
-
114
-
115
-
116
-
117
-
118
-
119
-
120
-
121
-
122
-
123
-
124
-
125
-
126
-
127
-
128
-
129
-
130
-
131
-
132
-
133
-
134
-
135
-
136
-
137
-
138
-
139
-
140
-
141
-
142
-
143
-
144
-
145
-
146
-
147
-
148
-
149
-
150
-
151
-
152
-
153
-
154
-
155
-
156
-
157
-
158
-
159
-
160
-
161
-
162
-
163
-
164
-
165
-
166
-
167
-
168
-
169
-
170
-
171
-
172
-
173
-
174
-
175
-
176
-
177
-
178
-
179
-
180
-
181
-
182
-
183
-
184
-
185
-
186
-
187
-
188
-
189
-
190
-
191
-
192
-
193
-
194
-
195
-
196
-
197
-
198
-
199
-
200
-
201
-
202
-
203
-
204
-
205
-
206
-
207
-
208
-
209
-
210
-
211
-
212
-
213
-
214
-
215
-
216
-
217
-
218
-
219
-
220
-
221
-
222
-
223
-
224
-
225
-
226
-
227
-
228
-
229
-
230
-
231
-
232
-
233
-
234
-
235
-
236
-
237
-
238
-
239
-
240
-
241
-
242
-
243
-
244
-
245
-
246
-
247
-
248
-
249
-
250
-
251
-
252
-
253
-
254
-
255
-
256
-
257
-
258
-
259
-
260
-
261
-
262
-
263
-
264
-
265
-
266
-
267
-
268
-
269
-
270
-
271
-
272
-
273
-
274
-
275
-
276
-
277
-
278
-
279
-
280
-
281
-
282
-
283
-
284
-
285
-
286
-
287
-
288
 |
 |