JVC DLA-RS45U 288 page operation manual for D-ILA Projectors DLA-RS65, DLA-RS5 - Page 61
Progressive, 3D Setting, 2-3] 3D settings, Items Explanation, operation, precautions, settings,
 |
View all JVC DLA-RS45U manuals
Add to My Manuals
Save this manual to your list of manuals |
Page 61 highlights
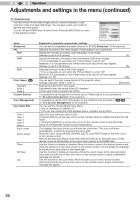
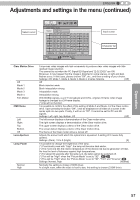
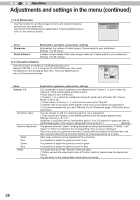
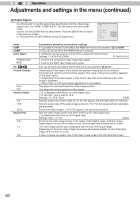
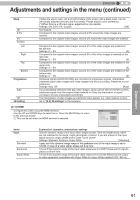
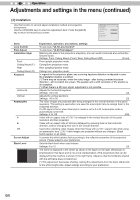
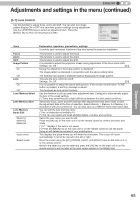
ENGLISH Adjustments and settings in the menu (continued) Mask Off 2.5% 5% Custom Left Right Top Bottom Progressive Auto Off 3D Setting It hides the upper, lower, left and right borders of the screen with a black mask. Can be individually adjusted vertically and horizontally. Please adjust to your preference. (*) When there is a 3D input signal, adjustment is not possible. Settings: Off, 2.5%, 5%, Custom [Off] Not masked. Compared to the original video images, around 2.5% around the video images are masked. Compared to the original video images, around 5% around the video images are masked. Compared to the original video images, around 5% of the video images are masked on the left side. Settings: 0 ~ 5% [0] Compared to the original video images, around 5% of the video images is masked on the right side. Settings: 0 ~ 5% [0] Compared to the original video images, around 5% of the video images are masked at the upper side. Settings: 0 ~ 5% [0] Compared to the original video images, around 5% of the video images are masked at the bottom side. Settings: 0 ~ 5% [0] Interlaced signals (480i/576i/1080i) are converted to progressive signals. Interpolates interlaced signal video images with video images from the surrounding. Please set to your preference. Settings: Auto, Off [Auto] It is automatically detected if the 24p video images, which can be seen in the film screens, interlaced signals from the original video material or if they are the product of signal conversion and are interpolated accordingly. The interpolation of video images as interlaced video signals, e.g. video material is done. Go to "[2-3] 3D settings" in the submenu. [2-1] HDMI Configure this when using the HDMI terminal. Use the UP and DOWN keys to select items. Press the [BACK] key to return to the previous screen. (*) This can be set when the HDMI terminal is selected. HDMI Input Level Check Color Space Control with HDMI Standard Auto Off Items Input Standard Enhanced Super White Explanation, operation, precautions, settings Sets the dynamic range of the input video images (scale). Dark and bright areas, which are not matched to the range, might get brighter or darker. If you are unsure of the input signal dynamic range, please check under "Level Check". Settings: Standard, Enhance, Super White [Standard] It gets set if the dynamic image range of the gradation level of the input image is set to 16-235. In case of a video signal, please set it up here. It is set if the dynamic range of the input video scale level is 0-255.If these are PC signals, please set them here. It is set if the dynamic range of the input video scale level is 16-255.Please set the output to video equipment compatible with Super White for Super White-enabled DVD / BD etc. Operation 61
-
 1
1 -
2
-
3
-
4
-
5
-
6
-
7
-
8
-
9
-
10
-
11
-
12
-
13
-
14
-
15
-
16
-
17
-
18
-
19
-
20
-
21
-
22
-
23
-
24
-
25
-
26
-
27
-
28
-
29
-
30
-
31
-
32
-
33
-
34
-
35
-
36
-
37
-
38
-
39
-
40
-
41
-
42
-
43
-
44
-
45
-
46
-
47
-
48
-
49
-
50
-
51
-
52
-
53
-
54
-
55
-
 56
56 -
 57
57 -
 58
58 -
 59
59 -
 60
60 -
 61
61 -
 62
62 -
 63
63 -
 64
64 -
 65
65 -
 66
66 -
67
-
68
-
69
-
70
-
71
-
72
-
73
-
74
-
75
-
76
-
77
-
78
-
79
-
80
-
81
-
82
-
83
-
84
-
85
-
86
-
87
-
88
-
89
-
90
-
91
-
92
-
93
-
94
-
95
-
96
-
97
-
98
-
99
-
100
-
101
-
102
-
103
-
104
-
105
-
106
-
107
-
108
-
109
-
110
-
111
-
112
-
113
-
114
-
115
-
116
-
117
-
118
-
119
-
120
-
121
-
122
-
123
-
124
-
125
-
126
-
127
-
128
-
129
-
130
-
131
-
132
-
133
-
134
-
135
-
136
-
137
-
138
-
139
-
140
-
141
-
142
-
143
-
144
-
145
-
146
-
147
-
148
-
149
-
150
-
151
-
152
-
153
-
154
-
155
-
156
-
157
-
158
-
159
-
160
-
161
-
162
-
163
-
164
-
165
-
166
-
167
-
168
-
169
-
170
-
171
-
172
-
173
-
174
-
175
-
176
-
177
-
178
-
179
-
180
-
181
-
182
-
183
-
184
-
185
-
186
-
187
-
188
-
189
-
190
-
191
-
192
-
193
-
194
-
195
-
196
-
197
-
198
-
199
-
200
-
201
-
202
-
203
-
204
-
205
-
206
-
207
-
208
-
209
-
210
-
211
-
212
-
213
-
214
-
215
-
216
-
217
-
218
-
219
-
220
-
221
-
222
-
223
-
224
-
225
-
226
-
227
-
228
-
229
-
230
-
231
-
232
-
233
-
234
-
235
-
236
-
237
-
238
-
239
-
240
-
241
-
242
-
243
-
244
-
245
-
246
-
247
-
248
-
249
-
250
-
251
-
252
-
253
-
254
-
255
-
256
-
257
-
258
-
259
-
260
-
261
-
262
-
263
-
264
-
265
-
266
-
267
-
268
-
269
-
270
-
271
-
272
-
273
-
274
-
275
-
276
-
277
-
278
-
279
-
280
-
281
-
282
-
283
-
284
-
285
-
286
-
287
-
288
 |
 |
