JVC DLA-RS45U 288 page operation manual for D-ILA Projectors DLA-RS65, DLA-RS5 - Page 51
Menu operation procedure
 |
View all JVC DLA-RS45U manuals
Add to My Manuals
Save this manual to your list of manuals |
Page 51 highlights
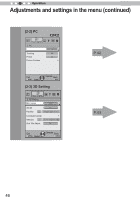
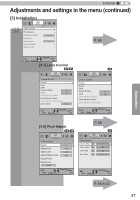
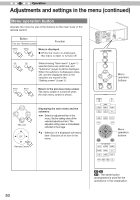
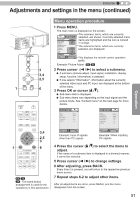
ENGLISH Adjustments and settings in the menu (continued) Operation STANDBY/ON INPUT OK 3 3,4 2,5 MENU BACK 1 6 STAND BY ON HDMI 1 INPUT HDMI 2 3D FORMAT 3D SETTING COMP. PC LENS. CONTROL LENS MEMORY ANAMO. HIDE LIGHT 3,4 2,5 3 1 MENU BACK 6 PICTURE MODE FILM CINEMA ANIME NATURAL STAGE 3D THX USER C.M.D. GAMMA COLOR TEMP COLOR P.FILE PIC. ADJ. 65 55 X475 : The same button arrangement is used for the operations in this explanation. Menu operation procedure 1 Press MENU. The main menu is displayed on the screen. Picture Adjust Picture Mode Color Profile Color Temp. Gamma Dark/Bright Level Picture Tone Contrast Brightness Color Tint Advanced Exit MENU Select Natural Video 6500K Normal 0 0 0 0 Reset Operate Back BACK The submenu items, which are currently selected, are shown. Currently selected menu items are highlighted and the icon is colored in orange. The submenu items, which are currently selected, are displayed. This displays the remote control operation guide. Example: Picture Adjust 65 55 2 Press cursor ( / ) to select a submenu. ● A submenu (picture adjust, input signal, installation, display setup, function, information) is selected: ● If one selects "Information", information about the currently selected video input and PC input are displayed at the bottom of the menu. 3 Press OK or cursor ( / ). ● Sub-menu item is displayed. ● Sub-menu items vary depending on the input signal and the picture mode. See "Content menu" on the next page for more details. Input : Source : Deep Color : Lamp Time : Soft Ver. : Information HDMI-2 1080p60 8bit 160H 12.011 Information Input : Resolution : H Frequency : PC 1920X1080 67.50kHz V Frequency Deep Color Lamp Time : 60.0Hz : 8bit : 160H Soft Ver. : 12.011 Exit MENU Select Operate Back BACK Example: Input of signals other than PC signals Exit MENU Select Operate Back BACK Example: When inputting PC signals 4 Press the cursor ( / ) to select the items to adjust. If the name of a submenu item is displayed in a dimmed manner, it cannot be selected. 5 Press cursor ( / ) to change settings. 6 After adjusting, press BACK. Every time it is pressed, you will return to the respective previous menu screen. 7 Repeat steps 6-2 to adjust other items. After all adjustments are done, press MENU, and the menu disappears from the screen. 51
-
 1
1 -
2
-
3
-
4
-
5
-
6
-
7
-
8
-
9
-
10
-
11
-
12
-
13
-
14
-
15
-
16
-
17
-
18
-
19
-
20
-
21
-
22
-
23
-
24
-
25
-
26
-
27
-
28
-
29
-
30
-
31
-
32
-
33
-
34
-
35
-
36
-
37
-
38
-
39
-
40
-
41
-
42
-
43
-
44
-
45
-
 46
46 -
 47
47 -
 48
48 -
 49
49 -
 50
50 -
 51
51 -
 52
52 -
 53
53 -
 54
54 -
 55
55 -
 56
56 -
57
-
58
-
59
-
60
-
61
-
62
-
63
-
64
-
65
-
66
-
67
-
68
-
69
-
70
-
71
-
72
-
73
-
74
-
75
-
76
-
77
-
78
-
79
-
80
-
81
-
82
-
83
-
84
-
85
-
86
-
87
-
88
-
89
-
90
-
91
-
92
-
93
-
94
-
95
-
96
-
97
-
98
-
99
-
100
-
101
-
102
-
103
-
104
-
105
-
106
-
107
-
108
-
109
-
110
-
111
-
112
-
113
-
114
-
115
-
116
-
117
-
118
-
119
-
120
-
121
-
122
-
123
-
124
-
125
-
126
-
127
-
128
-
129
-
130
-
131
-
132
-
133
-
134
-
135
-
136
-
137
-
138
-
139
-
140
-
141
-
142
-
143
-
144
-
145
-
146
-
147
-
148
-
149
-
150
-
151
-
152
-
153
-
154
-
155
-
156
-
157
-
158
-
159
-
160
-
161
-
162
-
163
-
164
-
165
-
166
-
167
-
168
-
169
-
170
-
171
-
172
-
173
-
174
-
175
-
176
-
177
-
178
-
179
-
180
-
181
-
182
-
183
-
184
-
185
-
186
-
187
-
188
-
189
-
190
-
191
-
192
-
193
-
194
-
195
-
196
-
197
-
198
-
199
-
200
-
201
-
202
-
203
-
204
-
205
-
206
-
207
-
208
-
209
-
210
-
211
-
212
-
213
-
214
-
215
-
216
-
217
-
218
-
219
-
220
-
221
-
222
-
223
-
224
-
225
-
226
-
227
-
228
-
229
-
230
-
231
-
232
-
233
-
234
-
235
-
236
-
237
-
238
-
239
-
240
-
241
-
242
-
243
-
244
-
245
-
246
-
247
-
248
-
249
-
250
-
251
-
252
-
253
-
254
-
255
-
256
-
257
-
258
-
259
-
260
-
261
-
262
-
263
-
264
-
265
-
266
-
267
-
268
-
269
-
270
-
271
-
272
-
273
-
274
-
275
-
276
-
277
-
278
-
279
-
280
-
281
-
282
-
283
-
284
-
285
-
286
-
287
-
288
 |
 |