JVC DLA-RS45U 288 page operation manual for D-ILA Projectors DLA-RS65, DLA-RS5 - Page 56
-2] Advanced
 |
View all JVC DLA-RS45U manuals
Add to My Manuals
Save this manual to your list of manuals |
Page 56 highlights
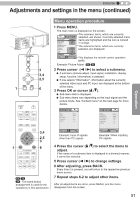
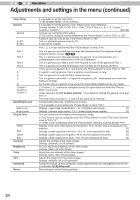
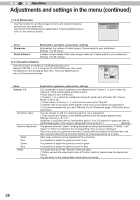
3 Operation Adjustments and settings in the menu (continued) [1-2] Advanced Use this function to set video image contours, overall sharpness, noise reduction mode and video afterimage. You can also create your preferred gamma and color quality. Use the UP and DOWN keys to select items. Press the [BACK] key to return to the previous screen. > Advanced Sharpness NR Custom Gamma Color Management User Name Edit Clear Motion Drive CMD Demo Lens Aperture 0 Lamp Power Off Off Normal Items Sharpness NR RNR MNR BNR Color Space X475 Standard Wide 1 Wide 2 Custom Gamma Color Management User Name Edit User 1 User 2 User 3 User 4 User 5 Input cursor Select cursor Clear All Clear OK Explanation, operation, precautions, settings You can set the sharpness and detail enhance to "[1-2-1] Sharpness" of the submenu Reduces the noise of the video images. Please adjust to your preference. Adjusts the intensity of random noise elimination of the image. Settings: (Low) 0 to16 (strong) [0] Adjusts the intensity of mosquito noise elimination of the video images. (*) It is not possible to set it when the "Picture Mode" is set to "3D". Moreover, it is not possible to set it when there is an input of HD input signals. Settings: (Low) 0 to16 (strong) [0] Reduces the block noise of the video images. (*) It is not possible to set it when the "Picture Mode" is set to "3D" Moreover, it is not possible to set it when there is an input of HD input signals. Settings: On, Off You can switch the color space display of the projector output. Settings: Standard, Wide 1, Wide 2 Equivalent to the HDTV color space Equivalent to the color space of the DCI standard A color space that is broader than Wide1 [Off] [Standard] It is possible to set the gamma curve and save it. Please adjust to your preference. To "[1-2-2] Custom Gamma" of the submenu It is possible to set the color of the screen to the preferred color and save it. 65 55 To "[1-2-3] Color Management" of the submenu. You can edit the "Picture Mode" User Name. (*) No. of characters is limited to 10 (*) You can use capital and small alphabet letters, numbers and symbols. Select the user name you want to edit. Press the [OK] key on the main unit or on the remote control to confirm and enter the edit mode. (*) Press the [BACK] key on the main unit or on the remote control to exit edit mode. Doing so will delete the content of your modifications. This displays the place where you will enter the characters. The cursor will move automatically; it cannot be moved to the left or right. Move the cursor using the [UP], [DOWN], [LEFT], and [RIGHT] keys on the main unit or on the remote control. Move to the letter you want to enter and press the [OK] key on the main unit or on the remote control to set the letter at the input cursor position in the NAME field. Use this function to delete a character. Move the select cursor to the desired location and press the [OK] key on the main unit or on the remote control. This will delete the character to the left of the input cursor in the Name field. Use this function to delete all characters. Move the select cursor to the desired location and press the [OK] key on the main unit or on the remote control. A delete confirmation message will appear. Use this function to set your name. Move the select cursor to the desired location and press the [OK] key on the main unit or on the remote control. A save confirmation message will appear. 56
-
 1
1 -
2
-
3
-
4
-
5
-
6
-
7
-
8
-
9
-
10
-
11
-
12
-
13
-
14
-
15
-
16
-
17
-
18
-
19
-
20
-
21
-
22
-
23
-
24
-
25
-
26
-
27
-
28
-
29
-
30
-
31
-
32
-
33
-
34
-
35
-
36
-
37
-
38
-
39
-
40
-
41
-
42
-
43
-
44
-
45
-
46
-
47
-
48
-
49
-
50
-
 51
51 -
 52
52 -
 53
53 -
 54
54 -
 55
55 -
 56
56 -
 57
57 -
 58
58 -
 59
59 -
 60
60 -
 61
61 -
62
-
63
-
64
-
65
-
66
-
67
-
68
-
69
-
70
-
71
-
72
-
73
-
74
-
75
-
76
-
77
-
78
-
79
-
80
-
81
-
82
-
83
-
84
-
85
-
86
-
87
-
88
-
89
-
90
-
91
-
92
-
93
-
94
-
95
-
96
-
97
-
98
-
99
-
100
-
101
-
102
-
103
-
104
-
105
-
106
-
107
-
108
-
109
-
110
-
111
-
112
-
113
-
114
-
115
-
116
-
117
-
118
-
119
-
120
-
121
-
122
-
123
-
124
-
125
-
126
-
127
-
128
-
129
-
130
-
131
-
132
-
133
-
134
-
135
-
136
-
137
-
138
-
139
-
140
-
141
-
142
-
143
-
144
-
145
-
146
-
147
-
148
-
149
-
150
-
151
-
152
-
153
-
154
-
155
-
156
-
157
-
158
-
159
-
160
-
161
-
162
-
163
-
164
-
165
-
166
-
167
-
168
-
169
-
170
-
171
-
172
-
173
-
174
-
175
-
176
-
177
-
178
-
179
-
180
-
181
-
182
-
183
-
184
-
185
-
186
-
187
-
188
-
189
-
190
-
191
-
192
-
193
-
194
-
195
-
196
-
197
-
198
-
199
-
200
-
201
-
202
-
203
-
204
-
205
-
206
-
207
-
208
-
209
-
210
-
211
-
212
-
213
-
214
-
215
-
216
-
217
-
218
-
219
-
220
-
221
-
222
-
223
-
224
-
225
-
226
-
227
-
228
-
229
-
230
-
231
-
232
-
233
-
234
-
235
-
236
-
237
-
238
-
239
-
240
-
241
-
242
-
243
-
244
-
245
-
246
-
247
-
248
-
249
-
250
-
251
-
252
-
253
-
254
-
255
-
256
-
257
-
258
-
259
-
260
-
261
-
262
-
263
-
264
-
265
-
266
-
267
-
268
-
269
-
270
-
271
-
272
-
273
-
274
-
275
-
276
-
277
-
278
-
279
-
280
-
281
-
282
-
283
-
284
-
285
-
286
-
287
-
288
 |
 |