JVC DLA-RS45U 288 page operation manual for D-ILA Projectors DLA-RS65, DLA-RS5 - Page 65
Items Explanation, operation, precautions, settings, Focus, Shift, Image Pattern, Lens Memory Select
 |
View all JVC DLA-RS45U manuals
Add to My Manuals
Save this manual to your list of manuals |
Page 65 highlights
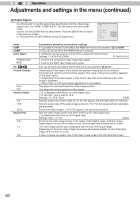
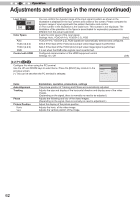
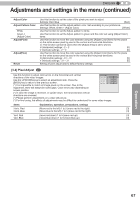
ENGLISH Adjustments and settings in the menu (continued) [3-1] Lens Control Use this function to adjust focus, zoom and shift. You can also turn image pattern display ON or OFF and save lens position settings during adjustment. Use the UP/DOWN keys to select an adjustment item. Press the [BACK] key to return to the previous screen. Lens Control Focus Zoom Shift Image Pattern On Lock Off Lens Memory Select Lens Memory Save Lens Memory Name Edit Lens Cover Auto Items Focus Zoom Shift Image Pattern On Off Lock On Off Lens Memory Select Lens Memory Save Lens Memory Name Edit Memory1 Memory2 Memory3 Input cursor Select cursor Explanation, operation, precautions, settings It controls each motorized functions of the lens during the projector-installation. This function is used to adjust the focus. This function is used to adjust the zoom. This function is used to adjust the shift. It is possible to adjust the projection screen during adjustment of the focus zoom shift. Settings: On, Off [On] During the adjustment, the image pattern is displayed. The image pattern is displayed in conjunction with the above setting items. The external input signal is displayed without displaying the image pattern. This sets the lens control to on/off. Settings: On, Off [Off] It is not possible to adjust the above setting items. If the remote control button "LENS" button is pressed, a warning message is issued. This functions as lens control function. Use this function to call up saved lens adjustment data. Configure to automatically adjust the lens to the saved settings. (*) There may sometimes be a slight difference between this and saved conditions. Select lens focus, zoom and shift settings after adjustments have been made to save the adjustment data at the time of selection. Select Memory 1, Memory 2 or Memory 3 in accordance with your preference. You can also save as a different name when save data. You can edit the lens memory name. (*) No. of characters is limited to 10. (*) You can use capital and small alphabet letters, numbers and symbols. Select the user name you want to edit. Press the [OK] key on the main unit or on the remote control to confirm and enter edit mode. (*) A "-" displays if the data is not saved. (*) Press the [BACK] key on the main unit or on the remote control to exit edit mode. Doing so will delete the content of your modifications. This displays the place where you will enter the characters. The cursor will move automatically; it cannot be moved to the left or right. Move the cursor using the [UP], [DOWN], [LEFT], and [RIGHT] keys on the main unit or on the remote control. Move to the letter you want to enter and press the [OK] key on the main unit or on the remote control to set the letter at the input cursor position in the NAME field. Operation 65
-
 1
1 -
2
-
3
-
4
-
5
-
6
-
7
-
8
-
9
-
10
-
11
-
12
-
13
-
14
-
15
-
16
-
17
-
18
-
19
-
20
-
21
-
22
-
23
-
24
-
25
-
26
-
27
-
28
-
29
-
30
-
31
-
32
-
33
-
34
-
35
-
36
-
37
-
38
-
39
-
40
-
41
-
42
-
43
-
44
-
45
-
46
-
47
-
48
-
49
-
50
-
51
-
52
-
53
-
54
-
55
-
56
-
57
-
58
-
59
-
 60
60 -
 61
61 -
 62
62 -
 63
63 -
 64
64 -
 65
65 -
 66
66 -
 67
67 -
 68
68 -
 69
69 -
 70
70 -
71
-
72
-
73
-
74
-
75
-
76
-
77
-
78
-
79
-
80
-
81
-
82
-
83
-
84
-
85
-
86
-
87
-
88
-
89
-
90
-
91
-
92
-
93
-
94
-
95
-
96
-
97
-
98
-
99
-
100
-
101
-
102
-
103
-
104
-
105
-
106
-
107
-
108
-
109
-
110
-
111
-
112
-
113
-
114
-
115
-
116
-
117
-
118
-
119
-
120
-
121
-
122
-
123
-
124
-
125
-
126
-
127
-
128
-
129
-
130
-
131
-
132
-
133
-
134
-
135
-
136
-
137
-
138
-
139
-
140
-
141
-
142
-
143
-
144
-
145
-
146
-
147
-
148
-
149
-
150
-
151
-
152
-
153
-
154
-
155
-
156
-
157
-
158
-
159
-
160
-
161
-
162
-
163
-
164
-
165
-
166
-
167
-
168
-
169
-
170
-
171
-
172
-
173
-
174
-
175
-
176
-
177
-
178
-
179
-
180
-
181
-
182
-
183
-
184
-
185
-
186
-
187
-
188
-
189
-
190
-
191
-
192
-
193
-
194
-
195
-
196
-
197
-
198
-
199
-
200
-
201
-
202
-
203
-
204
-
205
-
206
-
207
-
208
-
209
-
210
-
211
-
212
-
213
-
214
-
215
-
216
-
217
-
218
-
219
-
220
-
221
-
222
-
223
-
224
-
225
-
226
-
227
-
228
-
229
-
230
-
231
-
232
-
233
-
234
-
235
-
236
-
237
-
238
-
239
-
240
-
241
-
242
-
243
-
244
-
245
-
246
-
247
-
248
-
249
-
250
-
251
-
252
-
253
-
254
-
255
-
256
-
257
-
258
-
259
-
260
-
261
-
262
-
263
-
264
-
265
-
266
-
267
-
268
-
269
-
270
-
271
-
272
-
273
-
274
-
275
-
276
-
277
-
278
-
279
-
280
-
281
-
282
-
283
-
284
-
285
-
286
-
287
-
288
 |
 |