JVC DLA-RS45U 288 page operation manual for D-ILA Projectors DLA-RS65, DLA-RS5 - Page 69
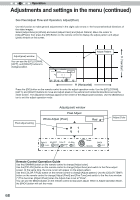
See Pixel Adjust Flow and Operation: AdjustFine, AdjustFine window
 |
View all JVC DLA-RS45U manuals
Add to My Manuals
Save this manual to your list of manuals |
Page 69 highlights
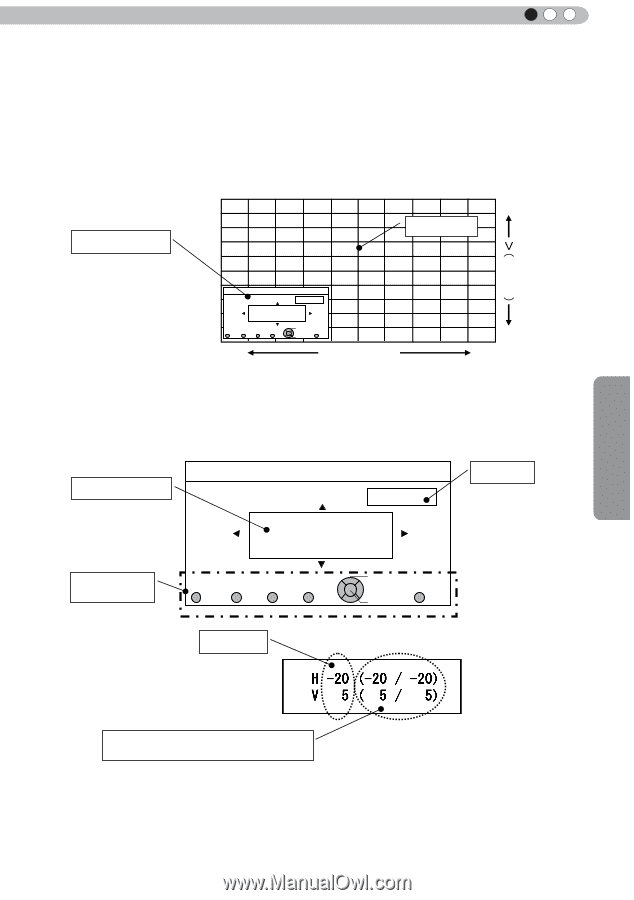
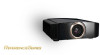
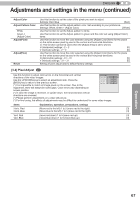
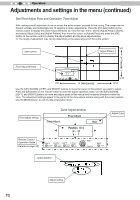
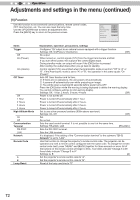
ENGLISH Adjustments and settings in the menu (continued) See Pixel Adjust Flow and Operation: Adjust(Fine) After making overall adjustment for error across the entire screen, proceed to fine-tuning. Press the [COLOR TEMP] button on the remote control to display the [Adjust(Fine) Window]. Also, from the main menu, set the [Adjust Area] to [All] and select [Adjust Color] and [Adjust Pattern], then move the cursor to [Adjust (Fine)] and press the [OK] button on the remote control to display the adjust pattern and the fine tune window. (*) The range of adjustment may narrow depending on the adjust amount of the entire screen. Adjust(Fine) window Adjust Pattern Vercital You can use the [UP], [DOWN], [LEFT], and [RIGHT] buttons to change position. Pixel Adjust Whole Adjust (Fine) Red H ̺1 č̺20/̺20Ď V 1 čḤ 5 / 5 Ď Color A. ADJUST. Color P. A. Area GAMMA COLOR. TEMP COLOR. P.FILE. PIC. ADJ. Select Operate BACK BACK H (Horizontal) Press the [OK] button on the remote control to enter the adjust operation mode. Use the [UP], [DOWN], [LEFT], and [RIGHT] buttons to move and adjust pixels in the vertical and horizontal directions across the entire screen. The adjustment settings appear in the center of the Adjust (Fine) window. Use the [BACK] button to exit the adjust operation mode. Pixel adjust setting Adjust(Fine) window Pixel Adjust AWdhjuoslet(AFidnjeu)st (Fine) Red H ̺1 č̺20/̺20Ď V 1 čḤ 5 / 5 Ď Remote Control Operation Guide (Reference page: 68) Color A. ADJUST. Color P. A. Area GAMMA COLOR. TEMP COLOR. P.FILE. PIC. ADJ. Adjust setting Select Operate BACK BACK Adjust Color Operation This shows the maximum and minimum overall screen error.(Max)/(Min) When both H (horizontal direction) and V (vertical direction) show a maximum overall screen error of 31, even if the adjust setting is less than this, you may not configure an adjustment setting that is larger than the displayed setting. Furthermore, when the minimum overall screen error is -31, even if the adjust setting is greater than this, you may not configure an adjustment setting that is larger than the displayed setting. 69
-
 1
1 -
2
-
3
-
4
-
5
-
6
-
7
-
8
-
9
-
10
-
11
-
12
-
13
-
14
-
15
-
16
-
17
-
18
-
19
-
20
-
21
-
22
-
23
-
24
-
25
-
26
-
27
-
28
-
29
-
30
-
31
-
32
-
33
-
34
-
35
-
36
-
37
-
38
-
39
-
40
-
41
-
42
-
43
-
44
-
45
-
46
-
47
-
48
-
49
-
50
-
51
-
52
-
53
-
54
-
55
-
56
-
57
-
58
-
59
-
60
-
61
-
62
-
63
-
 64
64 -
 65
65 -
 66
66 -
 67
67 -
 68
68 -
 69
69 -
 70
70 -
 71
71 -
 72
72 -
 73
73 -
 74
74 -
75
-
76
-
77
-
78
-
79
-
80
-
81
-
82
-
83
-
84
-
85
-
86
-
87
-
88
-
89
-
90
-
91
-
92
-
93
-
94
-
95
-
96
-
97
-
98
-
99
-
100
-
101
-
102
-
103
-
104
-
105
-
106
-
107
-
108
-
109
-
110
-
111
-
112
-
113
-
114
-
115
-
116
-
117
-
118
-
119
-
120
-
121
-
122
-
123
-
124
-
125
-
126
-
127
-
128
-
129
-
130
-
131
-
132
-
133
-
134
-
135
-
136
-
137
-
138
-
139
-
140
-
141
-
142
-
143
-
144
-
145
-
146
-
147
-
148
-
149
-
150
-
151
-
152
-
153
-
154
-
155
-
156
-
157
-
158
-
159
-
160
-
161
-
162
-
163
-
164
-
165
-
166
-
167
-
168
-
169
-
170
-
171
-
172
-
173
-
174
-
175
-
176
-
177
-
178
-
179
-
180
-
181
-
182
-
183
-
184
-
185
-
186
-
187
-
188
-
189
-
190
-
191
-
192
-
193
-
194
-
195
-
196
-
197
-
198
-
199
-
200
-
201
-
202
-
203
-
204
-
205
-
206
-
207
-
208
-
209
-
210
-
211
-
212
-
213
-
214
-
215
-
216
-
217
-
218
-
219
-
220
-
221
-
222
-
223
-
224
-
225
-
226
-
227
-
228
-
229
-
230
-
231
-
232
-
233
-
234
-
235
-
236
-
237
-
238
-
239
-
240
-
241
-
242
-
243
-
244
-
245
-
246
-
247
-
248
-
249
-
250
-
251
-
252
-
253
-
254
-
255
-
256
-
257
-
258
-
259
-
260
-
261
-
262
-
263
-
264
-
265
-
266
-
267
-
268
-
269
-
270
-
271
-
272
-
273
-
274
-
275
-
276
-
277
-
278
-
279
-
280
-
281
-
282
-
283
-
284
-
285
-
286
-
287
-
288
 |
 |