JVC DLA-RS45U 288 page operation manual for D-ILA Projectors DLA-RS65, DLA-RS5 - Page 60
Items Explanation, operation, precautions, settings, 2-1] HDMI., COMP., Color Space, 2-2] PC.,
 |
View all JVC DLA-RS45U manuals
Add to My Manuals
Save this manual to your list of manuals |
Page 60 highlights
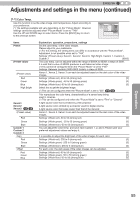
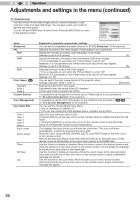
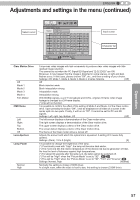
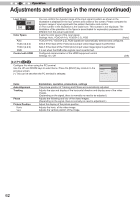
3 Operation Adjustments and settings in the menu (continued) [2] Input Signal Use this function to set the appropriate specifications for the video image HDMI signals input from HDMI, COMP and PC. Set the aspect ratio and screen COMP. mask. PC Picture Position Use the UP and DOWN keys to select items. Press the [BACK] key to return Aspect(Video) 16:9 to the previous screen. Mask Off (*) This becomes "[2-3]3D Setting" during 3D signal input. Progressive Auto 3D Setting Items HDMI COMP. Color Space Y Pb/Cb Pr/Cr RGB PC 65 55 Picture Position Horiz. Vert. Aspect (Video) 4:3 16:9 Zoom Aspect (PC) Auto 1:1 Full Explanation, operation, precautions, settings It is possible to set this if one selects the HDMI terminal to the submenu "[2-1] HDMI". (*) This can be set when the HDMI terminal is selected. It configures the input signal method of the component input terminal. Settings: Y Pb/Cb Pr/Cr, RGB [Y Pb/Cb Pr/Cr] It is set for the component video image input signal. It is set for the RGB video image input signal. This can be set if one selects the PC terminal to the submenu "[2-2] PC". Please adjust if the edges of the picture are partially missing due to the timing of horizontal and vertical synchronization signals. The value of the picture position depends on the input signal. (*) Depending on the input signal, it may be the case that not everything of the video image is displayed. (*) When there is a 3D input signal, adjustment is not possible. This aligns the horizontal direction of the image position. This aligns the vertical positions of the image. (*) It is displayed when there is a video signal input. (*) If set to3D, ratio is fixed to 16:9. Settings: 4:3, 16:9, Zoom [16:9] Sets the screen size of the image to 4:3. For HD signals, left and right sides are reduced. Sets the screen size of the video image screen to 16:9. For SD signals left and right sides are expanded. Zooms the video images. (*) For HD signals, this cannot be selected. Sets the video image screen size when there is a PC video signal input. (*) Is displayed when there is a PC signal input. Settings: Auto, 1:1, Full [Auto] Positions the video image screen in the center of the display range, to fill the screen. Depending on the size of the video screen, left and right black borders will be drawn. The video image screen size is displayed with the size of the input image. Depending on the input video image, the screen will become smaller or part of the input image off the screen is cut off. It does not keep the aspect ratio of the video image screen and fills the entire screen. 60
-
 1
1 -
2
-
3
-
4
-
5
-
6
-
7
-
8
-
9
-
10
-
11
-
12
-
13
-
14
-
15
-
16
-
17
-
18
-
19
-
20
-
21
-
22
-
23
-
24
-
25
-
26
-
27
-
28
-
29
-
30
-
31
-
32
-
33
-
34
-
35
-
36
-
37
-
38
-
39
-
40
-
41
-
42
-
43
-
44
-
45
-
46
-
47
-
48
-
49
-
50
-
51
-
52
-
53
-
54
-
 55
55 -
 56
56 -
 57
57 -
 58
58 -
 59
59 -
 60
60 -
 61
61 -
 62
62 -
 63
63 -
 64
64 -
 65
65 -
66
-
67
-
68
-
69
-
70
-
71
-
72
-
73
-
74
-
75
-
76
-
77
-
78
-
79
-
80
-
81
-
82
-
83
-
84
-
85
-
86
-
87
-
88
-
89
-
90
-
91
-
92
-
93
-
94
-
95
-
96
-
97
-
98
-
99
-
100
-
101
-
102
-
103
-
104
-
105
-
106
-
107
-
108
-
109
-
110
-
111
-
112
-
113
-
114
-
115
-
116
-
117
-
118
-
119
-
120
-
121
-
122
-
123
-
124
-
125
-
126
-
127
-
128
-
129
-
130
-
131
-
132
-
133
-
134
-
135
-
136
-
137
-
138
-
139
-
140
-
141
-
142
-
143
-
144
-
145
-
146
-
147
-
148
-
149
-
150
-
151
-
152
-
153
-
154
-
155
-
156
-
157
-
158
-
159
-
160
-
161
-
162
-
163
-
164
-
165
-
166
-
167
-
168
-
169
-
170
-
171
-
172
-
173
-
174
-
175
-
176
-
177
-
178
-
179
-
180
-
181
-
182
-
183
-
184
-
185
-
186
-
187
-
188
-
189
-
190
-
191
-
192
-
193
-
194
-
195
-
196
-
197
-
198
-
199
-
200
-
201
-
202
-
203
-
204
-
205
-
206
-
207
-
208
-
209
-
210
-
211
-
212
-
213
-
214
-
215
-
216
-
217
-
218
-
219
-
220
-
221
-
222
-
223
-
224
-
225
-
226
-
227
-
228
-
229
-
230
-
231
-
232
-
233
-
234
-
235
-
236
-
237
-
238
-
239
-
240
-
241
-
242
-
243
-
244
-
245
-
246
-
247
-
248
-
249
-
250
-
251
-
252
-
253
-
254
-
255
-
256
-
257
-
258
-
259
-
260
-
261
-
262
-
263
-
264
-
265
-
266
-
267
-
268
-
269
-
270
-
271
-
272
-
273
-
274
-
275
-
276
-
277
-
278
-
279
-
280
-
281
-
282
-
283
-
284
-
285
-
286
-
287
-
288
 |
 |