JVC DLA-RS45U 288 page operation manual for D-ILA Projectors DLA-RS65, DLA-RS5 - Page 81
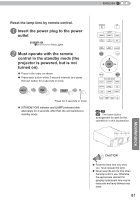
Insert the power plug to the power, outlet, Must operate with the remote, control in the standby
 |
View all JVC DLA-RS45U manuals
Add to My Manuals
Save this manual to your list of manuals |
Page 81 highlights
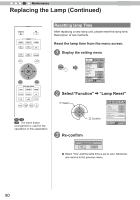
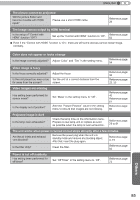
ENGLISH Reset the lamp time by remote control. 1 Insert the power plug to the power outlet Red Lights 2 Must operate with the remote control in the standby mode (the projector is powered, but is not turned on). ● Press in the order as shown. ● Press each button within 2-second intervals and press the last button for 2 seconds or more. BACK OK HIDE Press for 2 seconds or more ● [STANDBY/ON] indicator and [LAMP] indicator blink alternately for 3 seconds. After that, the unit switches to standby mode. STAND BY ON HDMI 1 INPUT HDMI 2 3D FORMAT 3D SETTING COMP. PC LENS. CONTROL LENS MEMORY ANAMO. HIDE LIGHT MENU BACK PICTURE MODE FILM CINEMA ANIME NATURAL STAGE 3D THX USER C.M.D. GAMMA COLOR TEMP COLOR P.FILE PIC. ADJ. 65 55 X475 : The same button arrangement is used for the operations in this explanation. WARNING LAMP STANDBY/ON Maintenance CAUTION ● Reset the lamp time only when you have replaced the lamp. ● Never reset the service time when the lamp is still in use. Otherwise, the approximate standard for gauging replacement time may be inaccurate and lamp blowout may occur. 81
-
 1
1 -
2
-
3
-
4
-
5
-
6
-
7
-
8
-
9
-
10
-
11
-
12
-
13
-
14
-
15
-
16
-
17
-
18
-
19
-
20
-
21
-
22
-
23
-
24
-
25
-
26
-
27
-
28
-
29
-
30
-
31
-
32
-
33
-
34
-
35
-
36
-
37
-
38
-
39
-
40
-
41
-
42
-
43
-
44
-
45
-
46
-
47
-
48
-
49
-
50
-
51
-
52
-
53
-
54
-
55
-
56
-
57
-
58
-
59
-
60
-
61
-
62
-
63
-
64
-
65
-
66
-
67
-
68
-
69
-
70
-
71
-
72
-
73
-
74
-
75
-
 76
76 -
 77
77 -
 78
78 -
 79
79 -
 80
80 -
 81
81 -
 82
82 -
 83
83 -
 84
84 -
 85
85 -
 86
86 -
87
-
88
-
89
-
90
-
91
-
92
-
93
-
94
-
95
-
96
-
97
-
98
-
99
-
100
-
101
-
102
-
103
-
104
-
105
-
106
-
107
-
108
-
109
-
110
-
111
-
112
-
113
-
114
-
115
-
116
-
117
-
118
-
119
-
120
-
121
-
122
-
123
-
124
-
125
-
126
-
127
-
128
-
129
-
130
-
131
-
132
-
133
-
134
-
135
-
136
-
137
-
138
-
139
-
140
-
141
-
142
-
143
-
144
-
145
-
146
-
147
-
148
-
149
-
150
-
151
-
152
-
153
-
154
-
155
-
156
-
157
-
158
-
159
-
160
-
161
-
162
-
163
-
164
-
165
-
166
-
167
-
168
-
169
-
170
-
171
-
172
-
173
-
174
-
175
-
176
-
177
-
178
-
179
-
180
-
181
-
182
-
183
-
184
-
185
-
186
-
187
-
188
-
189
-
190
-
191
-
192
-
193
-
194
-
195
-
196
-
197
-
198
-
199
-
200
-
201
-
202
-
203
-
204
-
205
-
206
-
207
-
208
-
209
-
210
-
211
-
212
-
213
-
214
-
215
-
216
-
217
-
218
-
219
-
220
-
221
-
222
-
223
-
224
-
225
-
226
-
227
-
228
-
229
-
230
-
231
-
232
-
233
-
234
-
235
-
236
-
237
-
238
-
239
-
240
-
241
-
242
-
243
-
244
-
245
-
246
-
247
-
248
-
249
-
250
-
251
-
252
-
253
-
254
-
255
-
256
-
257
-
258
-
259
-
260
-
261
-
262
-
263
-
264
-
265
-
266
-
267
-
268
-
269
-
270
-
271
-
272
-
273
-
274
-
275
-
276
-
277
-
278
-
279
-
280
-
281
-
282
-
283
-
284
-
285
-
286
-
287
-
288
 |
 |