Konica Minolta bizhub PRESS C7000/C7000P IC-601 Color Centro User Guide - Page 61
Menu of [Sample Picture] screen, Select Sample Image
 |
View all Konica Minolta bizhub PRESS C7000/C7000P manuals
Add to My Manuals
Save this manual to your list of manuals |
Page 61 highlights
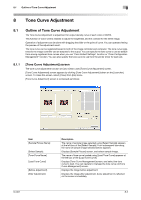
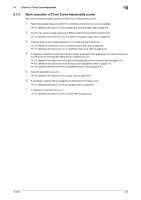
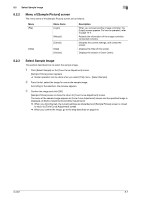
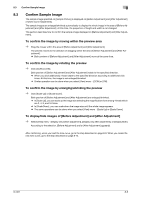
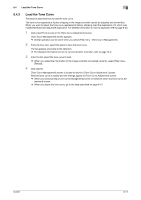
8.2 Select Sample Image 8 8.2.2 Menu of [Sample Picture] screen The menu items of the [Sample Picture] screen are as follows; Menu [File] [Help] Menu Items [Login] [Reload] [Cancel] [Help] [Version] Description When you connect another image controller, the [Login] screen appears. For how to operate it, refer to page 14-2. Reloads the information of the image controller connected currently. Discards the current settings, and closes the screen. Displays the Help of this screen. Displays the version of Color Centro. 8.2.3 Select Sample Image This section describes how to select the sample image. 1 Click [Select Sample] on the [Tone Curve Adjustment] screen. [Sample Picture] screen appears % Similar operation can be done when you select [File] menu - [Select Sample]. 2 From the list, select the image for use as the sample image. According to the selection, the preview appears. 3 Confirm the image and click [OK]. [Sample Picture] screen is closed to return to [Tone Curve Adjustment] screen. The name of the sample image appears on [Tone Curve Adjustment] screen and the specified image is displayed on [Before Adjustment] and [After Adjustment]. % When you click [Cancel], the current settings are discarded and [Sample Picture] screen is closed to return to [Tone Curve Adjustment] screen. % When you confirm the image, go to the step described on page 8-8. IC-601 8-7
-
 1
1 -
2
-
3
-
4
-
5
-
6
-
7
-
8
-
9
-
10
-
11
-
12
-
13
-
14
-
15
-
16
-
17
-
18
-
19
-
20
-
21
-
22
-
23
-
24
-
25
-
26
-
27
-
28
-
29
-
30
-
31
-
32
-
33
-
34
-
35
-
36
-
37
-
38
-
39
-
40
-
41
-
42
-
43
-
44
-
45
-
46
-
47
-
48
-
49
-
50
-
51
-
52
-
53
-
54
-
55
-
 56
56 -
 57
57 -
 58
58 -
 59
59 -
 60
60 -
 61
61 -
 62
62 -
 63
63 -
 64
64 -
 65
65 -
 66
66 -
67
-
68
-
69
-
70
-
71
-
72
-
73
-
74
-
75
-
76
-
77
-
78
-
79
-
80
-
81
-
82
-
83
-
84
-
85
-
86
-
87
-
88
-
89
-
90
-
91
-
92
-
93
-
94
-
95
-
96
-
97
-
98
-
99
-
100
-
101
-
102
-
103
-
104
-
105
-
106
-
107
-
108
-
109
-
110
-
111
-
112
-
113
-
114
-
115
-
116
-
117
-
118
-
119
-
120
-
121
-
122
-
123
-
124
-
125
-
126
-
127
-
128
-
129
-
130
-
131
-
132
-
133
-
134
-
135
-
136
-
137
-
138
-
139
-
140
-
141
-
142
-
143
-
144
-
145
-
146
-
147
-
148
-
149
-
150
-
151
-
152
-
153
-
154
-
155
-
156
-
157
-
158
-
159
-
160
-
161
-
162
-
163
-
164
-
165
-
166
-
167
-
168
-
169
-
170
-
171
-
172
-
173
-
174
-
175
-
176
-
177
-
178
-
179
-
180
-
181
-
182
-
183
-
184
-
185
-
186
-
187
-
188
-
189
-
190
-
191
-
192
-
193
-
194
-
195
-
196
-
197
-
198
-
199
-
200
-
201
-
202
-
203
-
204
-
205
-
206
-
207
-
208
-
209
-
210
-
211
-
212
-
213
-
214
-
215
-
216
-
217
-
218
-
219
-
220
-
221
-
222
-
223
-
224
-
225
-
226
-
227
-
228
-
229
-
230
-
231
-
232
-
233
-
234
-
235
-
236
-
237
-
238
-
239
-
240
-
241
-
242
-
243
-
244
-
245
-
246
-
247
-
248
-
249
-
250
-
251
-
252
-
253
-
254
-
255
-
256
-
257
-
258
-
259
-
260
-
261
-
262
-
263
-
264
-
265
-
266
-
267
-
268
-
269
-
270
-
271
-
272
-
273
-
274
-
275
-
276
-
277
-
278
-
279
 |
 |
