Konica Minolta bizhub PRESS C7000/C7000P IC-601 Color Centro User Guide - Page 73
Save the Tone Curve
 |
View all Konica Minolta bizhub PRESS C7000/C7000P manuals
Add to My Manuals
Save this manual to your list of manuals |
Page 73 highlights
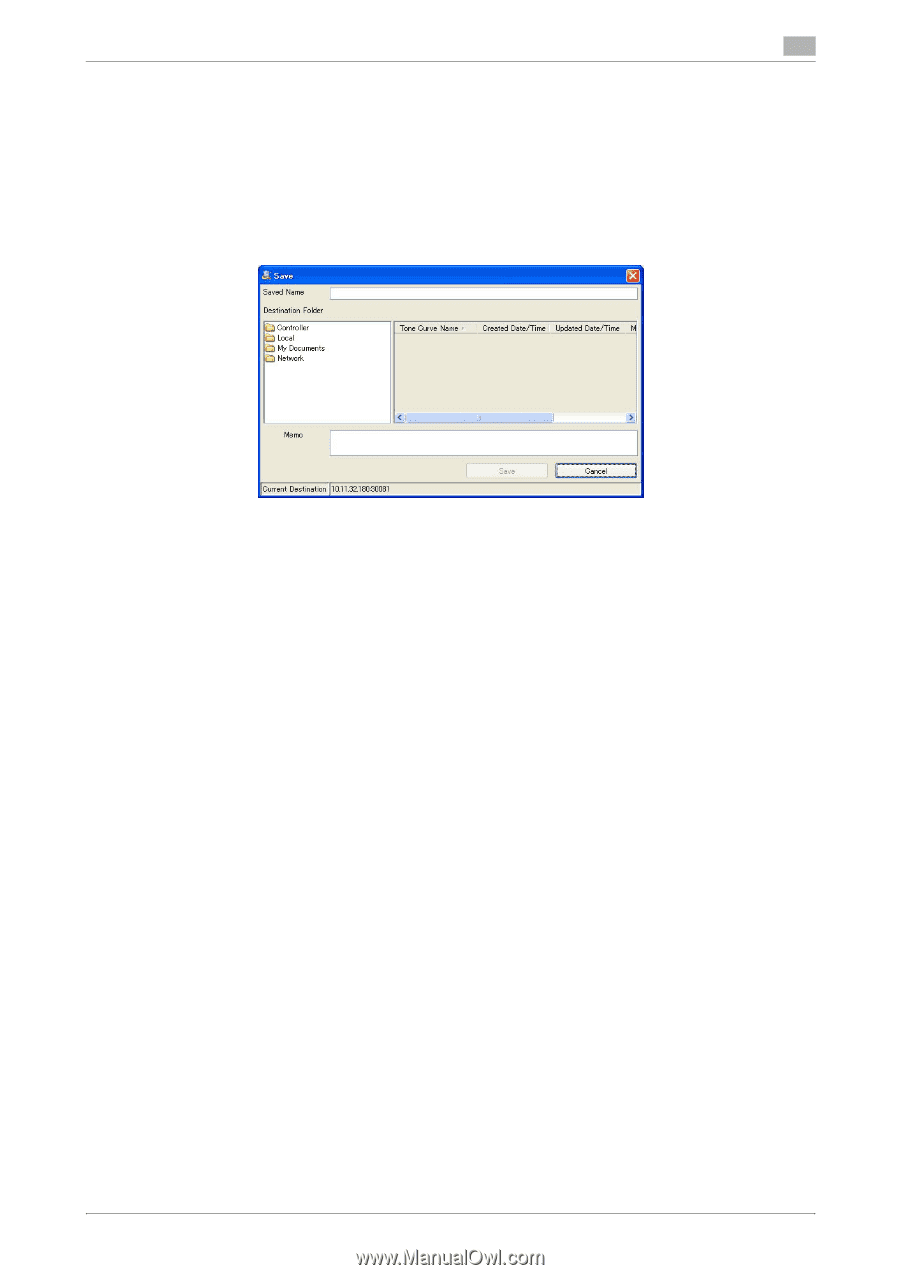
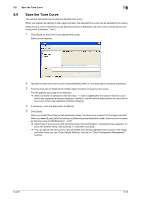
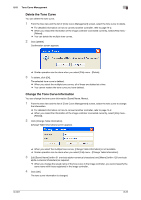
8.9 Save the Tone Curve 8 8.9 Save the Tone Curve This section describes how to save the adjusted tone curve. When you register the settings to the image controller, the adjusted tone curve can be adopted to the output. When the tone curve is saved in [Local], [My Documents] or [Network], the tone curve is saved as the tone curve profile (Extension: ".xml"). 1 Click [Save] on the [Tone Curve Adjustment] screen. [Save] screen appears. 2 Specify the name of the tone curve to [Saved Name] within 31 one-byte alpha-numerical characters. 3 From the tree view of [Destination Folder], select the place to save the tone curve. The list appears according to the selection. % When Controller is selected on the tree view, "*" mark is added after the name of the tone curve which was registered at factory shipping. In addition, a red @ mark is added before the name of the tone curve which was registered at factory shipping. 4 If necessary, enter the description to [Memo]. 5 Click [Save]. When you select [Controller] as the destination folder, the tone curve is saved in the image controller. When you select [Local], [My Documents] or [Network] as the destination folder, the tone curve is saved as the tone curve profile (Extension: ".xml"). % When there is a tone curve with the same name, the [Confirmation : Overwrite] screen appears. To save with another name, click [Cancel]. To overwrite, click [OK]. % You can specify the tone curve to use as default from among registered tone curves in the image controller when you use "Color Default Settings" function or "Color Configuration Management" function. IC-601 8-19
-
 1
1 -
2
-
3
-
4
-
5
-
6
-
7
-
8
-
9
-
10
-
11
-
12
-
13
-
14
-
15
-
16
-
17
-
18
-
19
-
20
-
21
-
22
-
23
-
24
-
25
-
26
-
27
-
28
-
29
-
30
-
31
-
32
-
33
-
34
-
35
-
36
-
37
-
38
-
39
-
40
-
41
-
42
-
43
-
44
-
45
-
46
-
47
-
48
-
49
-
50
-
51
-
52
-
53
-
54
-
55
-
56
-
57
-
58
-
59
-
60
-
61
-
62
-
63
-
64
-
65
-
66
-
67
-
 68
68 -
 69
69 -
 70
70 -
 71
71 -
 72
72 -
 73
73 -
 74
74 -
 75
75 -
 76
76 -
 77
77 -
 78
78 -
79
-
80
-
81
-
82
-
83
-
84
-
85
-
86
-
87
-
88
-
89
-
90
-
91
-
92
-
93
-
94
-
95
-
96
-
97
-
98
-
99
-
100
-
101
-
102
-
103
-
104
-
105
-
106
-
107
-
108
-
109
-
110
-
111
-
112
-
113
-
114
-
115
-
116
-
117
-
118
-
119
-
120
-
121
-
122
-
123
-
124
-
125
-
126
-
127
-
128
-
129
-
130
-
131
-
132
-
133
-
134
-
135
-
136
-
137
-
138
-
139
-
140
-
141
-
142
-
143
-
144
-
145
-
146
-
147
-
148
-
149
-
150
-
151
-
152
-
153
-
154
-
155
-
156
-
157
-
158
-
159
-
160
-
161
-
162
-
163
-
164
-
165
-
166
-
167
-
168
-
169
-
170
-
171
-
172
-
173
-
174
-
175
-
176
-
177
-
178
-
179
-
180
-
181
-
182
-
183
-
184
-
185
-
186
-
187
-
188
-
189
-
190
-
191
-
192
-
193
-
194
-
195
-
196
-
197
-
198
-
199
-
200
-
201
-
202
-
203
-
204
-
205
-
206
-
207
-
208
-
209
-
210
-
211
-
212
-
213
-
214
-
215
-
216
-
217
-
218
-
219
-
220
-
221
-
222
-
223
-
224
-
225
-
226
-
227
-
228
-
229
-
230
-
231
-
232
-
233
-
234
-
235
-
236
-
237
-
238
-
239
-
240
-
241
-
242
-
243
-
244
-
245
-
246
-
247
-
248
-
249
-
250
-
251
-
252
-
253
-
254
-
255
-
256
-
257
-
258
-
259
-
260
-
261
-
262
-
263
-
264
-
265
-
266
-
267
-
268
-
269
-
270
-
271
-
272
-
273
-
274
-
275
-
276
-
277
-
278
-
279
 |
 |