Konica Minolta bizhub PRESS C7000/C7000P IC-601 Color Centro User Guide - Page 70
Basic operation of [Adjust Each Color] tab, Select the Combination, Basic operation, Adjust
 |
View all Konica Minolta bizhub PRESS C7000/C7000P manuals
Add to My Manuals
Save this manual to your list of manuals |
Page 70 highlights
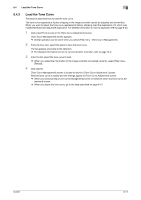
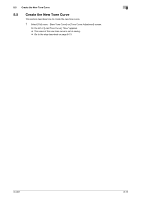
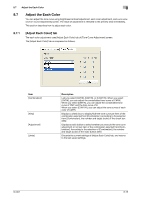
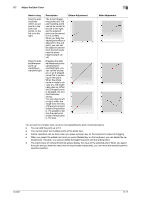
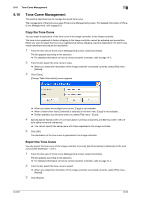
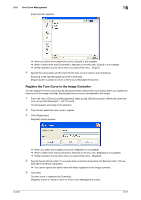
8.7 Adjust the Each Color 8 8.7.2 Basic operation of [Adjust Each Color] tab This section describes how to adjust with [Adjust Each Color] tab. Select the Combination The selected combination, the view settings and the settings of adjustment target on [Adjust Each Color] tab define the range of the adjustment by operation of points in the curve view area. Specify on each color whether you want to display the tone curve or hide and whether you execute adjustment or not, using [View] check box and [Adjustment] radio button which displayed per item of the combination selected from [Combination]. When [View] is checked, the tone curve of the color checked is displayed on curve view area. When [Adjustment] is selected, the tone curve of the color selected can be adjusted by operation of points in the curve view area. When check mark of [View] for one color was not selected and you select [Adjustment] for the same color, [View] is checked automatically. Basic operation 1 Click [Adjust Each Color] tab on the [Tone Curve Adjustment] screen. [Adjust Each Color] tab appears. 2 Select [CMYK], [CMY/K], or [C/M/Y/K] from [Combination]. According to the selection from [Combination], [View] check box per each color and [Adjustment] radio button per each color appear. 3 When you want to display the tone curve of one color, check the check box of that color. 4 When you want to adjust the tone curve of one color, select the radio button of that color. 5 Adjust the tone curve by operation of points in the curve view area. % For detailed information on how to operate the point, refer to page 8-16. % When you execute confirmation print to confirm the result of tone curve adjustment, go to the step described on page 8-18. Adjust with Point/Reference Point When you select [Adjust Each Color] tab, you can use the point/reference points to adjust. The point (small, black square) appears at both ends of the curve view area. You can adjust the tone curve by dragging and moving this point. You can also add the point by clicking on the curve. You can adjust the tone curve by dragging and moving this added point (small, red square). In addition, the position of 25%, 50%, and 75% may be added automatically on the curve as reference points according to the settings of [Brightness/Contrast] tab. You can also adjust the tone curve by dragging and moving the reference point. Those points and reference points can be used for adjustment of the tone curve as follows; How to drag Drag the points (at both ends) upward or downward Description You can change the entire inclination. Then, you can adjust the whole range of the output values. Before Adjustment After Adjustment IC-601 8-16
-
 1
1 -
2
-
3
-
4
-
5
-
6
-
7
-
8
-
9
-
10
-
11
-
12
-
13
-
14
-
15
-
16
-
17
-
18
-
19
-
20
-
21
-
22
-
23
-
24
-
25
-
26
-
27
-
28
-
29
-
30
-
31
-
32
-
33
-
34
-
35
-
36
-
37
-
38
-
39
-
40
-
41
-
42
-
43
-
44
-
45
-
46
-
47
-
48
-
49
-
50
-
51
-
52
-
53
-
54
-
55
-
56
-
57
-
58
-
59
-
60
-
61
-
62
-
63
-
64
-
 65
65 -
 66
66 -
 67
67 -
 68
68 -
 69
69 -
 70
70 -
 71
71 -
 72
72 -
 73
73 -
 74
74 -
 75
75 -
76
-
77
-
78
-
79
-
80
-
81
-
82
-
83
-
84
-
85
-
86
-
87
-
88
-
89
-
90
-
91
-
92
-
93
-
94
-
95
-
96
-
97
-
98
-
99
-
100
-
101
-
102
-
103
-
104
-
105
-
106
-
107
-
108
-
109
-
110
-
111
-
112
-
113
-
114
-
115
-
116
-
117
-
118
-
119
-
120
-
121
-
122
-
123
-
124
-
125
-
126
-
127
-
128
-
129
-
130
-
131
-
132
-
133
-
134
-
135
-
136
-
137
-
138
-
139
-
140
-
141
-
142
-
143
-
144
-
145
-
146
-
147
-
148
-
149
-
150
-
151
-
152
-
153
-
154
-
155
-
156
-
157
-
158
-
159
-
160
-
161
-
162
-
163
-
164
-
165
-
166
-
167
-
168
-
169
-
170
-
171
-
172
-
173
-
174
-
175
-
176
-
177
-
178
-
179
-
180
-
181
-
182
-
183
-
184
-
185
-
186
-
187
-
188
-
189
-
190
-
191
-
192
-
193
-
194
-
195
-
196
-
197
-
198
-
199
-
200
-
201
-
202
-
203
-
204
-
205
-
206
-
207
-
208
-
209
-
210
-
211
-
212
-
213
-
214
-
215
-
216
-
217
-
218
-
219
-
220
-
221
-
222
-
223
-
224
-
225
-
226
-
227
-
228
-
229
-
230
-
231
-
232
-
233
-
234
-
235
-
236
-
237
-
238
-
239
-
240
-
241
-
242
-
243
-
244
-
245
-
246
-
247
-
248
-
249
-
250
-
251
-
252
-
253
-
254
-
255
-
256
-
257
-
258
-
259
-
260
-
261
-
262
-
263
-
264
-
265
-
266
-
267
-
268
-
269
-
270
-
271
-
272
-
273
-
274
-
275
-
276
-
277
-
278
-
279
 |
 |