Kyocera ECOSYS P5021cdw ECOSYS P5021cdn/P5021cdw/M5026cdn/P5026cdw Operation G - Page 106
Printing Document from Proof and Hold Box, Deleting the Documents Stored in the Proof and Hold Box
 |
View all Kyocera ECOSYS P5021cdw manuals
Add to My Manuals
Save this manual to your list of manuals |
Page 106 highlights
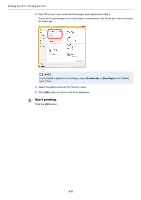
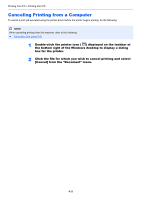
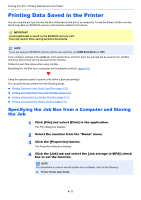
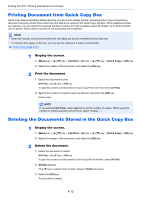
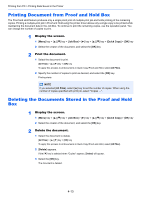
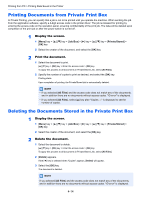
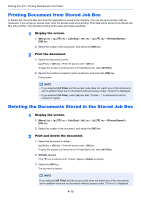
Printing from PC > Printing Data Saved in the Printer Printing Document from Proof and Hold Box The Proof and Hold feature produces only a single proof print of multiple-print job and holds printing of the remaining copies. Printing a multiple-print job in Proof and Hold using the printer driver allows only a single copy to be printed while maintaining the document data in the Job Box. To continue to print the remaining copies, use the operation panel. You can change the number of copies to print. 1 Display the screen. 1 [Menu] key key > [Job Box] > [►] key key > [Quick Copy] > [OK] key 2 Select the creator of the document, and select the [OK] key. 2 Print the document. 1 Select the document to print. [All Files key > [OK] key To apply this process to all documents in Quick Copy/Proof-and-Hold, select [All Files]. 2 Specify the number of copies to print as desired, and select the [OK] key. Printing starts. NOTE If you selected [All Files], select [▲] key to set the number of copies. When using the number of copies specified with print job, select "Copies ---". Deleting the Documents Stored in the Proof and Hold Box 1 Display the screen. 1 [Menu] key key > [Job Box] > [►] key key > [Quick Copy] > [OK] key 2 Select the creator of the document, and select the [OK] key. 2 Delete the document. 1 Select the document to delete. [All Files key > [OK] key To apply this process to all documents in Quick Copy/Proof-and-Hold, select [All Files]. 2 [Delete] appears. If the [▼] key is selected when "Copies" appears, [Delete] will appear. 3 Select the [OK] key. The document is deleted. 4-13
-
 1
1 -
2
-
3
-
4
-
5
-
6
-
7
-
8
-
9
-
10
-
11
-
12
-
13
-
14
-
15
-
16
-
17
-
18
-
19
-
20
-
21
-
22
-
23
-
24
-
25
-
26
-
27
-
28
-
29
-
30
-
31
-
32
-
33
-
34
-
35
-
36
-
37
-
38
-
39
-
40
-
41
-
42
-
43
-
44
-
45
-
46
-
47
-
48
-
49
-
50
-
51
-
52
-
53
-
54
-
55
-
56
-
57
-
58
-
59
-
60
-
61
-
62
-
63
-
64
-
65
-
66
-
67
-
68
-
69
-
70
-
71
-
72
-
73
-
74
-
75
-
76
-
77
-
78
-
79
-
80
-
81
-
82
-
83
-
84
-
85
-
86
-
87
-
88
-
89
-
90
-
91
-
92
-
93
-
94
-
95
-
96
-
97
-
98
-
99
-
100
-
 101
101 -
 102
102 -
 103
103 -
 104
104 -
 105
105 -
 106
106 -
 107
107 -
 108
108 -
 109
109 -
 110
110 -
 111
111 -
112
-
113
-
114
-
115
-
116
-
117
-
118
-
119
-
120
-
121
-
122
-
123
-
124
-
125
-
126
-
127
-
128
-
129
-
130
-
131
-
132
-
133
-
134
-
135
-
136
-
137
-
138
-
139
-
140
-
141
-
142
-
143
-
144
-
145
-
146
-
147
-
148
-
149
-
150
-
151
-
152
-
153
-
154
-
155
-
156
-
157
-
158
-
159
-
160
-
161
-
162
-
163
-
164
-
165
-
166
-
167
-
168
-
169
-
170
-
171
-
172
-
173
-
174
-
175
-
176
-
177
-
178
-
179
-
180
-
181
-
182
-
183
-
184
-
185
-
186
-
187
-
188
-
189
-
190
-
191
-
192
-
193
-
194
-
195
-
196
-
197
-
198
-
199
-
200
-
201
-
202
-
203
-
204
-
205
-
206
-
207
-
208
-
209
-
210
-
211
-
212
-
213
-
214
-
215
-
216
-
217
-
218
-
219
-
220
-
221
-
222
-
223
-
224
-
225
-
226
-
227
-
228
-
229
-
230
-
231
-
232
-
233
 |
 |
