Kyocera ECOSYS P5021cdw ECOSYS P5021cdn/P5021cdw/M5026cdn/P5026cdw Operation G - Page 99
Printing on Non-standard Sized Paper, Basic, Settings, Control Panel, Devices and Printers
 |
View all Kyocera ECOSYS P5021cdw manuals
Add to My Manuals
Save this manual to your list of manuals |
Page 99 highlights
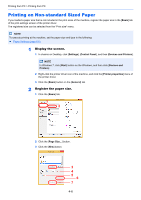
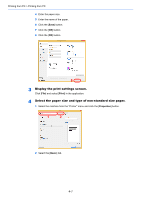
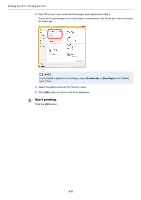
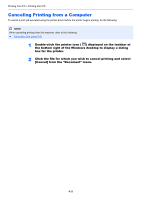
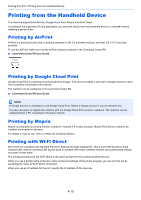
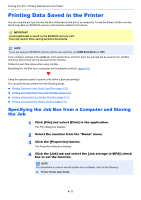
Printing from PC > Printing from PC Printing on Non-standard Sized Paper If you loaded a paper size that is not included in the print sizes of the machine, register the paper size in the [Basic] tab of the print settings screen of the printer driver. The registered size can be selected from the "Print size" menu. NOTE To execute printing at the machine, set the paper size and type in the following: Paper Settings (page 6-6) 1 Display the screen. 1 In charms on Desktop, click [Settings], [Control Panel], and then [Devices and Printers]. NOTE In Windows 7, click [Start] button on the Windows, and then click [Devices and Printers]. 2 Right-click the printer driver icon of the machine, and click the [Printer properties] menu of the printer driver. 3 Click the [Basic] button on the [General] tab. 2 Register the paper size. 1 Click the [Basic] tab. 1 2 2 Click the [Page Size...] button. 3 Click the [New] button. 3 4 5 6 7 4-6
-
 1
1 -
2
-
3
-
4
-
5
-
6
-
7
-
8
-
9
-
10
-
11
-
12
-
13
-
14
-
15
-
16
-
17
-
18
-
19
-
20
-
21
-
22
-
23
-
24
-
25
-
26
-
27
-
28
-
29
-
30
-
31
-
32
-
33
-
34
-
35
-
36
-
37
-
38
-
39
-
40
-
41
-
42
-
43
-
44
-
45
-
46
-
47
-
48
-
49
-
50
-
51
-
52
-
53
-
54
-
55
-
56
-
57
-
58
-
59
-
60
-
61
-
62
-
63
-
64
-
65
-
66
-
67
-
68
-
69
-
70
-
71
-
72
-
73
-
74
-
75
-
76
-
77
-
78
-
79
-
80
-
81
-
82
-
83
-
84
-
85
-
86
-
87
-
88
-
89
-
90
-
91
-
92
-
93
-
 94
94 -
 95
95 -
 96
96 -
 97
97 -
 98
98 -
 99
99 -
 100
100 -
 101
101 -
 102
102 -
 103
103 -
 104
104 -
105
-
106
-
107
-
108
-
109
-
110
-
111
-
112
-
113
-
114
-
115
-
116
-
117
-
118
-
119
-
120
-
121
-
122
-
123
-
124
-
125
-
126
-
127
-
128
-
129
-
130
-
131
-
132
-
133
-
134
-
135
-
136
-
137
-
138
-
139
-
140
-
141
-
142
-
143
-
144
-
145
-
146
-
147
-
148
-
149
-
150
-
151
-
152
-
153
-
154
-
155
-
156
-
157
-
158
-
159
-
160
-
161
-
162
-
163
-
164
-
165
-
166
-
167
-
168
-
169
-
170
-
171
-
172
-
173
-
174
-
175
-
176
-
177
-
178
-
179
-
180
-
181
-
182
-
183
-
184
-
185
-
186
-
187
-
188
-
189
-
190
-
191
-
192
-
193
-
194
-
195
-
196
-
197
-
198
-
199
-
200
-
201
-
202
-
203
-
204
-
205
-
206
-
207
-
208
-
209
-
210
-
211
-
212
-
213
-
214
-
215
-
216
-
217
-
218
-
219
-
220
-
221
-
222
-
223
-
224
-
225
-
226
-
227
-
228
-
229
-
230
-
231
-
232
-
233
 |
 |
